
Some of the links below are affiliate links, meaning, at no additional cost to you, I will earn a commission if you click through and make a purchase.
Let’s follow a project of mine from (nearly) the beginning, through to as far as I take it. Since the project is, as yet, barely started, this will be the first of a series.
I’m not really certain when I got interested in making jewelry. I mean, I’ve entertained the notion of taking up silversmithing classes for probably over a decade. I’ve toyed with the notion of casting (starting with pewter, and working my way up to precious metals) for nearly as long. But gems and stones, particularly cutting and polishing, that’s a fairly new one. Maybe two or three years? But I finally decided to act on that one a few months ago.
The root of the idea was wondering how exactly bezel settings worked–probably based on admiring some of the lovely Anglo-Saxon “gold-and-garnet” jewelry that’s been found. It struck me that the garnet pieces were certainly shaped and polished, and I began thinking about that. I know that precious stones are “lapped” (faceted) using fancy setups with spinning abrasive discs, using finely-tuned armatures to ensure the “proper” angles to the various faces. I reasoned that the first faceted stones probably were lapped and polished by hand, with a somewhat more “organic” form. So I set about to figure out how they did it.
YouTube, one of my normal “how would I…” starting points, was rather mum on the subject. There are several videos about lapping gems, all using modern tools. There are a couple of videos about making homemade modern lapping tools… Just when I thought all was lost, I found one video on polishing and faceting gemstones by hand, using no power tools. Not historical, but it was a start, and told me it could be done.
The next typical online stops for this sort of project include Cariadoc’s Miscellany and Stefan’s Florilegium, two great repositories of knowledge, sources, and information. The Miscellany is a series of essays, classes, documents, papers, and such by one of the more famous people in the SCA, Duke Cariadoc of the Bow. The Florilegium, meanwhile, is a curated compilation of email discussions from various SCA forums, dating from the early days of computer bulletin boards and such. Both pointed me at several books; the Miscellany was extra helpful and gave me some quotes.
One of these sources, which I was able to get my hands on fairly quickly, was Theophilus’ treatise On Divers Arts, which in addition to covering all sorts of metalworking has a chapter on polishing gemstones. Theophilus recommends using powdered emery stone and water on a copper plate as the abrasive; the runoff is collected in a basin and allowed to settle and dry. Afterwards, the powder is sprinkled on a flat limewood board and wet with saliva; this is used to polish the gem.
As it happens, I have access to emery powder (available as filler for making pincushions) and a copper plate that I acquired for a different project some time ago. “Limewood” is probably the same wood that we would call “basswood,” and is available in most craft stores.
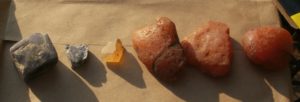
Rough gem material is available from many sources on EBay and Amazon; I have some Carnelian Agate, some Fire Quartz, and some Iolite readily at hand, and if I get decent results with these, I’ll get some others.
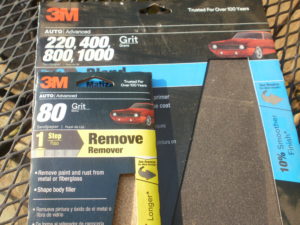
In the interest of following the guidelines from the YouTube video, I’ve got an assortment of wet/dry sandpaper, and I’ll use that to give it a go.
My theory is that they’ll work more quickly than the emery; we’ll see how they go.
Additionally, knowing that some stones–the harder ones, such as any of the corundum (ruby and sapphire), and a few others–are likely to be very slow to polish up, I’ve got some modern sharpening stones, which use diamond powders of various grits. I’m hopeful that they’ll do a quicker job even than the sandpaper.
That pretty well covers the acquisition of inspiration, ideas, and materials for the project; next time around, we’ll give some of the methods a try.