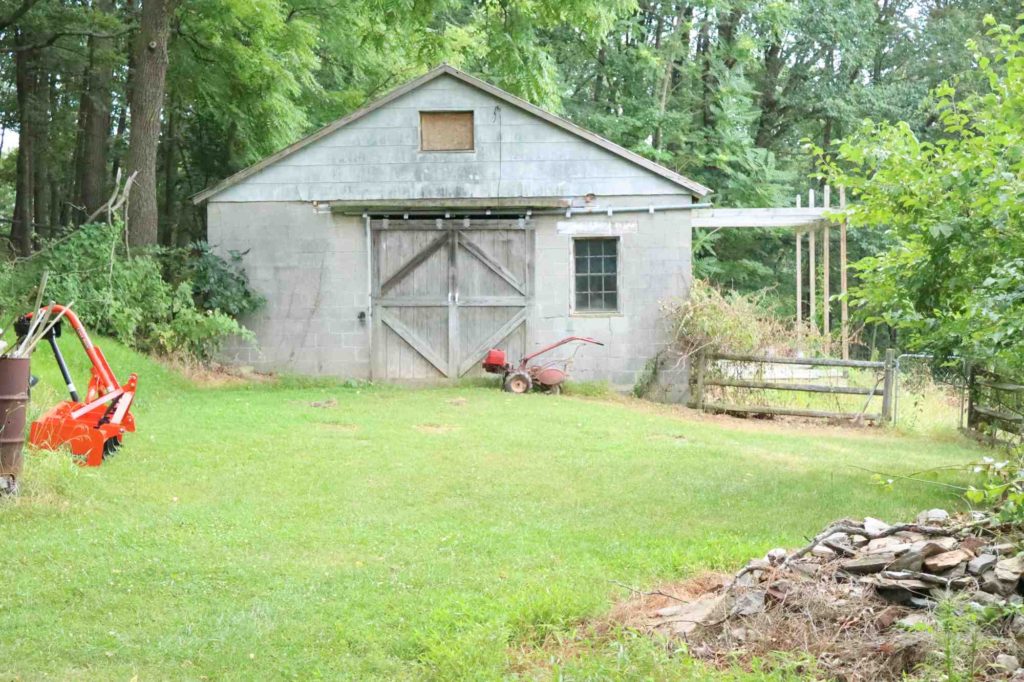
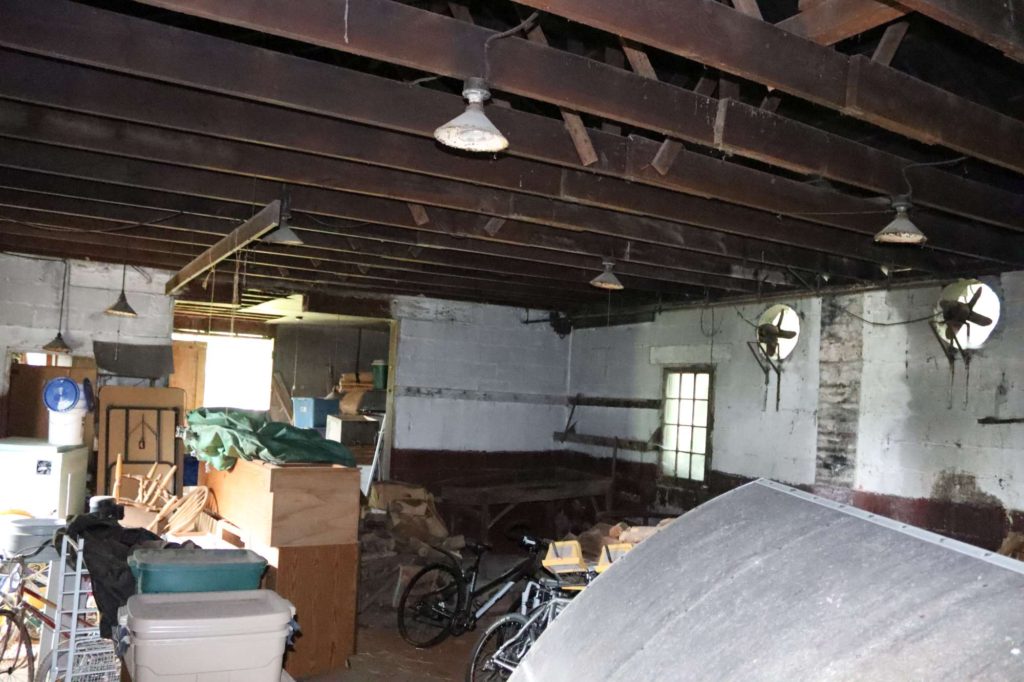
In preparation of my boatbuilding adventures, I have to prep the barn. This is where I’ll be doing the building; it will also become my shop. It’ll be quite the bit of work.
The barn has been primarily used as storage since shortly after we moved to the homestead. There was a little initial repair–I had to patch a couple of holes in the roof, and replace one of the roofing sheets when we took out the chimney. And there’s still some to do, yet. We’re getting water intrusion from the eastern wall (which is set into the hillside). I think we’ll have to go as far as to dig the earth back a bit on the outside, and possibly re-set some of the wall.
One issue I’ve been puzzling over is the doorways. The barn doors will be replaced, because I really don’t like the sliding style that are on the building. But a problem comes up with the width of the doors. They’re about 7-1/2 feet wide; if I’m going to build a James Cook, this is a problem–that model has 8′ of beam. I’ll need to widen the doors at least a foot (to allow “wiggle room”), if not a foot and a half. There’s an interior wall with the same basic issue.
I think I can do it, if I “sister” some beams through the existing wall and header, on either side of the wall. I’ll probably have to put uprights/studs beneath them for support (inside and outside, as well). Then cut away the “excess” doorway… Fortunately, it’s cinder block. And I don’t think it’s as essential to the structure of the building as it might be. (But putting the support headers will help, particularly if I bolt through the blocks in multiple places, and attach to the existing header.)
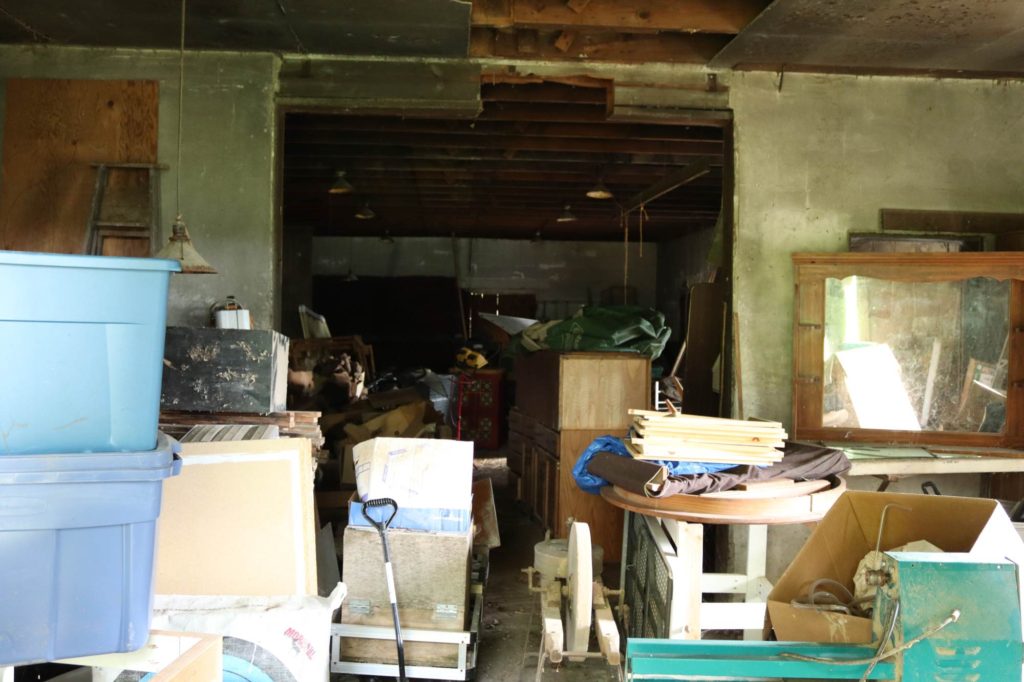
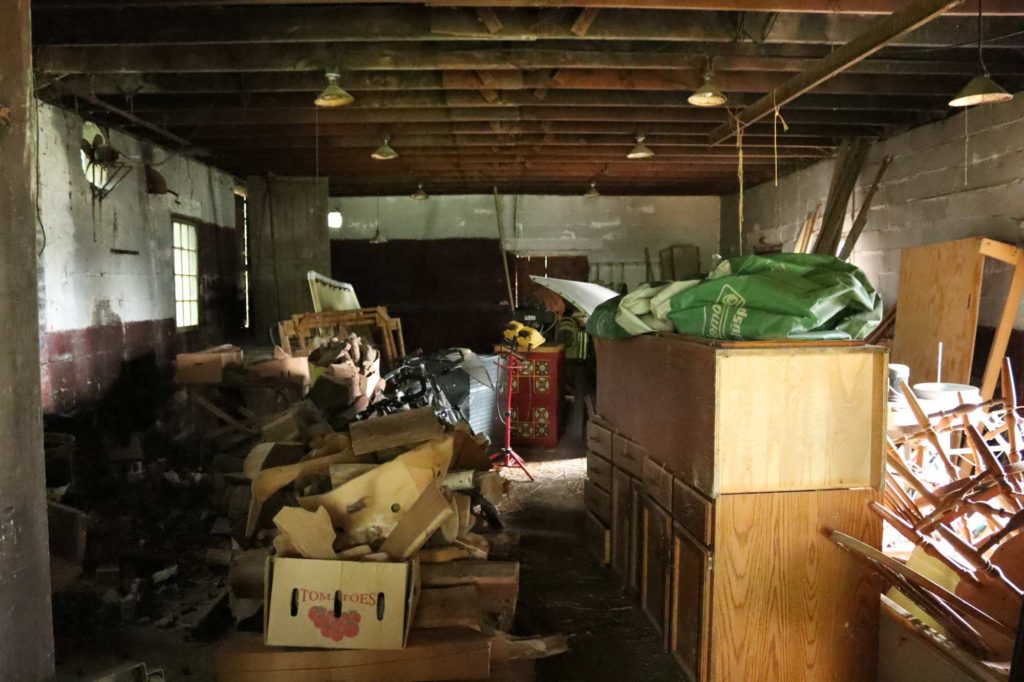
First, though, there’s cleanup. Here are some pictures of the “starting” state of the barn–I’ve already hauled a bunch of stuff out; there’s more still to go, then there’s hooking up lights and fans…
The “front” of the barn.The inside of the barn, from right inside the “front door”.From the entrance into the back room of the barn.View from the back corner of the barn, towards the front entrance
So, it’s the middle of a sweltering summer, and to help counteract the heat (or perhaps because of the heat), I’m considering adding another “B” to my list of activities: Boats. Sailboats, in particular, and the building thereof. (Wait… should that actually count as two things?)
The notion struck me at work one day. I spent 20 years in the Navy as a “sailor,” but never really sailed a single day. Ten months of sea time, but that was all motoring–and I had precious little to do with any of that.
I was also looking for a way to beat the heat, remain socially distant, and maybe even get a little fishing done. So, as with all such things, I did a little research.
We live near enough to the Chesapeake that finding somewhere to take lessons is trivial. Google lists dozens of places, all within a reasonable distance. So, learning how to sail can be arranged.
Most of the places to learn will also rent boats–for everything from one day in the bay fishing trips, on to bareboat charters for many days at a time. Practicing the skills learned in the class can be arranged.
But in the scheme of things, I’d really rather own a boat, rather than rent one–especially if any sort of cruising might be in order. (Or, god forbid, an actual crossing!)
Given the pandemic, apparently purchasing a boat is problematic, unless you want to essentially strip and refurbish one from the keel up. (Everyone else has decided that boats are the way to go, too–so the dealers have sold out of pretty much everything that’s ready to go.) All right, if I can’t buy one, can I build my own?
It seems the answer is “Yes.” There are a number of places that sell the plans to build boats of various types and sizes, from canvas-hulled, collapsible rowboats, up to a 45′ steel oceanic cruiser.
One consideration I had was that I’d like the boat to be trailerable. In no small part, this is because I’d be building it at home, a good 2-plus hour drive from the coast, even without hauling a boat. Also, since I’d want to be near home to do any sort of significant maintenance/overhaul, I’d have to get it back & forth. I may save a little in berthing fees in the off-season, or if we should decide to only cruise every other year or so. The trailerable requirement limits the size–I’ve got to be able to haul it, and it has to be “legal trailer width,” which means absolutely no more than 8′ 6″ of beam.
One of the boats I had started looking at was the 22′ Amigo, from Glen-L Designs. This boat is most famous for its appearance on a popular TV show, although most people wouldn’t know that… I figured, though, if Gibbs could build her in his basement, I could build her in my barn.
But a 22′ sailboat doesn’t seem to leave much room for stuff–she’d be an overnighter/weekender, and folks aboard would have to get really friendly, quick. So, I began perusing Glen-L’s catalog, ad saw that they have two “big sisters” to the Amigo, both trailerable; of the two, the 27′ James Cook caught my eye.
Now, I certainly don’t plan to have her built in a day, or a weekend, or even a month. I’ll probably spend weeks, just looking over the plans and instructions. And while my woodworking chops are fair-to-adequate, I’m certain I’ll be learning a host of new techniques during the build. And, of course, other things around the farm take precedence.
As such, I don’t think I’ll be able to launch anything for several years–I’m shooting for six, but things may slide, and that’ll be possible only if things in my Etsy shop really take off.
As things move ahead, I’ve probably set up a Patreon account, for folks to help out (if you like what you see). Not sure just what I can offer, as incentive. Perhaps the chance to help with the build? Maybe day trips, when she’s built? That’s all stuff to be decided.
And apologies to Henry the Eighth. (For the uninitiated, the title of this post refers to a drinking song written by the Corpulent King in his younger days, and wildly popular at many a RennFest.)
The Mead Hall
This weekend, I had the great joy of attending an overnight SCA event. This particular event, the Red Mountain Mead Hall hosted by the Shire of Isenfir, started as a mostly brewing-focused event. It has added a fair bit of dance and other artistic happenings, as well as becoming known for its delicious (and sizable!) feasts.
For me, the event was a chance to spend quality time with fellow brewers I don’t get to see often–the event is located near the geographic center of the Kingdom, so attracts people from all over. I also took it upon myself to clear a little clutter from my cellar.
A Miscellany of Bottles
Every brewer, with time, tends to collect a group of bottles of various batches. Makers of meads and wines are particularly bad in this regard. These bottles will usually, for one of a variety of reasons, be un-labeled. (Many of my batches simply don’t get labels; other times, they fall off, or fade.) I brought about twenty bottles, planning on opening them all and doing a “tasting and critique” party.
I generally leave my ego at the door when my brews are being tasted, the more so when I’m not sure what’s going to come out of the bottle. Things ranged from a growler (one of a set of four) that has been sitting full and undisturbed for going on four years, through a variety of unlabeled things of various colors, to the single remaining bottle of a batch of Acerglyn (Maple Mead) that I put together something over a decade ago.
Often Surprising Results
The beverages that emerged from the bottles were almost entirely unexpected. Several were given a resounding “meh.” Some were really good. And only one, really, was bad as such.
The best (and first) surprise was the growler. I had completely forgotten what I had bottled up; the rubber gasket was completely dried out and cracked, and I was certain that the contents would be thoroughly oxidized, if not vinegar. Instead, what poured out was an extremely delightful apple cider. Huge apple on the nose, lovely flavor, and not bone-sucking dry on the finish. The only real complaint was a brief period of “dead space” towards the middle, where the cider was trying to decide what to do next. Clarity was magnificent. All in all, quite lovely, and I’m glad I’ve still got three growlers of it.
The worst surprise, on the other hand, was the “bad” one. The liquid was a clear golden yellow. Decent legs. No sediment. But the aroma was… off, somehow. And the taste–wow. After pondering just what I had bottled, and what exactly happened to it, it struck me: this was a batch I had made for an acquaintance on something of a dare. Tomato wine. Once I had placed it, the flavor was quite clear (and lingering). From a purely technical standpoint, there was absolutely nothing wrong with it. It just… well, it sucked.
Other samples included a bottle of chocolate mead (not ready yet–I’m led to believe that they can take years for the bitterness to mature out), a pair of bottles of Perry (which I brought because I know that’s a good batch), and a red wine that didn’t quite reach its full potential (not bad, but also not great). There were others, but they’re not really all that memorable.
The Exciting Part of the Evening, Sort Of
Having done a fair bit of drinking, obviously no one was in a hurry to drive on home. (Particularly me, as it’s about a 3 hour trip from home.) So we took advantage of the on-site cabins, and racked out for the night.
But it must be mentioned that the cabins are unheated, and while they’re not “open-air,” there are sizable gaps in the walls. And the low for the night was 26 degrees F (that’s negative 3 degrees Centigrade, if you’re doing the math). Indeed, the whole day was quite chilly outside. Fortunately, the Great Hall itself has a large fireplace that was kept roaring all day.
Events like that are when having a Russian persona shows its worth. I was layered up quite nicely (wool socks under the leg wraps; two pair of pants; three shirts–two linen, one wool; a nalbound hood and mantle, and a nalbound hat). Indeed, I had to step out of the hall on several occasions to cool off.
And for sleeping, I had a cold-weather sleeping bag, with a separate fleece liner. Those were atop a wool blanket on doubled mattresses on the bunk, with a small (fake) fur under my head, using my “mundane” clothes rolled up nicely as a pillow. I had another blanket over the top of me, was wearing a T-shirt, long underwear, and socks, and had my hat on my head.
Once again, I found myself almost too warm, and was letting my arms alternate “chilling” in the open air to moderate my temperature. But in the end, I survived, and was relatively comfortable–certainly more so than several of the others attending the event.
Upcoming Brew Day
My next Brew Day will involve a little less mead, and a bit more beer. My friend Cormacc wants to recreate a popular Viking’s Blod mead he’s done in the past; I plan of making an Amber Lager, since the cellar has reached the right temperature range. I’ve also got the makings for a Kolsch-style beer, but that may wait for December (or, possibly, for Spring).
I’ve also got a gaggle of small mead batches that I can tend; assuming I can clear out another fermenter, I may even start a batch of Acerglyn. (Or possibly Berry Melomel. Or something along those lines.) And I’ve a batch of Dark Mild Ale that I have to decide whether to bottle or keg. And then there’s plating up the “wild”/feral yeast I collected from my honey.
One of my goals for a number of years has been the creation of an “Estate Beer”: a batch where all ingredients were grown/gathered from my property. While the way forward is clear, time constraints are significant; so I’ve decided to set that aside for the moment, and focus instead on creating an Estate Mead.
Bees and Honey
My beehives this year have done quite well. I was, frankly, just pleased that my two from last year survived the winter. But not only did they survive, they subsequently swarmed a number of times. I was able to catch most of them, and the apiary has gone from the original two hives to its current six.
Not only that, but they’ve produced an actual honey harvest for the first time. The original two hives got honey supers placed on them; they had to draw all of the comb, which cut back on production a bit, but they still did admirably. The stronger of the two hives gave me a remarkable 57 pounds (or maybe a little more), while the weaker produced over 21 pounds. The full harvest was about 80 pounds.
I’m told that about forty pounds per hive is a typical low average in this area.
Honey and Yeast
Yeast of various sorts is everywhere. Its spores float through the air, and are present on fruits, trees, and other surfaces. In fact, the first wines were undoubtedly fermented by the yeast colonies present on the skins of the grapes. (If you’ve ever seen grapes “in the wild,” there’s a whitish film on the ripe fruits–that is yeast.)
As the bees go about their day gathering nectar and pollen, they necessarily bump into various colonies of yeasts; some of the yeast cells are brought back to the hive, “piggybacking” with the nectar, as it were. And as the bees transform the nectar into honey, the yeast cells remain.
Now, honey is anti-bacterial, and is notoriously “immune” from spoilage. This is a factor purely of the sugar content of the honey. (When making beer, we typically measure the specific gravity–the density–of the wort, and we’re looking for numbers that indicate the liquid is in the vicinity of 6-10% sugar. Honey, on the other hand, isn’t “ripe” until it’s got less than 18% water–almost the exact opposite of the beer.) The osmotic pressure on the various microbes is simply too great; they shut down–either dying completely, or forming dormant spores.
Waking Up the Yeast
Well, if there’s dormant yeast in the honey (and there almost always is), how do we go about waking it? The reason most of it went dormant, recall, is the osmotic pressure–the sheer amount of sugar in solution was too much for it. So, we have to dilute the solution–add water back to it. This will allow the yeast to become active, thrive, and multiply.
I took a couple of ounces of honey, put them in a jar with about four times as much water, and shook it up to mix it. Then I set the jar in a warm place in my kitchen, with a lid on it (to keep out dust and unwanted contamination) loosely (to prevent messy bottle explosions).
Ideally, after a week or so, the various microbes will have come to life, and there will be a number of things growing visibly in the jar. I’m sure there will be various molds on the surface of the liquid–they’re aerobic, and need oxygen-rich environments. But I’m also reasonably confident that a fine layer of yeast sediment will have dropped to the bottom of the jar.
Yeast Wrangling
The yeast will be part of a very mixed culture, with multiple yeast strains, along with lots of bacteria and such. So I’ll have to somehow sort them out.
This is done by plating and isolating the yeast. Essentially, I’ll push the mold surface off to the side (or remove it completely), then take a sterile metal inoculating loop and get a sample of the sediment on the bottom. With the loop, I’ll spread this out in one quarter of a petri dish covered with a growth medium (malt agar). Then I’ll sterilize the loop, and “streak” it through the sample into a clean section of the dish. After repeating this three or four times, the final quadrant will have a number of single microbial cells spread out.
I’ll then put the lid back on the dish, and leave it somewhere undisturbed for a couple of days. During this time, the various single cells will grow up into small colonies of whatever they happen to be. With luck, there will be multiple yeasts–they form round, creamy-colored colonies.
I’ll then take the inoculating loop again, sterilize it, and take samples from several of these colonies, repeating the plating process individually for each of them. After another few days, I should have pure colonies grown from single cells, which I can grow up into starters and use for beer, wine, and mead.
Ifs, Ands, and Buts
There are, of course, caveats to the whole process. First, it’s not at all certain that my initial sample of honey has the right kinds of yeast: there are well north of 100 genera of yeast, covering nearly a thousand species. Not all of them do the things we want (eat sugars, emit alcohol and CO2). Or, they’ll do it, and smell putrid in the process. Or they’ll work well, but be unable to flocculate (drop out of solution). Or any of a number of other things.
I anticipate having to make multiple yeast samples, before finding something I can use. Most of the yeasts in honey are apparently from the Zygosaccharomyces or Schizosaccharomyces genera; while I can technically use them, they may not be as pleasant as I’d like. Ideally, I’d find one strain or other of “plain” Saccharomyces. There’s a fair chance that it would be a “feral” culture, stemming from one or another batch of my brewing. I’d count that as a win, though–it was still in the honey from my beehives, survived that process, and fought its way through the growing and plating and isolating steps.
How to tell whether I can use the yeast? Well, for the most part, it’s a case of smelling the yeast colonies that have grown on the plates. If they smell good (I’ve heard “honey and mango” descriptors, which would be neat), or at least neutral, they’re candidates. If they don’t smell good (descriptors include: feet, barnyard, leather, vomit, poo, etc.), then the plate gets dumped and sterilized, and I move on.
Candidates will be grown up in small batches of something–likely mead, since that’s what I’m trying to select for; simple wort is another choice. I’ll have to boil the liquid, to eliminate as much competition as possible. (This favors the use of beer wort, since it’s almost by definition been boiled.) I’ll grow up the cultures in 100mL beakers, then transfer them to 500mL, then 1000mL, and finally to a 3000mL flask on a stir plate. Once things have progressed through that step, I’ll be able to “bank” some of the strain (a separate process, with a separate post), and use the remainder to start a batch of mead.
Of course, again, at any point in the process, things could go awry with a given batch, and I’ll have to dump it. that’s just the nature of things; I’ll have to deal with it when I get there.
In the meantime, as I go from step to step, I’ll document the process here. Please stick with it!
(Valuable details, instructions and ideas for this process have been acquired from the Denard Brewing website and the forums at Homebrewtalk.com. Please visit them all, and show them some love!)
I recently spent a lovely evening discussing, among other things, the art of Kolrosing. It was at the (Unofficial) Northern Atlantian Arts and Sciences meeting, which apparently happens monthly, although I had somehow not heard of it before last week. It was a small crowd–names withheld 1) to protect the guilty, and 2) because I’m terrible with names, and can’t remember them all to save my life. But it was lively, and chatting was fun.
Kolrosing
While discussions wandered through various topics, Kolrosing was the theme of the evening. Kolrosing is an ancient art for decorating wood, involving incising a design, rubbing a colored powder into the incisions, then oiling the lot of it. The oil causes the wood to swell slightly, “grabbing” the powder, and creating as permanent a design as I’ve been able to find.
For a powder, I’ve seen cinnamon and coffee used most often. Historically, the inner bark of some trees were used–birch, for example. I could see walnut making a fine contrast against maple or birch. Powdered charcoal was also popular. Last night, I used some powdered roast barley, which worked fine. I have a notion to sand some honey locust down to a fine powder, and use it; while it wouldn’t contrast much against the background wood, locust fluoresces under blacklight, which could make for some interesting “magic rune” effects.
The oil used can be just about any light-colored oil that won’t go rancid–although I know of olive oil being used, in a pinch. My go-to is Boos Block Oil, but any other brand, or even a straight mineral oil, would certainly work.
After a light application of some fine sandpaper, it’s impossible to tell that the design wasn’t part of the wood to begin with; the only way to remove it would be to sand to the depth of the incision. I describe it as “tattooing” the wood.
Where is kolrosing used? The oldest example I know of is the Trossingen Lyre, dating from the late 500’s AD. While the kolrosing is difficult to see on the original, it’s definitely there.
Kolrosing was also popular among the Saami of Finland, for decorating things such as bone needle cases and the like. And in modern times, spoons and kuksas, popular among the bushcrafting crowd, are often intricately decorated with kolrosing. And it’s the technique I’ve been using to inscribe stanzas from the Poetic Eddas around the rims of the cups I’ve been turning for my shop.
Silver
If you follow my Facebook feed, you’ve seen the other medium I’m playing with lately: silver wire inlay. I’ve got a couple of goals with the silver, ultimately. I’d like to have a line of cups and bowls in the shop with a wire inlay around the rim. Against walnut or cherry, the silver really “pops.” And in a candlelit room, that gleam off of the silver just seems to add a certain something.
My other goal is to do some inlay on flat pieces. I have a notion to do a Hnefatafl board (similar to a chessboard), with the decorations (knotwork designs) and squares outlined with silver inlay.
Oddly, the “inlay” technique for the cups and the “flat” pieces is different. The cups use round silver wire, which is glued down into a groove cut in the cup as it’s turned. After the glue (typically super-glue) sets, final sanding is done to remove any excess glue, and buff/burnish the silver. This technique puts a horizontal ring around the cup.
The other inlay technique, seen most frequently on gunstocks and knife handles, involves cutting a groove in the wood, then (relatively lightly) hammering a ribbon of wire into the groove edgewise. Glue is supposedly optional. I’m told that if done right, the glue isn’t necessary; if not done right, the glue won’t help. Then the standard sanding and finishing is done.
It looks simple enough in principle, but I’m sure there are subtleties to it that the various online tutorials don’t go into. I can say for certain that there are things not mentioned doing the cup inlay. First and foremost, make sure the wood is bone-dry prior to gluing in the wire. Otherwise, the shrinkage will change the cup’s diameter, and the (suddenly too-long) wire will pop out. I’ve been using “thin” CA glue; a switch to “medium,” or even “thick,” might help–experimentation is in order.
While I’ve been messing about some with the cup inlay, I’m really looking forward to trying out the flat inlay. The design options are much greater. I do have an ulterior motive for wanting to “level up” on it, a little–but I’ll have to save that for a future post, as I’d like to keep it something of a surprise. If things work out as I hope, in addition to turning, there will be a combination of round and flat inlays. (Also perhaps some wood ebonizing–a fascinating technique for another time, when I’m feeling a bit more alchemical.)
I took advantage of the decent weather over the holidays to spend a bit of time in the shop. There was some re-organization, a little of which happens every time I go out there (and a lot of which still needs to happen). Some was getting a few things ready for spring. The really interesting stuff, though, was playing on the lathe a bit, and doing a little experimentation.
Cups and Goblets
My “lathe activities” tend to focus on drinkware, as befits my passion for brewing. Historically, leaving aside glassware, bowls were used by the majority of people–ale-bowls for, well, ale, and mazers for mead. The archaeological record, however, also shows a large number of what can only be classified as “cups,” with a somewhat smaller number of “goblets.”
(A quick diversion here to note that glass drinking vessels, made of clear glass, appear to have been relatively common. Certainly, they were more common than most folks tend to think. They had some value–they were buried along with their owners–and probably not accessible to the serfs and peasantry. But we’ve found quite a large number of them. This helps, in my opinion, put the lie to the myth that “all beers were dark and cloudy, but they couldn’t see it, so it didn’t matter.” And none of the below even touches on pottery/ceramic/stoneware vessels…)
Jelling Cup
One of my favorite period examples by style is a silver vessel called the “Jelling Cup.” It’s small, only 4.5cm (less than two inches) tall, and about the same diameter. It’s footed, and intricately carved around the outside in the namesake Jellinge style (S-shaped dragons and such).
Something that I’ve been fascinated by, as I’ve researched period cup shapes, is the size of the cups. Almost without exception, they’re tiny–the Jelling Cup is absolutely not exceptional, in this regard. Robin Wood, in his book The Wooden Bowl, has images of lots of different drinking vessels. A number of them, particularly the “globular cups” from Viking-era Coppergate, show gloved hands, holding the some of the cups.
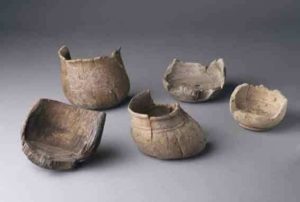
Coppergate cups
Doing a little side-by-side comparison, either the person holding the cups has enormous hands, or the cups are quite small… Only maybe three inches across at the most, and certainly all less than five inches tall. (The scale drawings from the archaeological digs, found in another book, indicate the same.)
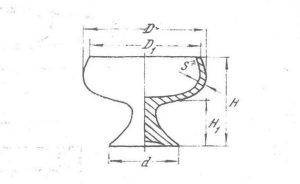
Russian cup in cross section
Things turn a little larger when you start talking turned goblets from medieval Novgorod–but then, the Russians have always been of the “bigger is better” persuasion. The finds from Novgorod include several goblets of the type shown here; they had heights up to about seven inches, and ran to as much as five and a half inches in diameter.
Turning the cups
Most cups are “spindle-turned,” or turned into the end-grain, meaning the grain of the wood runs vertically through the cup as it stands on the table. (By comparison, most bowls and plates are “face-turned,” with the wood grain running horizontally.) While that is a small difference, it significantly affects the wood properties, and thus how the turning is performed.
Significantly, I find it difficult, especially with “green” or slightly wet wood, to
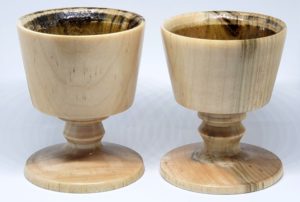
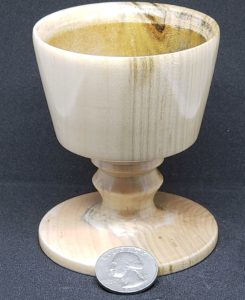
Darker maple cups
turn deep bowls in end-grain, particularly with my current set-up. (With a pole lathe, using hook tools, I can see it being somewhat easier in some respects.) Also, I find that I have to be much more diligent about keeping the tools sharp when turning the end-grain. I mean, I have to keep things sharp anyway, but I probably hit the sharpener twice as often with end-grain.
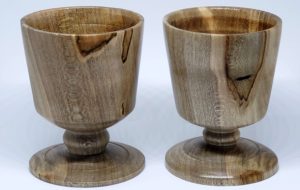
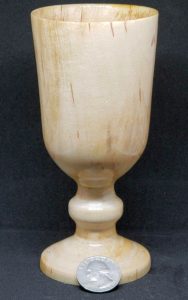
Lighter maple cupsBirch goblets
All that said, I do enjoy making the cups–especially when I can get a matched pair out of a single wood blank. I like using 3″x3″x12″ billets for most cups; I can get two to three from a single billet without much difficulty. A single cup would have to be pretty eccentric for the lines to work right, in my opinion; given the narrow bowl, the stem would have to be long and quite slender. While I’ve seen modern goblets turned like that, I’ve never seen anything similar in period.
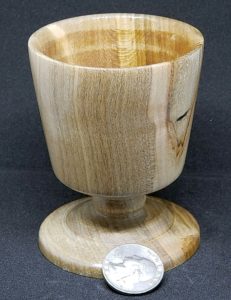
While I have made Russian-style goblets, as I said, I really like the Jelling style, for some reason. So, I’ve been turning out a number of cups and goblets in that style–both short ones, similar to the Jelling Cup, and taller ones with similar lines.
Finishes – Beeswax or Nothing
How and whether to finish the cups is something I’ve been playing with for almost as long as I’ve been turning them. The originals in period would have probably been left unfinished, or (at most) rubbed down with beeswax, and possibly buffed. Either way, they would have been left susceptible to damage from the liquids they held, or to rotting, if left damp and unused. That said, it’s really an experience to quaff your beverage from an unfinished wood cup, as your ancestors would have; it really changes the experience of the drink.
Another point, particularly for unfinished cups, is that the wood grain would act like a bundle of straws, and eventually whatever liquid the vessels held would find its way through to the bottom. (This is probably one reason that the Coppergate cups were thick-bottomed–to slow the penetration of the liquids.) In the interest of preventing this, I began playing with various oil finishes, such as walnut, linseed, and mineral oils.
Finishes – Oil and Wax
I used a mineral oil/beeswax mix for a long time; the two combine to form a soft paste, which applies nicely, buffs down well, and is food-safe. Any of those need multiple coats, though, to really provide protection to the wood. They also benefit from re-application after using the vessel, for at least the first couple of years. Time-consuming, and not much fun.
Finishes – Pitch
The next step was to use an oil or oil-and-wax finish on the outside, but line the inside of the cup with brewer’s pitch. This provided both the tactile sensation of the wood on the outside, while keeping it completely protected on the inside. Getting the pitch just right can be difficult–it’s a resin, which has to be melted, then poured into the cup and swirled around to coat, then the excess poured back out. When done well, it can be quite beautiful, almost jewel-like on the inside. When done not so well, it’s functional, but not as pretty.
Either way it’s done, the pitch lining is somewhat fragile. It can be scratched with a fingernail, and if (gods forbid) the cup flexes somewhat, it will crack, which creates a whole new set of problems. Adding a bit of beeswax to the pitch gives it more flex, but makes it even softer, and very susceptible to “slumping” into the bottom of the cup on hot days.
Finishes – Modern
Maple cup, quarter for scale
Lately, I’ve moved even further from period methods, and taken a cue from the pen-turners: the outside is finished to a high gloss, using an acrylate finish. (Yes, I’m using super-glue to finish the outsides of the cups.) I’m finding that the wood-grain really “pops,” and any unique features in the wood (figuring, or interesting color) show through nicely.
For the insides of the cups, I’ve got an epoxy that I’ll be giving a shot in the next few days. It’s a clear two-part, and is used for bartops and such; when cured, it’s alcohol- and water-proof, and quite food safe (as is the acrylate finish, when cured).
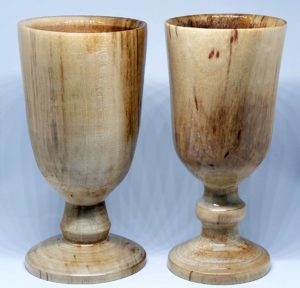
Birch GobletMaple cup
The jury is out on whether the epoxy will prove as subject to breakage as the pitch. I’m certain that the cups will be longer-lasting for modern usage–I have noted that we tend to be pretty rough on the cups. But with the acrylic and the epoxy, they should be much more washable, and (I think) quite a bit sturdier for use.
And for the curious, yes, I’ll have the cups up in my Etsy shop and my standalone shop, as soon as I can get doing the lining worked out, and turn a few more. In the meantime, look for me (and them!) at any event I’m at. I’ll try to have a couple of them on-hand, and I’m happy to let folks try them out!
I really love making things. Among my favorite things to make are the tools used to make other things. There’s just something satisfying about being able to take something you’ve produced and put it to use, making another thing. This weekend, it was time for a batch of bone nalbinding needles.
Nalbinding?
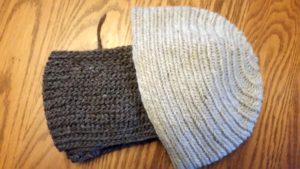
Nalbinding, for those who don’t know, is a fiber arts technique that creates generally thick, warm items. Most common are mittens, socks, and hats, but I’ve seen things ranging from scarfs to sweaters and more.
The technique is usually glossed as “Viking knitting,” but that’s very much over-simplifying things. The earliest known pieces are from Israel (scraps of fabric), while the Coptic Egyptians produced socks. Structurally, while there can be a visual resemblance to knitting, it’s closer to crochet–and closer still to net-making.
I’ll save a description of the technique for a separate post; suffice to say, it uses a single needle, similar to but typically larger than a tapestry or yarn needle. Traditionally, these are made of wood, antler, or bone–I prefer bone.
Bonecutting
I make the needles from the leg bones (the ‘cannon-bones’) of elk. I could use deer (whitetail or mule), but I don’t get as many needles from one of those; also, my supplier (Moscow Hide and Fur) tends to have lots of elk bones in stock.
I begin by cutting off the ends–the physical structure of the bone in the ends is unsuitable–and cut the “barrel” of the bone in half lengthwise. I then section the halves into roughly needle-length portions, and cut the needle blanks from those. From one elk cannon-bone, I normally get eight to ten nalbinding needles, plus a few other odds and sods that I can use for sewing needles, shuttles, or tabletweaving tablets. The ends can be made into things like beads or rings; I’m experimenting with spindle whorls, for handspinning drop spindles.
Sanding and drilling
What you’ve got at this point is a handful of rectangular bone pieces, about three inches long, a quarter inch wide, and an eighth of an inch thick. You could carve them down with a knife, but since I make these for my Etsy shop, I’d rather build my inventory a little more quickly.
For our purposes, abrasives are faster than whittling–and safer, too, when it comes down to it. I could sand them all down manually with loose sandpaper, but we’re trying for quickly! So in the interest of speed, I use a benchtop belt sander. After getting my technique down, I can sand a half dozen blanks down into rough needles in under fifteen minutes
Once I have the needles rough-shaped, they go over to the drill press, where I put the preliminary hole for the eye. Then, depending on whether I’m really in a hurry, I will either shape the eye with a rat-tail needle file, or I’ll use a grinding attachment on a rotary tool. The end result is a nice, oval eye, rounded around all of the edges.
The final sanding is a manual process–I haven’t found a way, yet, to get a good finish mechanically. Fortunately, it’s a fairly mindless, Zen sort of thing. I’ve got scraps of sandpaper, about three inches square, in 120, 220, 320, and 400 grits, and a wad of “000” steel wool. Fold the sandpaper in half, and plunge the needle between the paper, rotating with successive “stabs”, then flip to do the end you’ve been holding.
In the photo on the right are some roughed out nalbinding needles. If you look closely at the uppermost, you can see that it is “faceted,” and has several sharp-ish edges.
After a pass with the 120 and 220 grits, it looks like the one below: the edges are softened, and it’s rounder and beginning to smooth out.
And finally, having gone through the 400 grit, and finishing the process out with the steel wool, the needle is smooth, with almost the feel of a hard plastic. There may be some remnant scratches in the larger faces from the coarser sandpaper, but I don’t worry about those much; after a few hats or mittens worth of use, the scratches tend to buff out.
The whole finish-sanding process takes maybe 5 minutes per needle. I like to put on some music, or maybe pop a movie on the laptop, and kind of zone out while sanding.
The needle to the right is basically done. I’ll probably touch up the eye with a file, to “even out” the one side, but it’s not horrible.
Safety First
One word of advice: when you’re cutting or sanding bone or antler, you’ll want to add a face mask to your safety equipment, if not a full respirator. You’ll be sending fine particles of bone into the air; they’re organic particles, potentially with a bacterial load, and you really don’t want them in your lungs.
And while we’re on the topic, safety glass are your friend, especially during the sawing and belt-sanding portions of the event.
A Little Shop Production
That’s pretty much it! These nalbinding needles (and some shorter ones) seem to have been pretty popular. I’m experimenting with a few new items, as well: I’ve put up some nalbound hats, and will be offering up a leather needle-case (will hold probably four or five of these needles) and a couple of other items, once I work out a couple of bits in the designs. All this, of course, in addition to the turned bowls I’ve mentioned elsewhere.
Also mentioned elsewhere, I’m also in the process of building a “not-Etsy” site. I haven’t decided yet if I want to fully move off of Etsy, as it’s much easier to be “found” there. At least for the foreseeable future, I’ll probably just duplicate my inventory, with a few additional (fancier) items on the standalone site. I’ll be sure, of course, to link to it here, once it’s up.
If there are any small things that my re-enactor readers would like to see me make, I’m certainly open to suggestions in the comments! Let me know what you think!
Another brew day has passed, and the Thanksgiving holiday has come and gone. Things have been quietly busy around the homestead, as the weather has finally turned towards winter.
Brew Day
The brew went fairly seamlessly. I decided, at almost the last minute, to ditch my planned brews for the rest of the year, and instead of doing a Helles Lager this month, I brewed an all-grain version of the English Pale.
The change to the recipe from the extract version involved little more than swapping out the malt extract for eight pounds of Maris Otter malt. The net effect was, as I anticipated, to lighten the color slightly, and (I anticipate) to give an extra fullness to the batch when it’s done.
Now, rather than doing a Samichlaus clone in December, I’m considering brewing up a Kolsch-style lager. If pressed, I’d have to say that a well-done Kolsch is my favorite beer style; if I get it done now, along with maybe another batch in January or February, I’ll have a good start on summer drinking.
Thanksgiving
My wife did her usual astounding job whipping up a feast for us this year. I was pleased at the number of things that came from the homestead, this time around. Not only things grown ourselves (every onion that went into something was from our garden), but things that most folks would buy, that we made from scratch.
Among the snacks while waiting for things to finish baking, we had the smoked cheese from a few weeks back. That went over quite well–it’s always fun to introduce a cheese-lover to a smoked version of their favorite cheese.
Another thing that I threw together was a small batch, about a pound, of gravlax–cured salmon. Normally, the salmon is cured in salt and sugar between layers of fresh dill; lacking that, I used powdered dill from the spice cabinet. Otherwise, it went quite well. (I also got to use a new knife that I picked up, just for doing cured meats–a nice sashimi knife, with a single bevel; after a little practice, I should be able to get those nice paper-thin slices of bresaola…)
For the meal itself, I baked a batch of sourdough, which I’ll have to go into in another post. And we finished off the sauerkraut that had been fermenting on the counter, both as a straight dish, and fried with some shredded apple and a little caraway. And my wife added some of the homemade bacon off-cuts to the roasted brussels sprouts, which really bumped them up a notch.
Homestead
Otherwise, things on the homestead are slowing down for the winter. We’ve had our first snowfall, followed by a few temperature swings, and finally some icy rain. The chicken coop has been almost completely buttoned down for the winter, with the doors closed, insulation put in the eaves, and heat lamps warming the roosting bars. Still, with the cold and the clouds, their production is down from over twenty eggs a day to three or four.
The bees have been hunkered down in their hives for a bit over a month. I’m pleased just in the fact that they’re still there (this is something of a record for me). When last I checked, about two weeks ago, they were still slowly working the candy blocks they had. I’ll pick a warm-ish day in a couple of weeks, pop the tops, and give them more, if they need it.
The garden has gone dormant, as it should. I’m hopeful that the asparagus crowns did well enough this year to survive the winter, and start producing in the spring. And the garlic, which didn’t produce anything to speak of over the summer (as expected), sprang back to life as September rolled through, and it appears to be going into the winter with a vengeance–come spring, we should have a decent harvest there, I hope!
Lastly, I placed an order for two more apple trees: a Black Oxford, and a Golden Russet. I’m trying to decide where to place them; the problem is an excess of good places for them. I’m thinking across the field, near the tilled area for grains; I’ve got a few months to consider the problem, though.
Etsy and My Shop
If you carefully read the “about me” page, you’ll have noticed mention of a shop on Etsy. It’s called the Holmgard Trading Company, and I’ve had it up for over three years; I started with some wooden cups and bowls, adding them as I got time to make new ones. I have, lately, been branching out a bit–particularly since the shop is “climate controlled,” and very cold at present–and adding things I could work on while inside, being warm near the stove.
While I’ll keep the Etsy shop up (it’s certainly good for publicity, and it’s pulling its weight in sales), I’m in the process of getting an independent site set up for Holmgard Trading. The plan is for it to have a wider array of goods, plus better pictures, and some stories about the things. Stay tuned for further updates!
Pennsic 47 is now behind us. I certainly had a good time while there. I got to meet (and re-meet) many old friends, and make a number of new ones. I attended several classes, watched some of the spectacle, and enjoyed browsing the Arts and Sciences displays.
There were some tense moments, to be sure, but there always are. My group is planning an after-action party, and I hope some things will be ironed out there. Additionally, there was the undercurrent of SCA politics; some of it relatively benign, and some of it less so–but everyone I know is doing what we can.
I’ve got a good double-handful of pictures of things; I’ll see about setting up a photo album here somewhere, and getting them up. But one that I absolutely must post is the gathering of the Historic Brewing Roundtable:Yours truly isn’t in this one, because somebody had to take the photo. We had a grand discussion, and lots of samples went around; I think it’s safe to say that everyone learned something, and that a good time was had by all.
My class went well, both times I presented it. It probably went more smoothly the first time, but only because it hadn’t been so hot and humid for so long. By the time the second iteration came around, everybody was getting a little ragged around the edges.
As to the beer I brought, where I started with three full kegs (15 gallons), I came back with probably two or two and a half, at the very most. One keg was completely kicked (the Brown Ale); the Experimental has maybe two pints left. And the Pils has less than two gallons, probably closer to one. I’ll adjust fire for next year–it won’t be an 8-keg extravaganza, but I’ll probably bring four, at least.
That’s the quick report; due to coming home with a lovely head cold, I’ll save the full report for later. How about you, readers? How was your Pennsic (if you went)? Let us know in the comments! And if you’re one of my new brewing friends, feel free to say “Hi!” down there, as well!
We’ll have a little down time for the next couple of weeks, as the SCA’s biggest event, Pennsic, is about to begin. My wife and I will be going up this weekend to help with setup, but we won’t be on-site full time until late on Wednesday the 1st.
I’ll be teaching this year. It’ll be my first experience teaching (formally) at Pennsic; I’m a bit nervous, but I’ve been going over my stuff quite a bit lately, so I think it’ll go okay. (I’ll be mentioning the blog while there, and probably handing out my card to lots of people, so I’ll probably have to step things up, when I get back. Hi, new folks!)
Other exciting bits: After a mis-communication (or slight misunderstanding), I was prompted to re-build my beer cart, which goes by the title of “The Oracle.” (It’s a somewhat complicated story, which I’ll save for another post.) This one is Oracle v2.3. I’d originally planned for the next one to be v3.0, but there it is. Maybe next year–but more likely 2020.
I’m bringing up two kegs, plus hauling one for a friend. Mine are a Brown Ale and one of the Experimental Berlinerbier/Braunschweiger Mumme batches; the friend’s is the Pilsner-style from two months ago. I think we’ll be well-enough stocked for everything.
We’re doing quite a few experimental things this year, too. We’ve got a small solar setup (100W panel, one deep-cycle battery, plus charge controller and 300W inverter) to power the igniters on the propane stove (!). Yes, I know lots of folks do small (or not-so-small) solar setups at Pennsic… But aside from a small, portable 15W fold-up panel I brought last year, I don’t believe our camp has done anything quite this ambitious. I’m confident it’ll be fine.
Then there’s the bit about leaving the children to tend the homestead. Again, it’ll be fine–they’re 17 and 15, this year, and quite able to tend the animals, and cook for themselves. And we’ll be stocking them up with frozen dinners, just in case… And we’ll apparently be coming back every three or four days or so. (I’m of the opinion we could stretch it to “once in the middle of the trip,” but I’m not in charge of such things, so there it is.)
Then there’s what to do after we get home. Beyond the unpacking, leisurely showers, and clean clothes, I’m certain we’ll be spinning up to take on the next projects as soon as possible. Homestead-wise, that will be working on the utility room. Brewing-wise, though, I’ll have to consider.
I’m thinking I’ll be doing a series of… not classes, as such, but more “seminars” on brewing, going from the basics up to all-grain. The impetus is that I’ve had fully four people in the last two weeks ask me if I teach brewing. I’d like to do them in conjunction with my normal Brew Days, and maybe spread the word a little to see if there’s additional interest. I think it’ll be fun.
Speaking of fun, I was struck by inspiration this morning, for a set of brews based on various SCA awards. At the upper end of the scale would be the Peerages.
For the Pelicans, it would be probably something like a sessionable English bitter–something that would serve for everyday drinking. (Serve–get it? Pelican? Ha!) Masters Of Defense would have to be something in a Belgian Sour, sharp and brisk. Laurels–stay with me on this one–would be a Czech Pils: subtle and artistically challenging. And for the Chivalry, I’m thinking probably a Russian Imperial Stout. (Big, strong, and uncomplicated; about as subtle as an elephant.) All in jest, of course…
Anyway, if you’re going to Pennsic, dear Readers, please look me up (I’m in Ravenstreet, block E05, between Chandler’s Road and Brewer’s Road). I’ll try to get some pictures to share, for next time. Cheers!

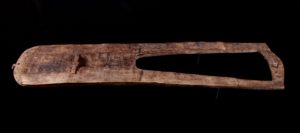 Where is kolrosing used? The oldest example I know of is the Trossingen Lyre, dating from the late 500’s AD. While the kolrosing is difficult to see on the original, it’s definitely there.
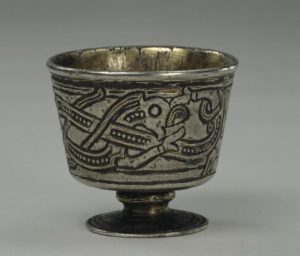
 The technique is usually glossed as “Viking knitting,” but that’s very much over-simplifying things. The earliest known pieces are from Israel (scraps of fabric), while the Coptic Egyptians produced socks. Structurally, while there can be a visual resemblance to knitting, it’s closer to crochet–and closer still to net-making.
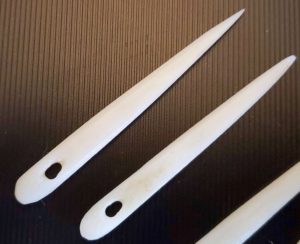 Fold the sandpaper in half, and plunge the needle between the paper, rotating with successive “stabs”, then flip to do the end you’ve been holding.
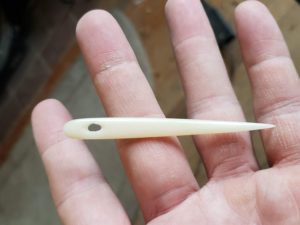 And finally, having gone through the 400 grit, and finishing the process out with the steel wool, the needle is smooth, with almost the feel of a hard plastic. There may be some remnant scratches in the larger faces from the coarser sandpaper, but I don’t worry about those much; after a few hats or mittens worth of use, the scratches tend to buff out.
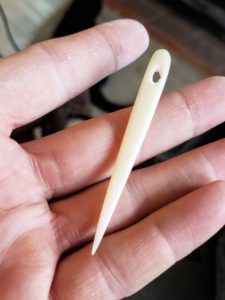
 Yours truly isn’t in this one, because somebody had to take the photo. We had a grand discussion, and lots of samples went around; I think it’s safe to say that everyone learned something, and that a good time was had by all.