Brew Day, July 2018 – Cellar Management and Meads

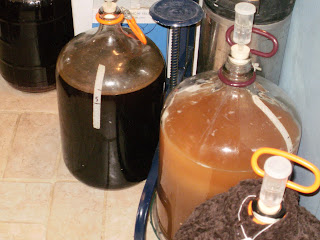
Between the heat, things to do around the house, and the proximity to Pennsic, this month’s Brew Day was mostly cellar management. I got the beers from May kegged, and pulled a few 2.5-gallon carboys to make a couple of meads.

Cellar Management – Kegging Brews

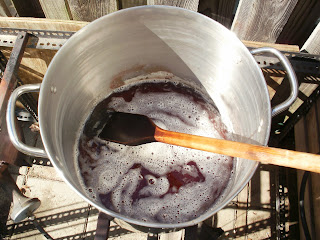
The first of the May brews was my experiment in direct-firing the mash. Overall, it was a success for what it was–but I’d have to revamp the recipe if I were to do it again. It came out a most peculiar orange color, and the malt “backbone” was off. I’m not certain just how to describe it, really. I think if I switch the amounts of the two base malts, it would come out better. (I had 11 pounds of Munich, and 5 pounds of Vienna; so swap them to 5 of Munich and 11 of Vienna.) The hops need tweaking, as well. I think move the First Wort addition to a straight 60-minute addition; move the 10-minute addition back to 20-30 minutes, and add a whirlpool dose.

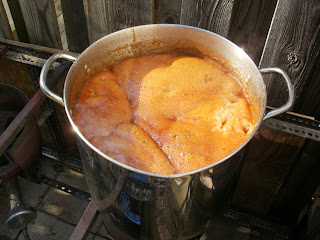
The second one to keg was for my friend Dominic; we brewed up a Pilsner-ish for him. (He’s very much of the “lighter is better” opinion.) When racking it into the keg, my only comment was “this is the most Dominic beer we’ve ever done.” It’ll be a step beyond “pale straw” color, I think. Corona is probably darker. The malt and hops are well-balanced, but very light. Tasty, and it’ll be great chilled at Pennsic.

Both beers were cloudy–my experiment much more so than the Pilsner.  And mine in particular was rather phenolic, a sign that things fermented warmer than the yeasts would have liked. But then, the cellar is running a very warm 80 degrees right now, supposedly–I think it’s probably more like high 70’s most of the time. So something needs to be done about that, in the long run.

Thoughts on future plans

I’m thinking more and more about switching my summer brewing over to a kveik yeast. They’re supposedly good up towards 110 degrees, even, fermenting cleanly the whole way.  I’ll have to wait until after Pennsic to try one, obviously, but I’m eager to see.

I do have a couple of questions about them: how would they do for a mead? How well do they flocculate (drop out of suspension)?  Things like that. Fodder for future experiments.

In the meantime, if I continue with “regular” yeasts in summertime brews, I’ll have to see about setting up a water bath for the fermenters, even down in the cellar. (Or turn off the dehumidifier for the duration of the ferment, but everything else in the cellar would be the worse for wear.) In the long run, of course, I hope to convert the “Garage” (currently my wood shop) into the “Brewery,” and set up some sort of dedicated cool space for fermenting and serving.

New Brews

This evening I’ll be mixing up a pair of meads to go in the fermenters I mentioned above. Both will be 2.5-gallon batches; one will be a blackberry melomel, and the other a Pinot Noir pyment.

The main thing about these two batches is that I’ll be moving out of my comfort zone, and using yeasts that I’m not as familiar with: 71B for the melomel, and RC-212 for the pyment. My “normal” go-to for meads is D-47. It plays well with most fruits, leaves a moderate sweetness, and actually improves over time when left on the lees.

I’m going with the “new” yeasts for a couple of reasons. Firstly, I’d like to expand my “library” some. I think I’ve learned and progressed a bit from my early days, when I used whatever wine yeast was available, as long as it was EC-1118. I’d like to see what these other yeasts can bring to the table. I mean, I keep seeing 71B mentioned as people’s preferred mead yeast, but I don’t have much experience with it, and a half-batch is a good way to learn. And finally, all of these yeasts evolved to do great things in their particular environments–RC-212 is great for red wines; 71B supposedly enhances berry flavors.

Each of these batches will get 5 pounds of clover honey, if only because that’s what I’ve got available. I’ll dose them up with staggered nutrients, too, then move them down to the cellar for the medium-term. I figure they’ll probably clear by early September, and I can get them bottled in September, then serve them up for Thanksgiving and Christmas.

(Note to self: set up calendar reminders to go check on them periodically, to make sure the airlocks don’t dry out…)

Hopleaf Mead Update, Cellar Management
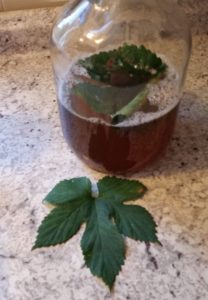
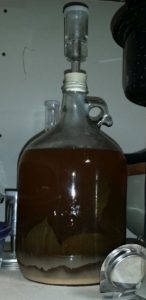
While I’m on the subject, the Hopleaf Mead continues to do its thing. It’s clearing up pretty nicely, and the hop leaves are surprising me a little by slowly sinking to the bottom. I’ll probably give it another week or two, simultaneously giving me time to find one of my other gallon jugs, then rack it onto some sorbate and hit it with some sort of finings before bottling it.

I’ll admit to being quite curious how this one turns out. My prediction is that the leaves will, at the absolute most, only mildly affect the flavor, and it’ll be a subtle “there’s something unusual here, but I’m not sure what.”

Bizarre Idea as a Closing Thought

This came to me in one of those half-asleep moments a while back: I should make a true “Frankenstein” batch. I’ve got techniques for malting and brewing from period. I’ve got grains from period (once I get enough of them grown up). In theory, I know how to get hops from period–or, failing that, at least their first-generation descendants. Yeast from period? Kveik (well, period enough). Add some honey (ideally from my hives), a la Trossingen. Ferment it up in a barrel, and serve it casked (either through a beer engine, or simply tapping the barrel).

Lots of planning and work would have to go into it–I’d need to grow enough Bere, and grow up the hops. I wouldn’t want to use a new barrel, so I’d have to run a few batches through one, to “mute” the oak a little…

But I think this would be a wonderful thing to do, in addition to my (already-planned) “Estate Beer.” What say you, readers?  Comments welcome below, or via email. (Speaking of which–I’m trying to get the blog’s email list function working; if you sign up, I won’t “spam” you, but only send at most a monthly newsletter, and notifications when I put up a new post. I hope you’ll give it a go!)

Brew Day, June 2018 – Hopleaf Mead

This month saw the brewing of a hopleaf mead. This is rather a strange-seeming batch, and a bit of an experiment, just to see if some 15th-century Venetians knew what they were talking about. (I opted not to make anything overly complex because it’s been in the low 90’s and humid. Also, we’ve been getting pavilions ready for Pennsic outside, which is hot, sweaty, and tiring. Firing up a burner was definitely counter-indicated.)

The hopleaf mead experiment stems from a passage in a Russian book on brewing. In it, a professor writing the foreword cites Ambrosio Contarini, part of the Venetian Embassy to the Shah of Iran from 1472-1475. On the trip back from Iran, Contarini and company stopped for about six months in Moscow. Part of the story of his travels reads thus:

They have no wine of any kind, but drink a beverage made of honey and the leaves of the hop, which is certainly not a bad drink, especially when aged.

The “leaves of the hop” (hopleaf) really caught my attention. It reads that way in both Russian (“с листьями хмеля“) and, once I found it, the original Italian (“con le foglie del bruscandolo“).  My first thought was, certainly they don’t mean hop leaves? Contarini has to be confused about what part of hops gets used. I mean, the cones are green, and somewhat leaflike.

Intrigued, I dug a little further. “Bruscandolo” is Venetian dialect for hops (Google says that “normal” Italian would be “luppolo”; and a medieval Italian-English Herbal Dictionary even went with “lupuli“). Nowadays, it apparently means the hop shoots or tips, which can be treated like asparagus shoots or fern shoots, and cooked up in a variety of ways. (I’ll have to try Risotto di Bruscandolo, or Bruschetta Bruscandolo, next spring.) But I found another reference, again to a Venetian in period:

The principal imports of England are spices, sugars, and all sorts of fruit from Spain and France, wine, oil, and what they call hops (obloni), the flower of the hop plant, and the “bruscandoli,” needed for the brewing of beer…

This is from an English translation of some diplomatic letters from Giacomo Soranzo, the Venetian Ambassador to France. Now we’ve got several hop references and names; just to confuse matters, Soranzo describes “hops” and “bruscandolo.” Fortunately, he specifies “hops” as “the flower of the hop plant.”

Given all of these varying terms and such, until and unless I find anything different, I’m going with the notion that “hops” (or “obloni“, and maybe “lupuli” as well) are references to the hop flowers/cones, and “bruscandolo” is a reference to the plant as a whole. As such, it makes some sense to assume that Contarini meant the actual leaves. What one would get from them, I have no idea; all of the bittering oils are found in the cones. Hopleaf might (might) give you some tannins. There’s bound to be some natural yeast there, as well. But experimenting is in order.

I brewed this up as a 1-gallon batch of sweet mead, Cascade Hops, used in Hopleaf Meadand put three full-sized, mature hop leaves into primary, lacking any indication as to how much to use. I rinsed the leaves, just to ensure there weren’t any spiders, insects, aphids, or the like. The particular leaves I used were from one of my Cascade mounds, for the reason of ease of availability–I’d have had to go across the field to get Magnums or Willamettes, and did I mention it’s been hot?

Having acquired the leaves, it was time to assemble the rest of the recipe. I’ve got about 20 pounds of Clover honey left over from a previous meadmaking spree. Three pounds or so into a gallon batch makes for a decently sweet mead. I’d thought about using K1V-1116, but didn’t have any on hand, so I opted to go with EC-1118 instead. They’ve got similar alcohol tolerances, and both ferment out cleanly. Also, after pondering things, K1V is a “killer” strain–it kills off other yeasts in solution with it. If the hopleaf is to add anything of a yeasty nature to the brew, going with EC-1118 will allow that to come out. The rest of the batch is pretty standard, with GoFerm and Fermaid O staggered nutrient additions.

Hopleaf Mead
Hopleaf Mead, prior to adding the final leaf. It also got diluted by almost half.

Hopleaf Mead (this is recipe #166 in my Little Black Book)

3.1 pounds of Clover Honey
1 packet Lalvin EC-1118 yeast
4.53 grams Fermaid-O (split into four additions, at 24, 48, and 72 hours, and on day 7)
2.5 grams GoFerm nutrient
3 mature Cascade hop leaves, rinsed

OG: 1.126

Five Minutes of Mead

I just realized that for all of my talk about brewing, I’ve neglected to talk about meads. While the majority of my mead recipes are for a full 5-gallon batch, I’ve recently discovered the joys of micro-batches. Here’s an article I wrote up for the newsletter of my local beekeeping association, discussing the process and providing a recipe for them:

Five Minutes of Mead with Misha

An issue many people have with making meads is finding vessels to use for the fermentation. As a homebrewer, I have a plethora of glass carboys of various sizes, from 7 gallons down to one-gallon. While convenient for me, they have a number of drawbacks: they tend to be large; they are heavy (especially when full of liquid); they are fragile, and tend to cut people when they break; and they can be expensive. A less-costly option would be fermenting buckets, made of food-grade plastic. These also come in a range of sizes. Plastic, however, scratches readily, meaning that they’re only really worthwhile for a small number of batches. Then there’s the issue of batch size: while you can brew a 1-gallon batch in a 5-gallon carboy or bucket, the extra airspace can be problematic for the brew. And brewing a 5-gallon batch requires a lot of honey: ten to fifteen pounds, or even more.

A simple solution is the use of pickle fermenting kits (readily found on Amazon; I think I saw a kit in Wegman’s, a while back, as well) and Mason jars. The kits consist of a Mason jar lid, which has been drilled and fitted with an o-ring to hold a standard homebrewing airlock. These are available in both wide- and narrow-mouth styles; I’m fond of the wide-mouth, for ease of adding things to the mead as I feel the urge. Quart jars are readily available, easily cleaned and sanitized (sterilized, even), and make the recipe math fairly easy.

Generally speaking, the amount of honey used will have the largest impact on the final sweetness of the mead. All other things being equal, using less than 2 ¾ pounds of honey per gallon will give you a dry mead; using more, up to about 3 ¼ pounds per gallon, yields an off-dry to semi-sweet mead. Going above that, up to about 4 ¼ pounds per gallon, gives increasingly sweeter meads, then above about 4 ½ pounds per gallon yields what is called “sack” mead.

Honey weighs about twelve pounds per gallon, give or take. Given that there are 16 cups to a gallon, a little kitchen math shows that four cups of honey would weigh three pounds. This means, conveniently, that one cup of honey in a quart is the equivalent of three pounds per gallon—a nice, semi-sweet mead. Want to drop it to two pounds per gallon? Only use 2/3 cup. Four pounds? 1-1/3. Little tweaks beyond that are a matter of tablespoons.

With all that said, here’s a fairly simple, “basic sweet mead” recipe, given in volumes for a quart; everything scales up directly to a gallon, or even five:

1 ¼ cups honey

Hot water to 1 quart

¼ packet of dry wine yeast (I recommend Lalvin K1V-1116, available here or here.)

  1. Put the honey in your fermenting container.
  2. Heat the water to a boil, then let it cool to just off the boil.
  3. Pour the hot water into the container, stirring to dissolve the honey.
  4. Let the liquid cool; when it reaches lukewarm (or below 100º F), add the yeast.
  5. Put the lid on the fermenter, and add water to the airlock.
  6. Give the vessel a shake twice a day for the first week.
  7. Leave the fermenter alone for about a month, then carefully decant the contents into a new fermenter, leaving behind as much sediment as possible.
  8. Once the mead is clear enough to see through, decant it once more.
  9. Let it sit another six months, then decant it a final time; now, you can put the “sealing” lid on the jar (ideally, not too tight-just enough to barely seal). The mead is ready to drink! It should keep a year or more in the refrigerator.

I’ve got another couple of articles that I can clean up a little bit and post, but this should be enough to get even the newest mead-maker started. Enjoy!

Turning up cups!

Due to Winter(tm), and the associated weather, my outside brewing has been limited, lately.  Instead, I’ve got three batches of mead burbling away.  One is a traditional, made with Radish and Christmasberry honeys; the second is a Blackberry/Raspberry melomel, with these berries in some blackberry honey; the third is my wife’s popular Cranberry, with varietal honey and two pints of homemade cranberry sauce.  The ciders from the fall (2.5 gallons of perry, 5 gallons of apple) are seemingly quite happy, as well–settling out and clearing nicely.

So, given the abundance of “free time,” I’ve been playing with wood.  But not just any playing. Me being me, this is SCA playing.

I wish I could say that I’m using period tools, but I’m just not there yet.  (Yes, I did say ‘yet.’)  I’m working up to using period materials–I want to get some basic skillsets down before I go whole-hog and pay the pretty pennie$ necessary for the right wood varieties.  So, I’m practicing on and off with chest-making; I’ve got a pair of Mastermyr-style chests done.  I really like them–the sloped sides are aesthetically pleasing to me–but finding hardware is a pain.  I’m working up to being able to make my own–but blacksmithing is a whole ‘nother skillset…

Most of the fun, though, has been woodturning: bowls, cups, and plates.

Assortment of my early attempts at turning bowls and cups. Banana for scale
Drinking vessels, in assorted birch, maple, ash, and cherry. Banana for scale.

It’s relatively early days, yet.  I’m almost to where I really want to be with the basics–I don’t have to do much post-processing (sanding), if I take my time and work methodically.  Still, I’m running 45 minutes to an hour per vessel; I might be able to bring it to more like 30 minutes, given enough practice.

I’m doing quite a bit of study, too, to find period-appropriate shapes and styles.  Oddly enough, wood types matter here, too, although it’s not quite as crucial.  Most of what I’ve been turning have been drinking bowls and cups–and they tended to be maple, ash, or birch, depending on what part of the world you were looking at.  (Maple seemed to be a universal; ash and birch–mostly ash–were popular in Russia, while alder and birch seemed to be favored in England.)

So, I’m doing up a class, for Gemutlichplatz (a semi-local event, focused on brewing and brewers), on turned wooden drinking vessels.  I hope to have enough examples to do a bit of drinking with them, too.

But a thought which struck me, recently: how much demand is there, in the SCA community, for period wooden drinking vessels?  Is there enough to support my getting a business license, and peddling them at the odd event or two?  Perhaps an Etsy shop?  I’ve been thinking about this more than a little bit, lately…  Perhaps three “tiers” of wares, to start:

  • Period material and design (researched design);
  • Period design, modern selection of material;
  • Plausibly- or non-period design (inlays, etc.), modern material.

At the least, it might support my hobbies somewhat–even if only to make the turning sustainable.  (Woodturning is an amazingly fun way to make a whole lot of wood shavings…)  I have designs, eventually, on making some pottery and pit-firing it, too–probably using the shavings from turning–which might find its way, eventually, into the second or third tier of the storefront.  Add in carved things (spoons, bowls–particularly the big dough/bread trays), and it starts looking really interesting.

I plan on gauging the reaction at Gemutlichplatz, and asking a few trusted individuals between now and then, and making my decision towards spring.  If I do go for it, it wouldn’t be before fall; I’d have to build up an inventory.  What say you, good Reader?  Is there interest?

(2018 edit: I decided there was enough interest, and have opened Holmgard Trading Company on Etsy. The focus is still mainly on turning bowls, cups, and plates, but I’ve also branched into carved bone items, and will likely expand past that in the future.)

Brew Day October 2010, and Bochet

While I’ve been lax in updating this blog, I’ve been (reasonably) active with some experimentation.  My last brew day, one week ago today, saw one modified “normal” batch and one experimental, and I’ll be whipping up two more experimental batches tomorrow evening.

The modified batch was a version of my (quite popular) Kolsch recipe, but with the volume turned up to 11.  I believe it will end more like a pale ale than anything else.  I was down to basically dregs on my current base malt stash, and decided to use it all; this bumped the starting gravity up about 25-30 points.  I increased the bitterness by a similar amount, keeping the BU:GU ratio roughly the same…  It will still be quite pale, I believe–something in the golden range–but with a firm bittering, and a solid malt backbone.

The experimental batch was based on the idea of caramelizing honey for a mead.  Several folks have done so-called “bochet”, or “burnt” meads, with the results being described as different, if not entirely to their liking.  I was going for a slightly less “cooked” flavor, and hoping for an improved color.  (Not that a straw-gold mead is a bad thing, but it’s just a bit… well, overdone.)  I took my “spare” pot (7.5 gallons) and emptied 10lbs of wildflower honey into it.  With a touch of water to rinse the honey containers, the total volume was right about 1 gallon.

1 gallon honey in a 7 gallon pot
Honey, before the boil

All accounts that I’ve read regarding boiling/caramelizing honey when making bochet indicate that it foams up quite a lot.  I had planned on simply stirring like mad to keep it from boiling over; let me recommend instead using a very low flame.  The stuff literally tried to crawl out of the pot.

Honey boiling for bochet
45 minutes into the boil; still climbing the pot, but a lovely color.

I boiled for about an hour, all told; the honey turned a lovely deep amber, and even my kids commented on the “caramel” smell.  A second word of warning for those who would follow in my footsteps:  bees can smell the honey cooking.  They will come to try to “rescue” it.  Lots of them will.  At the end of the hour, there were about 6 big bumblebees and maybe 15-20 honeybees swarming the pot.  At least three of the honeybees gave their lives trying to grab some of the honey–they got “caught” by bursting bubbles, and fell into the pot.  I don’t think they’ll throw the flavor off by much, though.  At any rate, the end result is quite pretty, and is (still) fizzing away happily.

Bochet and Kolsch
The mead and the Kolsch; the mead is the dark one just left of center.

As for tomorrow’s adventures, I’ll be throwing together some more meads–a few folks over on the GotMead forums have some “quick” meads, supposedly ready-to-drink in 3-5 weeks.  We shall see.  I’ll try to document those here, with pics.

Not a braggart…

But a braggot, maybe. I’ve been contemplating this one for quite some time, and am still not certain exactly what I’m going to do. I’ve got the honey–a full gallon of killer-bee honey, rich and tasty. To this, I’ll add a basic beer-like concoction, and ferment. But what sort of concoction?

The grain bill is the obvious place to start. Malt will add a both color and a depth of flavor to the brew. But what to add? The BJCP guidelines seem to suggest that the braggot should be built off of a base beer style, but Ken Schramm indicates that it doesn’t necessarily have to be so. I think that my course of action will be to do a basic, mostly light malt brew. I’ll add some slightly darker grains, Special-B and/or a bit of Crystal 60L, just enough to add a reddish tint.

The hops are next on the hit parade. All of my sources call them “optional” in a braggot. I think a light hopping with something in a floral/noble bittering hop, just to cut some of the intense sweetness, is in order. Certainly nothing IPA-like; I’m thinking more the hopping levels of a mild ale, possibly even slightly less. I don’t know necessarily what type of hops; perhaps a nice Hallertau?

Finally, there’s the yeast to consider. Schramm’s samples use Lalvin D-47, which supposedly flocs well and works to 12-14%. I think a better choice would be to start with a clean, alcohol-tolerant beer yeast, then perhaps finish up with something else in the wine variety, to “clean up” some of the residual sugar. A healthy lager yeast, combined with a cold ferment, could do marvelous things. (2018 edit: or one of my new favorites, WYeast 1968) But then, perhaps going straight for a wine yeast to start would be good. I’ll have to play on Promash and look at starting gravity, attenuation, and alcohol percentages, then decide.

Lastly, while it’s likely a while off, I’ll need to consider containers. This won’t be one to keg–it’ll be far too strong for that. Small bottles will be in order. Perhaps after a light filtration and force-carbonation. The bottles I’ve got on order from Shiloh Pottery will be lovely for presentation, too. I think I’ll enjoy this process.

Tasting Notes, 10/1/08

Tonight, we did a tasting of three of my brews: a Northern English Brown, a Russian White Mead, and an Unoaked Merlot. Tasters were: my Lady Wife and myself.
Northern English Brown Ale tasting
First up: the Brown Ale. This poured from the tap with a moderate white head. (The first pint of the night had a perfect, 3/4-inch head.) The head dissipated within a few minutes, leaving a nice lace, and a ring of foam that chased the top of the beer down the glass. The aroma is of malt and fruity esters, perhaps a bit heavy on the fruit if anything. Visually, the beer is crystal-clear and a light amber-brown in color. The flavor mimics the aroma, with a nice malt forwardness balanced by the hop bitterness and some esters. It’s a touch over-carbonated right now, so tastes a little thinner than it ought; the CO2 also adds a bite from the carbonic acid that really shouldn’t be there. (Oh, the problems of not having independent regulators for the kegs…) It finishes rich, but a little dry. In all, a pleasant brew.

Second: the Russian White Mead. This is the third tasting of this mead; it’s been in the bottle for nearly a year, now. It is scheduled for two more tastings, unless the next one shows vast improvement. This mead is hopped, which changes its aging characteristics drastically, compared to my ‘usual’ brews. It pours smoothly, with perhaps a bit of carbonation; the second glass had some bubbles in the glass, which may have been the result of agitation from the first pour. These dissipated quickly, and were not a factor in the taste. The color is a light gold, comparable to a lightish Chardonnay. Aroma and taste-wise, it is smooth, and not unlike a decent white; there’s a backbone to it which is reminiscent of oak tannins, but not quite the same. Some oak would, in fact, probably benefit this mead immensely. It is definitely a dry mead, but not obtrusively so–it doesn’t suck the water from your mouth like some white wines do. Well-balanced. I would call this good for the white wine drinker who’s looking for something a little off the beaten path. Tasty, but my Lady Wife is put off by the ‘grassiness’ of the hops (which, to be fair, she tastes in nearly anything with hops in it).

Finally for tonight’s tasting, the Merlot. Pours a deep garnet red. No carbonation, which is as it should be. The aroma is fruity and rich, promising a luscious richness. There is a backbone of oak and, yes, mineral, present, but it doesn’t overshadow the sweetness, merely supports it. The flavor is all dark fruit and rich grape, again with the tannin support. It starts sweet and floral, and ends richly; the ‘middle’ leaves a little to be desired. There’s a certain undefinable quality about it that says that it needs something. I had been aiming for the Georgian wines when I started this; it has the sweetness and mouthfeel, but lacks the spiciness and crispness of the Georgian reds. I believe a blend would do wonderfully to remedy this–perhaps 70%/30% Merlot/Gewurztraminer. I believe this one is ready to serve, and will age beautifully over the coming months (years?).

For the curious, the Brown Ale was batch #60 in Misha’s Little Black Book:

Northern English Brown Ale

5 lbs Maris Otter pale malt
4.75 lbs Pale 2-row malt
.75 lb Special Roast malt
.5 lb Victory malt
.5 lb Crystal 40L
.25 lb Pale Chocolate Malt
1.2 oz Kent Goldings pellet hops (5%AA, 60 minutes)
1 Whirlfloc tablet (15 minutes)
.5 oz Kent Goldings pellet hops (5%AA, 5 minutes)
2 packets Nottingham Ale dry yeast

Mash at 152 degrees F for 1 hour. Sparge to 7.5 gallons. Boil 1 hour, hopping as scheduled. OG: 1.053.