This Brew Day, I had some visitors. Two folks, one of whom wanted to learn a bit of brewing, and the other of whom hadn’t brewed regularly in I don’t know how long. And another friend came over to make a “show” mead–my well water is much tastier than his municipal supply.
I had hoped for a few more people, but the “main attraction” of the weekend was landfall of Hurricane Florence. Many folks were busy doing other things to prepare–or simply doing other things.
What to Brew
Having anticipated the new(-ish) brewers, I thought it would be worthwhile to do a few basic extract beers. I wanted something that would ferment out and be drinkable quickly, as we’re planning on a neighborhood get-together in early October. Also, something relatively sessionable, because that’s the direction my interests have been leaning of late.
After digging about the web a bit, I settled on a pair of kits from MoreBeer: the Best Bitter, and the English Pale Ale.
The two kits arrived quite quickly after ordering–MoreBeer is quite good about that–and I opened them up enough to pull the hops for each batch and put them in the freezer until brew day. Their kits don’t intrinsically come with yeast, so I had to stop by my local homebrew shop to pick some up, which I did a few days prior to brewing. They also don’t come with grain bags for steeping any specialty grains; those, fortunately, are cheap.
Best Bitter
The Best Bitter kit shoots for a light-colored (6-7 SRM), lightly bittered ale (about 27.4 IBUs). The alcohol content, with a starting gravity of 1.048, should come out right around 4%, maybe up to 4.5%. I chose White Labs’ Burton Ale (WLP023), figuring that it was sourced to a similar style to what I was making (Burton Ale hails from Henley-on-Thames, and comes from Brakspear Bitter). One packet, for a low-gravity beer, was plenty.
The kit came with pre-measured hop additions (two 1-oz doses of Kent Goldings, and a 1.5-oz hit of Northern Brewer), a whirlfloc tab, a double-walled, sealed, mylar pouch with six pounds of liquid malt extract, a pound of dry malt extract, and 8 ounces of crushed specialty malt to steep.
The extract was quite fresh; MoreBeer does a pretty brisk business, so I figured it would be. In the back of my mind, I had anticipated seeing cans–it’s been about that long since I did an extract batch. I can’t say for certain that this helped keep the extract fresh, but it seemed that way. Regardless, the pouches make it easier to get the syrup into the kettle.
English Pale
Even though English Pale Ale isn’t a recognized BJCP style any longer, I recall it fondly from my early brewing days. The kit is superficially similar to the Bitter, with the pouch of extract, specialty grains, hops, and whirlfloc. It is designed to come out a bit darker (about 14 SRM), if anything more lightly bittered at 24 IBUs, and about the same alcohol (starting gravity 1.049, and shooting for about 4-4.5% ABV). For this batch, I chose White Labs’ London Ale (WLP013), which is supposedly sourced from Worthington White Shield, an English IPA.
If anything, on looking at the recipes, I’d have swapped them style-for-style; to my eye, the Pale Ale looks more like a Bitter, and vice-versa. But then, really, it’s sort of the “what’s in a name?” effect: the name is more cosmetic than anything, and if they want to call it a Pale Ale, that’s on them.
Either way, both brews went very smoothly, smelled delicious, and were fermenting happily away the next morning. I’ll try to remember to provide tasting notes, after they’re kegged and tapped.
A Little Light Reading – Book Reviews
To pass the time on my daily work commute, I listen to a number of podcasts. Lately, I’ve been bingeing on the Experimental Homebrewing podcast, with Denny Conn and Drew Beecham. It’s a fun show, with interviews, discussion, style breakdowns, tips, and tricks, and pretty much everything you could ask for.
Inspired by the show, I went and picked up two of their books: Experimental Homebrewing, and Homebrew All-Stars. I haven’t dug much into the former, but I did read All-Stars straight through.
The main conceit of Homebrew All-Stars is that broadly, homebrewers can be classified as one of several types: Old-School Masters, Scientists and Process Nerds, Wild Ones, or Recipe and Ingredient Innovators. Denny and Drew readily admit that these aren’t 100% perfect fits all the time, and everybody has a little of all of these in them (indeed, they talk subtypes and crosses between types). But generally, I think they are on to something.
They interview several prominent homebrewers within each type, and get advice, tips, and a few recipes for each one. While I can’t say that everything was surprising and new, there were more than a few things I hadn’t seen before, and could take away for my own brewing processes.
One thing I’m grateful for is the blessedly short version of the apparently mandatory, near-ubiquitous “how to brew beer” chapter. (I do wish that editors of brewing books wouldn’t insist on one of these in every single book. By the time most brewers are getting into either of these books, they’ve probably got at least a handful of batches under their belt, and don’t really need the primer.)
In all, I would rate “All-Stars” at a 4.5 stars out of five. It did kind of seem a little like they were simply re-hashing interviews from the podcast, but there was enough new stuff to overcome that. (And, having book-in-hand is easier for referencing than trying to find the right podcast episode, and listen/transcribe the relevant portion.) I’m hesitant to give a rating to “Experimental” yet, as I haven’t read much of it–but what I’ve gone through seems at least as solid, if not a bit more so. For you intermediate to advanced brewers out there, I highly recommend them! (For any beginners reading this, they’re not bad, but they’re talking some more advanced stuff, particularly in “All-Stars”.)
What say you, readers? Have you found any good kits, lately? Or read a good book? Please let us know in the comments! Thanks!
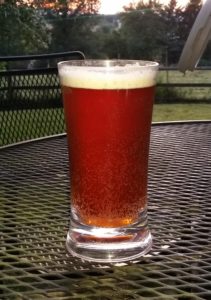
 The color is a deep amber, and it throws a fine, off-white head. I’ve got the carbonation set pretty low; I was aiming for about 1.5 volumes of CO2. The bubbles you can see in the photo are due to a less-than-perfectly-clean glass; it’s certainly not aggressively fizzy.