Final Brew Day of 2019: Kolsch, and Contemplation

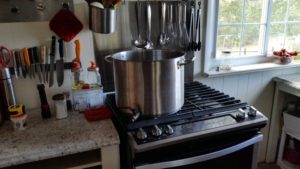
Today was the final Brew Day for 2019; I took another stab a a Kolsch, and got a friend started in brewing. I also worked a bit on setting goals for next year.

Kolsch

The brew from today was another stab at the Kolsch kit from Morebeer (available here). I was amused to see that my December Brew Day in 2018 was from the same kit–this was not intentional.

Looking back at my records, last year’s version came out much stronger than intended–basically, I boiled it down to a 4-gallon batch or so, which concentrated things down a bit far. I also felt that it was a little “flabby”–not as dry as it should have been, and it lacked the minerally “pop” that many beers of the style exhibit.

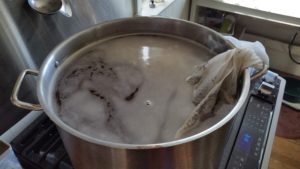
To combat those flaws this time around, I started by being much more careful with the water measurements, resulting in nailing all of my pre- and post-boil volumes. My Original Gravity was 1.052 for a hair over 5.5 gallons of wort–pretty good, when the software predicted 1.054 at 5 gallons. (Compare 1.063 last year, for 4 gallons.)

I also gave the water a little treatment, adding some gypsum, calcium chloride, and citric acid to the mash (2 tsp, 1/2 tsp, and 1 tsp, respectively). The gypsum, chemically Calcium Sulfate, bumps the hardness way up, and makes the hops “pop” a bit. Calcium Chloride does a similar thing, also helping decrease (acidify) the mash. The citric acid also acidifies things; I would have preferred to use lactic acid, which is naturally produced in the malt, but I’m out, at the moment, and didn’t want to make a store run. All of this water chemistry should give the missing “mineral” taste to the Kolsch.

(Also, to clarify, this is a “Kolsch-style German Ale.” “Kolsch” proper is a territorial designation, and only 20 or so breweries from immediately in and around Koln, Germany, can use it properly.)

Anyway, as mentioned, I hit all the numbers, or near enough for Government work. Things looked and smelled lovely, right where they should have been. Once the wort has cooled enough, I’ll pitch the yeast, and about the time I’m kegging the lager from last month, this will go into secondary–and in two months, give or take, it’ll be delightful.

A Friend Indeed

One of my typical brew buddies will be moving away–like, to a different continent away–in five or six months. He’s watched me brew several dozen batches, and finally decided to take the plunge and do one himself. So he hit the Local Homebrew Store on his way home, and has been pelting me with questions via text message.

I’ve been having a good time fleshing out the little details that he hasn’t caught, or hasn’t been around to see (he normally heads home before wort chilling and yeast pitching, to say nothing of racking, secondaries, or kegging). But it has put me in mind of working a better way to teach folks how to brew–hands-on is much better than just watching. Especially with something like brewing, where some of the more critical points happen much later in the process. Things like racking, and secondaries, and kegging…

Goals for Next Year

I’ve got a couple of goals set for next year, both for brewing and for the homestead generally.

I’d like to switch from brewing with propane over to an electric setup. At such time as I can tear down and rebuild the garage, I want a nice, all-stainless, 3-vessel electric HERMS system. But in the meantime, I’m eyeing the Robobrew Brewzilla 65l. It’s a single-vessel system, which isn’t my absolute favorite, but I’m sure I can make it work. In addition to being electric, it’s one of the least expensive 10-gallon capable systems available. (It is, in fact, one of the only 10-gallon systems out there.) While I’ll still be able to do 5-gallon batches, being able to crank up to a 10-gallon batch means I’ll be able to do side-by-side yeast experiments. I’ll also be able to crank out big batches to simplify stocking up for Pennsic. And in a 10-gallon system, I’ll be able to do the really really big beers in 5-gallon batches, which’ll be nice.

Speaking of the big beers, one of the ones I’d like to do would be a Samichlaus clone. I’d wait until December–the traditional time for Samichlaus–so that I’d have enough batches under my belt on the new system to be confident with something that big. (The grain bill for a 5-gallon batch runs to 29 pounds, which is more than my current system can handle by a bit.) Samichlaus runs to 14% abv, and generally is lagered for almost a year before being served–so it would be very much a seasonal thing.

I’d also like to set up a tasting, oriented at folks who don’t know beer that well, and would like to learn more. I got the idea from a post on the HomeBrewTalk forum, and I think arranging it more or less exactly as described there would be fine. I find that teaching this sort of thing to others helps me learn, as well, and can often recharge my interest in the subject.

There are, as I mentioned, household/homestead goals, as well, but they’ll wait for the next post. Until then, cheers!

Passing Times With Good Company

And apologies to Henry the Eighth. (For the uninitiated, the title of this post refers to a drinking song written by the Corpulent King in his younger days, and wildly popular at many a RennFest.)

The Mead Hall

This weekend, I had the great joy of attending an overnight SCA event. This particular event, the Red Mountain Mead Hall hosted by the Shire of Isenfir, started as a mostly brewing-focused event. It has added a fair bit of dance and other artistic happenings, as well as becoming known for its delicious (and sizable!) feasts.

For me, the event was a chance to spend quality time with fellow brewers I don’t get to see often–the event is located near the geographic center of the Kingdom, so attracts people from all over. I also took it upon myself to clear a little clutter from my cellar.

A Miscellany of Bottles

Every brewer, with time, tends to collect a group of bottles of various batches. Makers of meads and wines are particularly bad in this regard. These bottles will usually, for one of a variety of reasons, be un-labeled. (Many of my batches simply don’t get labels; other times, they fall off, or fade.) I brought about twenty bottles, planning on opening them all and doing a “tasting and critique” party.

I generally leave my ego at the door when my brews are being tasted, the more so when I’m not sure what’s going to come out of the bottle. Things ranged from a growler (one of a set of four) that has been sitting full and undisturbed for going on four years, through a variety of unlabeled things of various colors, to the single remaining bottle of a batch of Acerglyn (Maple Mead) that I put together something over a decade ago.

Often Surprising Results

The beverages that emerged from the bottles were almost entirely unexpected. Several were given a resounding “meh.” Some were really good. And only one, really, was bad as such.

The best (and first) surprise was the growler. I had completely forgotten what I had bottled up; the rubber gasket was completely dried out and cracked, and I was certain that the contents would be thoroughly oxidized, if not vinegar. Instead, what poured out was an extremely delightful apple cider. Huge apple on the nose, lovely flavor, and not bone-sucking dry on the finish. The only real complaint was a brief period of “dead space” towards the middle, where the cider was trying to decide what to do next. Clarity was magnificent. All in all, quite lovely, and I’m glad I’ve still got three growlers of it.

The worst surprise, on the other hand, was the “bad” one. The liquid was a clear golden yellow. Decent legs. No sediment. But the aroma was… off, somehow. And the taste–wow.  After pondering just what I had bottled, and what exactly happened to it, it struck me: this was a batch I had made for an acquaintance on something of a dare. Tomato wine. Once I had placed it, the flavor was quite clear (and lingering). From a purely technical standpoint, there was absolutely nothing wrong with it. It just… well, it sucked.

Other samples included a bottle of chocolate mead (not ready yet–I’m led to believe that they can take years for the bitterness to mature out), a pair of bottles of Perry (which I brought because I know that’s a good batch), and a red wine that didn’t quite reach its full potential (not bad, but also not great). There were others, but they’re not really all that memorable.

The Exciting Part of the Evening, Sort Of

Having done a fair bit of drinking, obviously no one was in a hurry to drive on home. (Particularly me, as it’s about a 3 hour trip from home.) So we took advantage of the on-site cabins, and racked out for the night.

But it must be mentioned that the cabins are unheated, and while they’re not “open-air,” there are sizable gaps in the walls. And the low for the night was 26 degrees F (that’s negative 3 degrees Centigrade, if you’re doing the math). Indeed, the whole day was quite chilly outside. Fortunately, the Great Hall itself has a large fireplace that was kept roaring all day.

Events like that are when having a Russian persona shows its worth. I was layered up quite nicely (wool socks under the leg wraps; two pair of pants; three shirts–two linen, one wool; a nalbound hood and mantle, and a nalbound hat). Indeed, I had to step out of the hall on several occasions to cool off.

And for sleeping, I had a cold-weather sleeping bag, with a separate fleece liner. Those were atop a wool blanket on doubled mattresses on the bunk, with a small (fake) fur under my head, using my “mundane” clothes rolled up nicely as a pillow. I had another blanket over the top of me, was wearing a T-shirt, long underwear, and socks, and had my hat on my head.

Once again, I found myself almost too warm, and was letting my arms alternate “chilling” in the open air to moderate my temperature. But in the end, I survived, and was relatively comfortable–certainly more so than several of the others attending the event.

Upcoming Brew Day

My next Brew Day will involve a little less mead, and a bit more beer. My friend Cormacc wants to recreate a popular Viking’s Blod mead he’s done in the past; I plan of making an Amber Lager, since the cellar has reached the right temperature range. I’ve also got the makings for a Kolsch-style beer, but that may wait for December (or, possibly, for Spring).

I’ve also got a gaggle of small mead batches that I can tend; assuming I can clear out another fermenter, I may even start a batch of Acerglyn. (Or possibly Berry Melomel. Or something along those lines.) And I’ve a batch of Dark Mild Ale that I have to decide whether to bottle or keg. And then there’s plating up the “wild”/feral yeast I collected from my honey.

But those are topics for next time…

On Making an Estate Mead

One of my goals for a number of years has been the creation of an “Estate Beer”: a batch where all ingredients were grown/gathered from my property. While the way forward is clear, time constraints are significant; so I’ve decided to set that aside for the moment, and focus instead on creating an Estate Mead.

Bees and Honey

My beehives this year have done quite well. I was, frankly, just pleased that my two from last year survived the winter. But not only did they survive, they subsequently swarmed a number of times. I was able to catch most of them, and the apiary has gone from the original two hives to its current six.

Not only that, but they’ve produced an actual honey harvest for the first time. The original two hives got honey supers placed on them; they had to draw all of the comb, which cut back on production a bit, but they still did admirably. The stronger of the two hives gave me a remarkable 57 pounds (or maybe a little more), while the weaker produced over 21 pounds. The full harvest was about 80 pounds.

I’m told that about forty pounds per hive is a typical low average in this area.

Honey and Yeast

Yeast of various sorts is everywhere. Its spores float through the air, and are present on fruits, trees, and other surfaces. In fact, the first wines were undoubtedly fermented by the yeast colonies present on the skins of the grapes. (If you’ve ever seen grapes “in the wild,” there’s a whitish film on the ripe fruits–that is yeast.)

As the bees go about their day gathering nectar and pollen, they necessarily bump into various colonies of yeasts; some of the yeast cells are brought back to the hive, “piggybacking” with the nectar, as it were. And as the bees transform the nectar into honey, the yeast cells remain.

Now, honey is anti-bacterial, and is notoriously “immune” from spoilage. This is a factor purely of the sugar content of the honey. (When making beer, we typically measure the specific gravity–the density–of the wort, and we’re looking for numbers that indicate the liquid is in the vicinity of 6-10% sugar. Honey, on the other hand, isn’t “ripe” until it’s got less than 18% water–almost the exact opposite of the beer.) The osmotic pressure on the various microbes is simply too great; they shut down–either dying completely, or forming dormant spores.

Waking Up the Yeast

Well, if there’s dormant yeast in the honey (and there almost always is), how do we go about waking it? The reason most of it went dormant, recall, is the osmotic pressure–the sheer amount of sugar in solution was too much for it. So, we have to dilute the solution–add water back to it. This will allow the yeast to become active, thrive, and multiply.

I took a couple of ounces of honey, put them in a jar with about four times as much water, and shook it up to mix it. Then I set the jar in a warm place in my kitchen, with a lid on it (to keep out dust and unwanted contamination) loosely (to prevent messy bottle explosions).

Ideally, after a week or so, the various microbes will have come to life, and there will be a number of things growing visibly in the jar. I’m sure there will be various molds on the surface of the liquid–they’re aerobic, and need oxygen-rich environments. But I’m also reasonably confident that a fine layer of yeast sediment will have dropped to the bottom of the jar.

Yeast Wrangling

The yeast will be part of a very mixed culture, with multiple yeast strains, along with lots of bacteria and such. So I’ll have to somehow sort them out.

This is done by plating and isolating the yeast. Essentially, I’ll push the mold surface off to the side (or remove it completely), then take a sterile metal inoculating loop and get a sample of the sediment on the bottom. With the loop, I’ll spread this out in one quarter of a petri dish covered with a growth medium (malt agar). Then I’ll sterilize the loop, and “streak” it through the sample into a clean section of the dish. After repeating this three or four times, the final quadrant will have a number of single microbial cells spread out.

I’ll then put the lid back on the dish, and leave it somewhere undisturbed for a couple of days. During this time, the various single cells will grow up into small colonies of whatever they happen to be. With luck, there will be multiple yeasts–they form round, creamy-colored colonies.

I’ll then take the inoculating loop again, sterilize it, and take samples from several of these colonies, repeating the plating process individually for each of them. After another few days, I should have pure colonies grown from single cells, which I can grow up into starters and use for beer, wine, and mead.

Ifs, Ands, and Buts

There are, of course, caveats to the whole process. First, it’s not at all certain that my initial sample of honey has the right kinds of yeast: there are well north of 100 genera of yeast, covering nearly a thousand species. Not all of them do the things we want (eat sugars, emit alcohol and CO2). Or, they’ll do it, and smell putrid in the process. Or they’ll work well, but be unable to flocculate (drop out of solution). Or any of a number of other things.

I anticipate having to make multiple yeast samples, before finding something I can use. Most of the yeasts in honey are apparently from the Zygosaccharomyces or Schizosaccharomyces  genera; while I can technically use them, they may not be as pleasant as I’d like. Ideally, I’d find one strain or other of “plain” Saccharomyces. There’s a fair chance that it would be a “feral” culture, stemming from one or another batch of my brewing. I’d count that as a win, though–it was still in the honey from my beehives, survived that process, and fought its way through the growing and plating and isolating steps.

How to tell whether I can use the yeast? Well, for the most part, it’s a case of smelling the yeast colonies that have grown on the plates. If they smell good (I’ve heard “honey and mango” descriptors, which would be neat), or at least neutral, they’re candidates.  If they don’t smell good (descriptors include: feet, barnyard, leather, vomit, poo, etc.), then the plate gets dumped and sterilized, and I move on.

Candidates will be grown up in small batches of something–likely mead, since that’s what I’m trying to select for; simple wort is another choice. I’ll have to boil the liquid, to eliminate as much competition as possible. (This favors the use of beer wort, since it’s almost by definition been boiled.) I’ll grow up the cultures in 100mL beakers, then transfer them to 500mL, then 1000mL, and finally to a 3000mL flask on a stir plate. Once things have progressed through that step, I’ll be able to “bank” some of the strain (a separate process, with a separate post), and use the remainder to start a batch of mead.

Of course, again, at any point in the process, things could go awry with a given batch, and I’ll have to dump it. that’s just the nature of things; I’ll have to deal with it when I get there.

In the meantime, as I go from step to step, I’ll document the process here. Please stick with it!

(Valuable details, instructions and ideas for this process have been acquired from the Denard Brewing website and the forums at Homebrewtalk.com. Please visit them all, and show them some love!)

The Consequences of Inattention

We should file this under “from every life, a little brew must be dumped.”

I’ve got a cellar. I store things down there. Completed/bottled brews; conditioning kegs; empties of all sorts. Also things undergoing long fermentations, or bulk-aging.

It’s those latter that are… well, persnickety. They tend to have airlocks. The thing about airlocks is that they require maintenance. Periodic top-offs of water, to keep the bad things from getting in.

If you neglect that over a period–like, say, since about this time last year, maybe longer–you’ll find that your brews have, at best, oxidized. At worst, they’re developing pellicles. Nice if you’re souring a beer, but not so much if you’re not. (And when you’re developing a pellicle, it needs to be the right kind–not fuzzy, but spongy. More like mother-of-vinegar.) Regardless, they’ve become bad brews.

So, this weekend just past, while working on the underside of the kitchen (putting in insulation; this required passing repeatedly through the cellar), I took it upon myself to deal with several of the carboys. So far, I’ve dumped and cleaned four 5-gallon carboys of various liquids. One of them might have been saved, possibly–but really, at that point, the simplest route was just to dump it.

Remaining is one 5-gallon carboy, and four 2.5-gallon carboys. All full. All at various points of bad. I’ll work on the rest of them over the next few days, and I fully intend to develop a monitoring schedule, to keep on top of things, so this doesn’t happen again.

Other Not Bad Brews

Meantime, the beehives have done their thing, and reproduced like crazy this season. I went from two hives in the fall, to six hives right now. Of the four new ones, three are in regular Langstroth hives, and one is in a top-bar. The two “old” hives have produced some honey, and I’ll be harvesting (“collecting the rent”) this weekend–probably extracting the honey next week.

My theoretical maximum harvest this year is about 120 pounds. (I’ve got three medium honey boxes on the hives; they can store a maximum of about 40 pounds each.) I don’t think I’ll get nearly that much; 35-40 pounds is much more likely. It might reach to 50, depending on a number of factors (they’ve been bringing in stores from somewhere, I just don’t know how much), which would tickle me to no end. We’ll see just how it goes.

There have also been several other brews initiated, in the last few months. I’ve done a Blackberry Stout that I think will be quite nice. I started an IPA using the Voss Kveik strain; when it went into the keg, it was delicious. Waiting impatiently to see how it is, once it’s carbonated. And a variety of meads are in process, not least of which is an experimental braggot I did, using the lees from the kveik, the leftover beer from the IPA, and 3 pounds of honey.

I’m also looking at converting 2 gallons of one of the more “normal” meads into something that I can give to the King & Queen of Atlantia, either for personal use, or to gift others as largesse. It seems that adding a handful of Thai Butterfly Pea flowers will give a burst of color to the brew–said color depending on the pH of the liquid. Most meads run about 3.5 or so, which imparts a reddish-purple color. Adding a little potassium carbonate will bump the pH up to about 4.0, which should turn the mead to a delightful blue, without harming the flavor overly much. And blue is, after all, one of the Kingdom’s colors…

The Family Tree of Fermented Drinks

Most people aren’t familiar with the family tree of the various adult beverages we drink. They don’t always group together quite the way you’d think, and I think it’s worth a quick look.

The Three Main Families

By and large, fermented drinks break down into three basic families: Beers, Wines, and Meads. The separating factor is the source of the sugars for the yeast to ferment. It looks something like this:

Fermented Drink Family Tree, "Primary Colors"
“Primary Colors” of fermented drinks

Basically, if the sugars are broken out from starches–generally from grains–you’re looking at a beer.

If the sugars are from fruits, it’s wine.

If they’re from honey, it’s mead.

Bad Naming Practices

These classifications can lead to some confusion, mostly rooted in what I’ll call “alternative modern naming.”  Mead, for instance, is often called “honey wine.” While that gets the point across to someone who is unfamiliar, it’s less than completely accurate. Mead is mead; no more, no less.

Similarly, sake is commonly called “rice wine.” The base of sake is rice, which is to say, starch. This is broken down by aspergillium fungi into sugars; the sugars are then fermented by saccharomyces species. Being starch-based, it’s therefore not a wine, but a beer.

Then there are the issues of things that have developed their own names: cider, particularly, and its lesser-known cousin perry. Most people would separate them out as their own individual things–but they’re from pressed fruit, and thus wines. Yes, they’re particular types of wine–but they’re still wine.

Hybrids

As with the color wheel we all remember from grade-school art class, it is possible to take these “primary colors” of drinks and blend them into new “colors.” For example, if you make meads that include fruit sugars, you have what are known as “melomels.” And within the melomels, there are particular names depending on the fruit. Apples get you cyser; grapes get you pyment. Pears are perry, which is also the name for pear cider, which is confusing. There are dozens of others.

Conversely, a cross between beer and mead is called “braggot.” These are typically big, malty, strong drinks. They’re usually hopped, but it’s not absolutely necessary for the style. Brewer’s choice as to what the “base” beer style is, as well–although matching them with different honeys is a bit of an art form.

Crossing beer with fruit gets a fruit beer. There’s not really a better name for them, unfortunately… With the fruit beers, the mix tends to skew heavy on the “beer” side. I can’t recall ever seeing a “wine with malt added;” I should think that getting that right would be tricky. (Note to self: do some small-batch experimentation with this…)

Then there’s what you get when you mix all three “primary types,” the mysterious middle of the triangle. Colors tend to get muddy here, and if you just toss drinks together willy-nilly, they will too. But there are commercial beverages that go this direction. Midas Touch is one, as is Chateau Jiahu, both by Dogfish Head. Historically, we think that the Beor of the sagas and legends was likely also a three-way mix.

Extending Past the Ferment

Interestingly, we tend to carry the distinctions between beverages into their distillations, as well. Scotch, Whiskey, and Bourbon are all distilled from grains. Brandy is distilled from fruit. I don’t know of any large-scale mead distillation, but the term for its product would be “honeyshine.” Beyond that, unfortunately, my knowledge of distilled products is limited.

A Hole in the Taxonomy

There’s one area that my taxonomy doesn’t cover. What do you call it if the drink is fermented from plant sugars, other than the fruit? For instance, if maple syrup was your primary sugar source? Or (gods forbid) cane sugar? Molasses? Treacle?

I’m tempted to lump these in with meads, mostly as a placeholder for now. (This due to the relative similarity between honey, syrup, and molasses.) I don’t know of anybody fermenting them on a large scale. Moonshiners, perhaps, in the case of cane sugar. Rum is the distillation of fermented cane sugar and/or molasses (and other sugarcane byproducts); following the “beer-whiskey, wine-brandy, mead-honeyshine” pairing above, either rum is a subset of honeyshine, or the fermented plant juices are their own category. If the latter, they’re mostly separate from the “big three.”

To Beor or not to Beor

In researching more about medieval drinking vessels, I’ve backed into a thorny issue: what, exactly, was beor/bjorr,  as written about in various Scandinavian and Anglo-Saxon sources?

The Background

I’ve been looking at more old drinking vessels, with the intent of trying to reproduce them for my Etsy shop. Again, with some of them, I was struck by their size–specifically, how oddly small many of them are. I have previously mentioned the Jelling Cup, at two inches in height. There are also “Sutton Hoo bottles” (pictured below). They also clock in at two inches or less.

Sutton Hoo bottles
Sutton Hoo bottles; the originals are bottom center.

Even the somewhat larger bottles from Sutton Hoo are “only” five or so inches:Large Sutton Hoo bottle

There was commentary online to the effect that whatever they were drinking from these vessels, it was likely strong. But what, pray tell, was it?

Strong Drink

A minute or two of playing with Google led me to a mention of there being debate in academic circles as to the nature of a particular “Viking drink,” generally described as strong, sweet, and rarer/more valuable than other drinks.

I’ll spare the entirety of the argument (one of the most cogent discussions I’ve found is this paper, by Christine Fell); in short, most sources we have in Old Norse and Anglo-Saxon describe four types of alcoholic drink: win (wine), mjod (mead), ealu (ale), and beor/bjorr.  What is beor? Most modern translations take the easy way out, and gloss it to beer, but that doesn’t seem right.

These writings are, almost without exception, from before the ale/beer distinction came about. (These are texts from before 1200AD; the English didn’t start differentiating until the 1400’s or so.) Pretty much everything at the time would have been what we’d classify as “ale.”

Also, a good case can be made that beor wasn’t grain-based, which again rules out beer.  So, it’s not wine, it’s not mead, it’s not ale, and it’s not beer… What could it be?  A plausible hypothesis is cider–or, at least, something cider-like. Apparently, in Normandy the word “bere” is used for cider. Depending on the provenance of the word, there’s a certain something there.

Beor’s Not Quite Cider

But even going with cider, some hurdles appear. Anglo-Saxon, at least, has a term for cider (aepplewin). And beor appears to have been sweetened (read Fell’s tract, above, for the reasoning). Perhaps a backsweetened cider? Again, plausible…

I certainly don’t claim to have the answers–I’ve only been devoting a little spare time to the topic for the last several days, really. I’m fine with it being a “strong, backsweetened fermented juice drink,” as far as that gets us. A thought did strike me that they could have “jacked” (freeze-distilled) a fruit drink, then sweetened it with honey to make it more palatable. I’m tempted to say we’d have some description somewhere of the process, though, and we don’t.

So where does that leave us?  As with so many things involved in period brewing, with more questions than answers. What are your thoughts on beor, readers? Let’s discuss them in the comments1

November Brew Day, and Holiday Meals

Another brew day has passed, and the Thanksgiving holiday has come and gone. Things have been quietly busy around the homestead, as the weather has finally turned towards winter.

Brew Day

The brew went fairly seamlessly. I decided, at almost the last minute, to ditch my planned brews for the rest of the year, and instead of doing a Helles Lager this month, I brewed an all-grain version of the English Pale.

The change to the recipe from the extract version involved little more than swapping out the malt extract for eight pounds of Maris Otter malt. The net effect was, as I anticipated, to lighten the color slightly, and (I anticipate) to give an extra fullness to the batch when it’s done.

Now, rather than doing a Samichlaus clone in December, I’m considering brewing up a Kolsch-style lager. If pressed, I’d have to say that a well-done Kolsch is my favorite beer style; if I get it done now, along with maybe another batch in January or February, I’ll have a good start on summer drinking.

Thanksgiving

My wife did her usual astounding job whipping up a feast for us this year. I was pleased at the number of things that came from the homestead, this time around. Not only things grown ourselves (every onion that went into something was from our garden), but things that most folks would buy, that we made from scratch.

Among the snacks while waiting for things to finish baking, we had the smoked cheese from a few weeks back. That went over quite well–it’s always fun to introduce a cheese-lover to a smoked version of their favorite cheese.

Another thing that I threw together was a small batch, about a pound, of gravlax–cured salmon. Normally, the salmon is cured in salt and sugar between layers of fresh dill; lacking that, I used powdered dill from the spice cabinet. Otherwise, it went quite well. (I also got to use a new knife that I picked up, just for doing cured meats–a nice sashimi knife, with a single bevel; after a little practice, I should be able to get those nice paper-thin slices of bresaola…)

For the meal itself, I baked a batch of sourdough, which I’ll have to go into in another post. And we finished off the sauerkraut that had been fermenting on the counter, both as a straight dish, and fried with some shredded apple and a little caraway. And my wife added some of the homemade bacon off-cuts to the roasted brussels sprouts, which really bumped them up a notch.

Homestead

Otherwise, things on the homestead are slowing down for the winter. We’ve had our first snowfall, followed by a few temperature swings, and finally some icy rain. The chicken coop has been almost completely buttoned down for the winter, with the doors closed, insulation put in the eaves, and heat lamps warming the roosting bars. Still, with the cold and the clouds, their production is down from over twenty eggs a day to three or four.

The bees have been hunkered down in their hives for a bit over a month. I’m pleased just in the fact that they’re still there (this is something of a record for me). When last I checked, about two weeks ago, they were still slowly working the candy blocks they had. I’ll pick a warm-ish day in a couple of weeks, pop the tops, and give them more, if they need it.

The garden has gone dormant, as it should. I’m hopeful that the asparagus crowns did well enough this year to survive the winter, and start producing in the spring. And the garlic, which didn’t produce anything to speak of over the summer (as expected), sprang back to life as September rolled through, and it appears to be going into the winter with a vengeance–come spring, we should have a decent harvest there, I hope!

Lastly, I placed an order for two more apple trees: a Black Oxford, and a Golden Russet. I’m trying to decide where to place them; the problem is an excess of good places for them. I’m thinking across the field, near the tilled area for grains; I’ve got a few months to consider the problem, though.

Etsy and My Shop

If you carefully read the “about me” page, you’ll have noticed mention of a shop on Etsy. It’s called the Holmgard Trading Company, and I’ve had it up for over three years; I started with some wooden cups and bowls, adding them as I got time to make new ones. I have, lately, been branching out a bit–particularly since the shop is “climate controlled,” and very cold at present–and adding things I could work on while inside, being warm near the stove.

While I’ll keep the Etsy shop up (it’s certainly good for publicity, and it’s pulling its weight in sales), I’m in the process of getting an independent site set up for Holmgard Trading. The plan is for it to have a wider array of goods, plus better pictures, and some stories about the things. Stay tuned for further updates!

Brew Day, October 2018 – Irish Red Ale

My latest brew day was a bit of a departure for me in a number of ways. First, it’s first Irish Red Ale I’ve brewed in over a decade–April 2008 was my last one. Second, I went with a partial-mash kit, done as a brew-in-a-bag (BIAB), which I’ve never done before. Third, due to high winds, I had to brew inside, which I’ve done before, but generally dislike. And lastly, this is my first time using yeast from Omega Labs.

Irish Red Partial-Mash Kit

Keeping with the “start from the basics” progression I’ve been doing the last few brews, I went “intermediate” with this batch, and used a partial-mash kit from MoreBeer. If you’ll recall, the “beginner” process was using extract kits, which took the majority of their maltiness from cans (or, in this case, pouches) of liquid malt extract, getting stylistic accents from a small handful of grains to be steeped.

So-called “partial-mashing” is in between extract brewing and all-grain brewing, in that about half of the fermentables come from extract, while the other half come from grains that have to be “mashed”. The process is simpler than it sounds. In essence, it’s the same thing as steeping the grains in an extract batch, except there are more of them–instead of the 8 ounces or so, I used 5-1/4 pounds of grains. They need to steep for longer, too, and at a slightly more particular temperature: an hour, at about 152 degrees.

Since I moved inside, which complicates using my all-grain equipment (an igloo cooler to hold the steeping grains, mostly), I decided to try the “brew-in-a-bag” method. This is a variation on the partial mashing technique, and with the right setup can be used for all-grain. Like it sounds, I put the crushed grains for this batch in a bag; I then heated up my full volume of liquid in my pot to about 160 degrees, turned off the heat, and added the bag of grains. Then, they steeped.

Another complication with being inside on the stove is that full-volume boils are difficult; compared to my 150,000 BTU burner outside, I’ve got access to something shy of 90,000 BTUs across the three biggest burners of the stove. But I made it work.Irish Red Ale on the Stovetop

Grain Tea

Had this been outside, I would have been more concerned with temperature loss through the kettle. As it was, the temp tried to drop quickly enough that I turned one burner on low, just to maintain things for the hour. Once that finished, I removed the bag, put a cooling rack across the top of the pot, and set the bag of grains on that to drain.Irish Red Ale grains steeping

About twenty minutes later, I added the remaining malt (about 4 pounds of extract, in this case), stirred it up to mix it, and turned the burners up to full again. As before, coming up to temperature (a full boil, in this case) took some time, but we got there.  Well, let’s call it a “vigorous simmer,” at the least. Eight gallons of liquid is a lot of mass to heat.

Once boiling, the brew proceeded as typical, adding hops at various intervals, stirring things now and again, and keeping an eye out to watch for boilovers, which is particularly important when brewing inside. With the smaller burners of the stove and a full-volume boil, it’s not usually an issue–but in this case, an unwatched pot always boils over.

Finishing Things Up

Having completed the hour-long boil, I gave everything a thorough stir, to get any trub (the “gunk” that forms in the liquid, comprised mostly of coagulated proteins) to pile in the center of the pot, then drained the finished wort into a fermenting bucket. I managed to get 5 gallons of wort at a gravity of 1.059, which was a higher efficiency than I was expecting, but that’s fine.Irish Red Ale Wort Collection
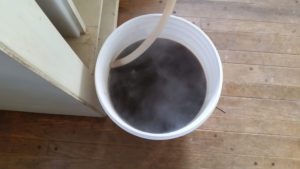
Here again, I was left with a digression from how I like to do things: being indoors, I don’t have access to hoses, which means no wort chillers. So, I did things the old-fashioned way, and put the lid (loosely) on the bucket, set it in the utility room, and left it overnight.

Come the next morning, it had cooled sufficiently, and I was able to pitch the yeast. I’ve not used Omega Yeast Labs in the past; they have liquid yeast in large pouches similar to Wyeast, but without the “smack pack”. Given that the wort wasn’t really high gravity, and it’s “only” 5 gallons, I felt safe enough just using the one packet. If things stall out, or otherwise don’t go well, I’ve got a packet of dry Nottingham yeast to use as a backup.

In all, I’ll probably get about 4.5 gallons of beer, with between 5.75-6% ABV. That’s stronger than I was aiming for, but not by too much. It’s looking like about 47 IBUs, and if my nose is a guide, it’ll be a nicely dry, roasty brew. I think the color of this one is a bit darker than I’d maybe hope for. It’s shaping up to be a deep garnet red, verging towards brown. The grain bill had both black roasted barley and Special B, as well as 120L (dark) crystal malt. Were I building this from scratch, I’d maybe keep the crystal, or more likely use 90L. I’d also use either the black roast or the Special B, but not both. (Most likely, I’d go with the Special B; it gives a nice red color, and has just enough of the roasty coffee-like bitterness, without being overwhelming.) In all, I think it’ll be lovely when it’s done.

For those keeping track, the Irish Red Ale is Batch #171 in my Little Black Book of Brews.

Previous Brews

I keep sipping on the Best Bitter and the English Pale from last month. They’ve been steadily improving, both due to the simple time factor, and from getting a little bit of chill on. Three weeks was a little young to be serving them. Now that they’re going on six weeks, they’re really hitting their stride. And since the kegs have been living on my back patio, and it’s been getting into the 30’s at night, they’ve cold-crashed down to a much better clarity.

That said, I still much prefer the English Pale. The Best Bitter, while better than it was, is still a little too estery for my taste. The English Pale, on the other hand, has developed into something very reminiscent of some of the draughts I had while in England and Scotland. In fact, it puts me in mind of a Fuller’s I once had on cask, and is quite yummy and quaffable.

That’s about it for this time around. I hope to get to more charcuterie in the near future. I also have to wrap up my thoughts on what’s happened with the bees this year, but I’d like to address them soon. As always, if you have any questions, commentary, or suggestions, I’d love to hear them in the comments!

Best Bitter Tasting

As promised last week, this time around I’m tasting the Best Bitter I brewed up on the last Brew Day.

Best BitterI’m not as happy with the Bitter as I was with the Pale Ale. A fair amount of it can be chalked up to the yeast, I think (Burton Ale Yeast, WLP-023). It’s just not settling out like it should, leaving the beer hazy. Also, it doesn’t seem to ferment out nearly as dry as the London Ale Yeast (WLP-013); at least, not in this iteration.

Between the yeast still in suspension, and the relative warmth of the fermentation putting out lots of esters, I’m getting a bunch of fruit in this one, mostly in the nose–almost like peaches, if you can believe that. Despite being more aggressively hopped than the Pale (3.5 ounces, versus 2 in the Pale), I’m not getting that as much; it’s not coming across with as much bitterness. Some of that is probably due to the roasted grains in the Pale, which were absent from the Bitter, but I’d expect some of the “greener” bittering from the hops.

It throws a lovely, thick white head, which quickly falls to an eighth of an inch that sticks with the beer for the rest of the glass. It’s not highly carbonated, by design; I wanted it to resemble something from a cask, so I was aiming for about 1.5 volumes. Despite that, it’s pressurizing itself in the keg to about 8 PSI, which is making for an aggressive head when I pour it.

In all, it’s a solid beer, just not exactly to my taste. If I do it again, it’ll have to be in steps, to see how various “improvements” change it. First, I’d have to do it with the WLP-013, then maybe try an all-grain version of it. Fermenting it cooler than I did (about 70 degrees) would probably help with the esters, but I’d probably have to shake it up a bit during fermentation, to rouse the yeast. I’ll admit to also being curious about the Extra Special Bitter, which is a slightly different recipe than this one. It might be worth trying it out on a future Brew Day.

My next Brew Day, on the 21st of October, will feature a mini-mash Irish Red Ale, again from a MoreBeer kit. Being a more “complex” brewing style, I’ll only be doing the one beer; it’ll probably take me a fair part of the afternoon. I plan on using the WLP-013 again, because I think it will really play nicely with the style: rich, lightly roasty, and nicely dry on the palate.

In non-brewing news, with the turn of the seasons, it’s time to get into curing meats again. I’ve already got about 9.5 pounds of pork belly curing in the fridge, a week or two from being delicious homemade bacon. Also, I’ve been eyeing the recipe for bresaola, and I think that once things cool off a little more, I’ll be able to pull that one off in the cellar. I’ll go more in-depth into procedure and recipes and such in a future post.

What sort of autumn deliciousness have you been up to, readers? Let us know in the comments!

English Pale Ale Tasting

My English Pale Ale from the last brew day has been kegged up, carbed, and made its debut at a party we held last night, not quite two weeks after brewing. I’ve got the Special Bitter in a keg, as well, but we didn’t quite get to that one, so I can’t speak to it just yet.

In all, I’m really quite pleased with the Pale. It’s got the characteristic toasty, biscuity notes that I associate with brews from the British isles. There’s an assertive bitterness to it, but it’s neither over-the-top (as an IPA would be, even an English one), nor does it really come through in either aroma or flavor.

English Pale Ale
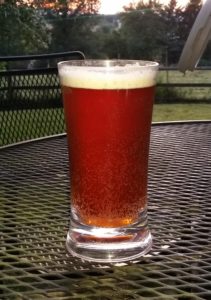
The color is a deep amber, and it throws a fine, off-white head. I’ve got the carbonation set pretty low; I was aiming for about 1.5 volumes of CO2. The bubbles you can see in the photo are due to a less-than-perfectly-clean glass; it’s certainly not aggressively fizzy.

There’s still a bit of a haze to it, but I’m sure that will drop out, if the keg survives long enough. The beer came in at about 4% ABV, which is about what I was hoping for. I adjusted my water a little, adding some gypsum (calcium sulfate), which helped give it a drier finish than it might otherwise have. It definitely leaves you wanting another!

I’ll have to see about doing this one up as an all-grain recipe, so that I can fully implement the single tweak I might make. As mentioned when I brewed it, I’m surprised by the (relative) darkness of the beer, and would like to back it up a few points to a lighter amber. I mean, it’s not a stout or porter, by any means, but it’s a good deal darker than I think of when I think “pale ale”.

I will be curious to compare this with the bitter. Not only was it lighter in color, it had a bigger hop profile. Not IPA big, but more than the pale. I’m also curious to see what differences I get from the yeast. The Pale used the London Ale strain, while the Bitter used the Burton strain (WLP-013 and WLP-023, respectively). It might be a worthwhile experiment to re-brew these beers, but swap the yeast strains out, just to see how they do.

The WLP-013 is, at least until I try the bitter, my new favorite English Ale strain. It definitely eclipses the WLP-002 strain, in my experience. The 013 seems a good deal cleaner, and really accentuates the malt, where the 002 has always given me a really fruity, ester-y beer.

For my next post, I’ll be going over the Special Bitter, and doing a closer comparison of the two beers. Also, since it’s fall, I’m beginning to think cider!

What have you been drinking lately?  Let us know in the comments section!