
I really love making things. Among my favorite things to make are the tools used to make other things. There’s just something satisfying about being able to take something you’ve produced and put it to use, making another thing. This weekend, it was time for a batch of bone nalbinding needles.
Nalbinding?
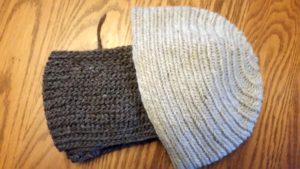
Nalbinding, for those who don’t know, is a fiber arts technique that creates generally thick, warm items. Most common are mittens, socks, and hats, but I’ve seen things ranging from scarfs to sweaters and more.
 The technique is usually glossed as “Viking knitting,” but that’s very much over-simplifying things. The earliest known pieces are from Israel (scraps of fabric), while the Coptic Egyptians produced socks. Structurally, while there can be a visual resemblance to knitting, it’s closer to crochet–and closer still to net-making.
I’ll save a description of the technique for a separate post; suffice to say, it uses a single needle, similar to but typically larger than a tapestry or yarn needle. Traditionally, these are made of wood, antler, or bone–I prefer bone.
Bonecutting
I make the needles from the leg bones (the ‘cannon-bones’) of elk. I could use deer (whitetail or mule), but I don’t get as many needles from one of those; also, my supplier (Moscow Hide and Fur) tends to have lots of elk bones in stock.
I begin by cutting off the ends–the physical structure of the bone in the ends is unsuitable–and cut the “barrel” of the bone in half lengthwise. I then section the halves into roughly needle-length portions, and cut the needle blanks from those. From one elk cannon-bone, I normally get eight to ten nalbinding needles, plus a few other odds and sods that I can use for sewing needles, shuttles, or tabletweaving tablets. The ends can be made into things like beads or rings; I’m experimenting with spindle whorls, for handspinning drop spindles.
Sanding and drilling
What you’ve got at this point is a handful of rectangular bone pieces, about three inches long, a quarter inch wide, and an eighth of an inch thick. You could carve them down with a knife, but since I make these for my Etsy shop, I’d rather build my inventory a little more quickly.
For our purposes, abrasives are faster than whittling–and safer, too, when it comes down to it. I could sand them all down manually with loose sandpaper, but we’re trying for quickly! So in the interest of speed, I use a benchtop belt sander. After getting my technique down, I can sand a half dozen blanks down into rough needles in under fifteen minutes
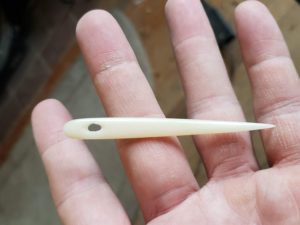
Once I have the needles rough-shaped, they go over to the drill press, where I put the preliminary hole for the eye. Then, depending on whether I’m really in a hurry, I will either shape the eye with a rat-tail needle file, or I’ll use a grinding attachment on a rotary tool. The end result is a nice, oval eye, rounded around all of the edges.
The final sanding is a manual process–I haven’t found a way, yet, to get a good finish mechanically. Fortunately, it’s a fairly mindless, Zen sort of thing. I’ve got scraps of sandpaper, about three inches square, in 120, 220, 320, and 400 grits, and a wad of “000” steel wool. 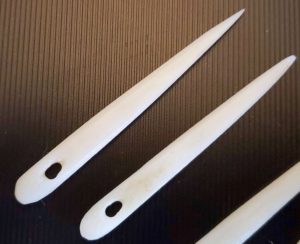 Fold the sandpaper in half, and plunge the needle between the paper, rotating with successive “stabs”, then flip to do the end you’ve been holding.
In the photo on the right are some roughed out nalbinding needles. If you look closely at the uppermost, you can see that it is “faceted,” and has several sharp-ish edges.
After a pass with the 120 and 220 grits, it looks like the one below: the edges are softened, and it’s rounder and beginning to smooth out.
 And finally, having gone through the 400 grit, and finishing the process out with the steel wool, the needle is smooth, with almost the feel of a hard plastic. There may be some remnant scratches in the larger faces from the coarser sandpaper, but I don’t worry about those much; after a few hats or mittens worth of use, the scratches tend to buff out.
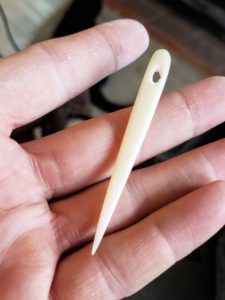
The whole finish-sanding process takes maybe 5 minutes per needle. I like to put on some music, or maybe pop a movie on the laptop, and kind of zone out while sanding.
The needle to the right is basically done. I’ll probably touch up the eye with a file, to “even out” the one side, but it’s not horrible.
Safety First
One word of advice: when you’re cutting or sanding bone or antler, you’ll want to add a face mask to your safety equipment, if not a full respirator. You’ll be sending fine particles of bone into the air; they’re organic particles, potentially with a bacterial load, and you really don’t want them in your lungs.
And while we’re on the topic, safety glass are your friend, especially during the sawing and belt-sanding portions of the event.
A Little Shop Production
That’s pretty much it! These nalbinding needles (and some shorter ones) seem to have been pretty popular. I’m experimenting with a few new items, as well: I’ve put up some nalbound hats, and will be offering up a leather needle-case (will hold probably four or five of these needles) and a couple of other items, once I work out a couple of bits in the designs. All this, of course, in addition to the turned bowls I’ve mentioned elsewhere.
Also mentioned elsewhere, I’m also in the process of building a “not-Etsy” site. I haven’t decided yet if I want to fully move off of Etsy, as it’s much easier to be “found” there. At least for the foreseeable future, I’ll probably just duplicate my inventory, with a few additional (fancier) items on the standalone site. I’ll be sure, of course, to link to it here, once it’s up.
If there are any small things that my re-enactor readers would like to see me make, I’m certainly open to suggestions in the comments! Let me know what you think!