Bees and Bresaola

The Great Honeybee Project of 2017 ended in early October, with the final disappearance of the bees of the West Hive. (The East Hive was gone by mid-September.) 2016 was done by mid-October, although I didn’t find out about it until late October.

Bees
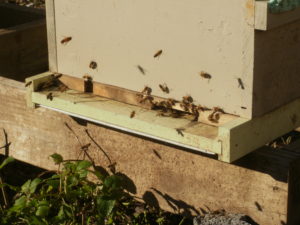
But apparently, the Great Honeybee Project of 2018 remains successful! The bees are still there, still numerous, and still doing their thing! I attribute their success this year to genetics from the Russian strain. I believe I can say I’m cautiously optimistic, but not out of the woods yet!

Feeding the Bees

The trick now will be to get them through the winter! Russian hives are supposed to go more slowly through their stores–but these ladies don’t have much in the way of stores put up. So it’ll be lots of feeding!

To do that, I’ve been making “sugar bricks” (also called candy boards, candy blocks, etc.). In essence, I put a bunch of sugar, a very little water, and a few drops of lemongrass oil (the bees’ favorite!) into a mixer, spin it up a little, divide it around some trays or plastic containers, and let it dry overnight (or over two nights, depending). Five pounds of sugar, a half cup of water, and about four drops of the essential oil will give me four blocks.

How fast the hives eat them will be an “it depends” sort of thing, and I’ll have to keep an eye on it. We’re supposed to have a few days of warm weather, so they’ll probably go through them more quickly. Once things cool off, they’ll slow down; I don’t know what the average will be, though.

How to Feed a Bee

So, the sugar blocks aren’t just shoved into the front of the hive; the feeding is a bit more complicated than that.

When things get cold, the bees form a cluster–they ball up around the queen and a bunch of brood, and shiver. This ideally keeps the center of the cluster at about 95 degrees, if I’m remembering my numbers correctly. But doing all of that shivering takes energy, which takes food–honey! Or, when they run out, sugar.

And where do the bees store honey, when they have it? At the top of the hive. So, over the course of the winter, the cluster moves its way up towards the top of the hive. And when they’re out of honey, they’re at the very top–so putting sugar down at the bottom doesn’t help them.

The remedy is to build a “feeder shim” to go on the top of the hive. Basically, it’s a short (about 2 or 3 inches) almost-hive-box–really, just a “rim” of wood–that has some half-inch mesh attached to the inside. This shim becomes the “top box” of the hive; you put your sugar blocks on the mesh, directly above the bee cluster. The bees generate moisture (rather like fogging the inside of a car window), which rises (due to the warmth) and softens the sugar, which they can then distribute amongst themselves.

The part that makes me nervous is that I’ll have to go into the hives during the cold. I mean, obviously, it’s been done–I’m not making the system up out of whole cloth–but the notion of exposing them to the cold unsettles me. (I’m told that if the wind is still, and you’re quick, it’s not too bad.) So we’ll see.

Bresaola – More Charcuterie

Also as promised, I started another cure over the weekend. This time, Bresaola: dry-cured beef. Specifically, eye-of-round, which is plied with cure for two weeks in the fridge, then trussed, hung, and left to air-dry for a time.

The recipe for this one is a little more complex than for bacon. In part, this is due to the air-drying portion of the event; instead of cure #1 (nitrite), it requires cure #2 (nitrate), for reasons I’ll get into below. And rather than set amounts, it goes by percentages.

I got my eye-of-round, which had already conveniently been cut into two more-or-less equal pieces, and I trimmed all of the visible fat, gristle, and silverskin off of it. Then a little tidying, to ensure no rogue flaps of meat, and I weighed the pieces: mine came to about 1400 grams and about 1250 grams. They went into individual ziplock bags.

Then I measured out the cure: 2% kosher salt, 2.5% sugar, 0.3% cure #2, 0.4% black pepper, 0.4% rosemary, 0.4% thyme, and (lacking the traditional juniper) a pinch of powdered ginger, and some cumin.

What this means is that for the 1400-gram piece, I used 28 grams (2% of 1400 grams) of salt, 35 grams (2.5% of 1400) of sugar, and so on. Yes, it’s difficult to measure the smaller amounts; I have a gram scale for just such occasions, and you should, too.

Why cure #2, instead of #1? It’s all to do with the length of time required for the cure. Either one of the cures will stop botulinum in its tracks, which is a good thing… But #1, sodium nitrite, only works for a short while–fine for bacon, which only takes a week. Cure #2, or sodium nitrate (note the “a,” there), actually has some nitrite in it, to start things off. The sodium nitrate, though, degrades over an extended time (weeks to months) into sodium nitrite, as well, giving you months of protection. Again, this is a good thing.

Having measured out the cure for each piece of meat, I then divided them in half: one half went into the ziplock bags with the bresaola, and the other half into another ziplock, to be reserved for later.

Bresaola, curing in bagsI massaged the cure into the meat, going as best I could for even coverage, and popped them into the fridge, where they are being re-massaged and turned daily. After a week, I’ll dump out the liquid that has accumulated, add the rest of the cure, then repeat the process for another week.

And once I get to there, it’ll be time to truss and hang the bresaola. It’ll also be time for another post!

Brew Day, October 2018 – Irish Red Ale

My latest brew day was a bit of a departure for me in a number of ways. First, it’s first Irish Red Ale I’ve brewed in over a decade–April 2008 was my last one. Second, I went with a partial-mash kit, done as a brew-in-a-bag (BIAB), which I’ve never done before. Third, due to high winds, I had to brew inside, which I’ve done before, but generally dislike. And lastly, this is my first time using yeast from Omega Labs.

Irish Red Partial-Mash Kit

Keeping with the “start from the basics” progression I’ve been doing the last few brews, I went “intermediate” with this batch, and used a partial-mash kit from MoreBeer. If you’ll recall, the “beginner” process was using extract kits, which took the majority of their maltiness from cans (or, in this case, pouches) of liquid malt extract, getting stylistic accents from a small handful of grains to be steeped.

So-called “partial-mashing” is in between extract brewing and all-grain brewing, in that about half of the fermentables come from extract, while the other half come from grains that have to be “mashed”. The process is simpler than it sounds. In essence, it’s the same thing as steeping the grains in an extract batch, except there are more of them–instead of the 8 ounces or so, I used 5-1/4 pounds of grains. They need to steep for longer, too, and at a slightly more particular temperature: an hour, at about 152 degrees.

Since I moved inside, which complicates using my all-grain equipment (an igloo cooler to hold the steeping grains, mostly), I decided to try the “brew-in-a-bag” method. This is a variation on the partial mashing technique, and with the right setup can be used for all-grain. Like it sounds, I put the crushed grains for this batch in a bag; I then heated up my full volume of liquid in my pot to about 160 degrees, turned off the heat, and added the bag of grains. Then, they steeped.

Another complication with being inside on the stove is that full-volume boils are difficult; compared to my 150,000 BTU burner outside, I’ve got access to something shy of 90,000 BTUs across the three biggest burners of the stove. But I made it work.Irish Red Ale on the Stovetop

Grain Tea

Had this been outside, I would have been more concerned with temperature loss through the kettle. As it was, the temp tried to drop quickly enough that I turned one burner on low, just to maintain things for the hour. Once that finished, I removed the bag, put a cooling rack across the top of the pot, and set the bag of grains on that to drain.Irish Red Ale grains steeping

About twenty minutes later, I added the remaining malt (about 4 pounds of extract, in this case), stirred it up to mix it, and turned the burners up to full again. As before, coming up to temperature (a full boil, in this case) took some time, but we got there.  Well, let’s call it a “vigorous simmer,” at the least. Eight gallons of liquid is a lot of mass to heat.

Once boiling, the brew proceeded as typical, adding hops at various intervals, stirring things now and again, and keeping an eye out to watch for boilovers, which is particularly important when brewing inside. With the smaller burners of the stove and a full-volume boil, it’s not usually an issue–but in this case, an unwatched pot always boils over.

Finishing Things Up

Having completed the hour-long boil, I gave everything a thorough stir, to get any trub (the “gunk” that forms in the liquid, comprised mostly of coagulated proteins) to pile in the center of the pot, then drained the finished wort into a fermenting bucket. I managed to get 5 gallons of wort at a gravity of 1.059, which was a higher efficiency than I was expecting, but that’s fine.Irish Red Ale Wort Collection
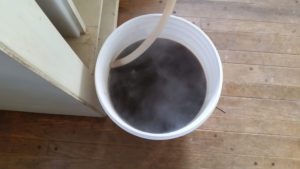
Here again, I was left with a digression from how I like to do things: being indoors, I don’t have access to hoses, which means no wort chillers. So, I did things the old-fashioned way, and put the lid (loosely) on the bucket, set it in the utility room, and left it overnight.

Come the next morning, it had cooled sufficiently, and I was able to pitch the yeast. I’ve not used Omega Yeast Labs in the past; they have liquid yeast in large pouches similar to Wyeast, but without the “smack pack”. Given that the wort wasn’t really high gravity, and it’s “only” 5 gallons, I felt safe enough just using the one packet. If things stall out, or otherwise don’t go well, I’ve got a packet of dry Nottingham yeast to use as a backup.

In all, I’ll probably get about 4.5 gallons of beer, with between 5.75-6% ABV. That’s stronger than I was aiming for, but not by too much. It’s looking like about 47 IBUs, and if my nose is a guide, it’ll be a nicely dry, roasty brew. I think the color of this one is a bit darker than I’d maybe hope for. It’s shaping up to be a deep garnet red, verging towards brown. The grain bill had both black roasted barley and Special B, as well as 120L (dark) crystal malt. Were I building this from scratch, I’d maybe keep the crystal, or more likely use 90L. I’d also use either the black roast or the Special B, but not both. (Most likely, I’d go with the Special B; it gives a nice red color, and has just enough of the roasty coffee-like bitterness, without being overwhelming.) In all, I think it’ll be lovely when it’s done.

For those keeping track, the Irish Red Ale is Batch #171 in my Little Black Book of Brews.

Previous Brews

I keep sipping on the Best Bitter and the English Pale from last month. They’ve been steadily improving, both due to the simple time factor, and from getting a little bit of chill on. Three weeks was a little young to be serving them. Now that they’re going on six weeks, they’re really hitting their stride. And since the kegs have been living on my back patio, and it’s been getting into the 30’s at night, they’ve cold-crashed down to a much better clarity.

That said, I still much prefer the English Pale. The Best Bitter, while better than it was, is still a little too estery for my taste. The English Pale, on the other hand, has developed into something very reminiscent of some of the draughts I had while in England and Scotland. In fact, it puts me in mind of a Fuller’s I once had on cask, and is quite yummy and quaffable.

That’s about it for this time around. I hope to get to more charcuterie in the near future. I also have to wrap up my thoughts on what’s happened with the bees this year, but I’d like to address them soon. As always, if you have any questions, commentary, or suggestions, I’d love to hear them in the comments!

First Bacon of the Season

As I mentioned in my last post, I had some bacon curing in the fridge. I took it out of the cure last night so it could air dry, and today it got smoked. Let’s take a look at the process.

Procuring a Pork Belly

I’ve often said that this is the hardest part of the whole process. If you’re a farmer raising pigs, you’re set. The rest of us, however, face the challenge of finding a good butcher who’s willing to part with a precious belly, before making bacon of his own. (They’re “precious” because there’s only one per pig; maybe 15-20 pounds for a good-sized full belly.)

I’ve had luck in the past at my local Costco; they occasionally have raw pork belly out (sold in half-bellies, typically 8-10 pounds each). But more often, and much more reliably, I head to my local ethnic grocery. In my local area, we have G-Mart and H-Mart; both are full-sized grocery stores, catering to Latin American and Oriental cuisines. Since pork belly is fairly common in Chinese cooking (as a soup flavoring), they typically have it in stock. If you don’t see it out front, ask the butcher behind the counter.

Preparation

Preparing the belly is optional, and will partly depend on how you get it. I like boneless, skinless bellies, because most of the work has been done for me, and I’m left paying for just the “bacon part,” by weight.

If you got it skin-on, don’t worry; you can leave it on, and remove it after smoking. (Save it for cracklings, or soup additives.) If you got bone-in pork belly, you’ll want to remove the bones (ribs) with as little mangling as possible.

After that, I generally cut the belly into two parts, across the center of the belly to give me two rough squares to work with. This isn’t absolutely necessary, but it makes the meat easier to handle. They also fit nicely into extra-large (~2.5 gallon) Ziploc bags.

Into the Cure

I use a variation of the basic bacon cure from Ruhlman and Polcyn’s book Charcuterie:  for about every 5 pounds of pork, use 2 ounces (50g) kosher salt, 12g pink salt, 1/4 cup dark brown sugar, 1/4 cup maple syrup, and a healthy dash of fresh, coarsely ground black pepper.

(I apologize for the mixture of measures; between cooking, brewing, and various other hobbies, I move back and forth between systems pretty smoothly. Generally, if it’s important that I get a specific amount by weight or volume, I’ll go metric; if it’s safe to fly by the seat of your pants, I’m fine with Imperial measures.)

Some folks take issue with the use of “pink salt” (AKA “Prague Powder” or “curing salt”, and which adds sodium nitrite to the mix) for health reasons. I counter with the fact that the human body produces sodium nitrite as part of the digestive process, anyway. And besides, if I was being that health-conscious, I wouldn’t be making and eating bacon, right?

Anyway, I put each of the chunks of pork belly into a Ziploc bag, and add a dose of the cure to each bag. Then I zip the bags shut, squeezing out as much air as possible. Then I massage the cure components as thoroughly as I can, over the entirety of the pieces of meat. then, into the refrigerator they go!

Waiting Game

The curing bellies sit in the refrigerator for 5-7 days. (The original recipe calls for a week, but I find that the meat cures faster without the skin, so I lean more towards 5 days.) Flip them over at least daily, and make sure to re-distribute the brine which forms in the bags across the meat.

By the end of the curing process, the meat will be significantly firmer than when you started. The “lean” parts will have darkened somewhat, and the whole thing should look something like this:Cured bacon, before smoking

Smoke, but no Fire

At this point, the bacon is technically ready to cook and eat. Just heat it in the oven, with as low a heat as you can get, until it reaches an internal temperature of 150 degrees; let it cool a bit, and slice off the skin with a sharp knife.

Or, you can go the route I much prefer, and smoke it. Ruhlman and Polcyn call for a hot-smoke, about 3 hours, ending the same as with the oven method. I like to cold-smoke it, though.

Until I get a full smoker built (a project for another time), I use my grill, and a nifty pellet smoking tube I found.Pellet tube, with pellets lit 
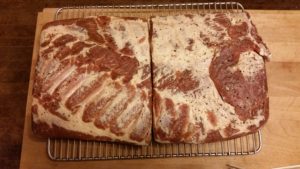
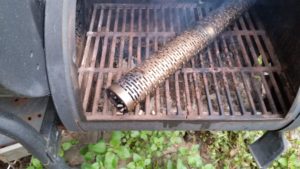
It uses pellets for the smoke, which is convenient: you can find dozens of types of pellets online for use in smoking, and they’re inexpensive, take up less room than chunks of wood, and work extremely well. I find that with the tube, I can easily get six to eight hours of consistent smoke.

This batch of bacon is getting an apple-maple mix that I’ve found to be quite lovely. Other good choices for this bacon would have been oak or maybe cherry; I wouldn’t go for anything heavier like hickory or mesquite, though, as they’d be a bit much for the cure.

It’s Bacon!

Here’s the slabs before and after smoking:

bacon, before smoke
Before smoke
bacon, after smoke
After smoke


The last step in the process, unless you’re going to immediately fry it all up and eat it, is to separate it into “single-meal portions,” then wrap it and freeze it (I like vacuum-sealing it). For slabs like this (about 4.5 pounds each), I’ll cut each into rough thirds. Make sure to cut across the grain of the meat, otherwise the bacon can be stringy.

I’ll probably do another couple of slabs of bacon over the fall and winter; I’d also like to do some bigger “whole-muscle” cured bits, like bresaola, lonzo, and maybe a dry-cured pork shoulder (“almost” prosciutto). Heck, I’d like to do a prosciutto, as well as a country-style ham. But before I do either of those, I’ll need to work on that smokehouse project, to say nothing of becoming good friends with one of the local butchers.

What do you think, readers? Do you have suggestions for other curing mixes, or for other things to cure? (I often put some cheese on the top rack in the grill and smoke it, when I’m doing something like this.) Let us know in the comments!

Best Bitter Tasting

As promised last week, this time around I’m tasting the Best Bitter I brewed up on the last Brew Day.

Best Bitter
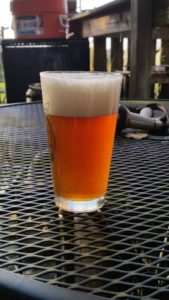
I’m not as happy with the Bitter as I was with the Pale Ale. A fair amount of it can be chalked up to the yeast, I think (Burton Ale Yeast, WLP-023). It’s just not settling out like it should, leaving the beer hazy. Also, it doesn’t seem to ferment out nearly as dry as the London Ale Yeast (WLP-013); at least, not in this iteration.

Between the yeast still in suspension, and the relative warmth of the fermentation putting out lots of esters, I’m getting a bunch of fruit in this one, mostly in the nose–almost like peaches, if you can believe that. Despite being more aggressively hopped than the Pale (3.5 ounces, versus 2 in the Pale), I’m not getting that as much; it’s not coming across with as much bitterness. Some of that is probably due to the roasted grains in the Pale, which were absent from the Bitter, but I’d expect some of the “greener” bittering from the hops.

It throws a lovely, thick white head, which quickly falls to an eighth of an inch that sticks with the beer for the rest of the glass. It’s not highly carbonated, by design; I wanted it to resemble something from a cask, so I was aiming for about 1.5 volumes. Despite that, it’s pressurizing itself in the keg to about 8 PSI, which is making for an aggressive head when I pour it.

In all, it’s a solid beer, just not exactly to my taste. If I do it again, it’ll have to be in steps, to see how various “improvements” change it. First, I’d have to do it with the WLP-013, then maybe try an all-grain version of it. Fermenting it cooler than I did (about 70 degrees) would probably help with the esters, but I’d probably have to shake it up a bit during fermentation, to rouse the yeast. I’ll admit to also being curious about the Extra Special Bitter, which is a slightly different recipe than this one. It might be worth trying it out on a future Brew Day.

My next Brew Day, on the 21st of October, will feature a mini-mash Irish Red Ale, again from a MoreBeer kit. Being a more “complex” brewing style, I’ll only be doing the one beer; it’ll probably take me a fair part of the afternoon. I plan on using the WLP-013 again, because I think it will really play nicely with the style: rich, lightly roasty, and nicely dry on the palate.

In non-brewing news, with the turn of the seasons, it’s time to get into curing meats again. I’ve already got about 9.5 pounds of pork belly curing in the fridge, a week or two from being delicious homemade bacon. Also, I’ve been eyeing the recipe for bresaola, and I think that once things cool off a little more, I’ll be able to pull that one off in the cellar. I’ll go more in-depth into procedure and recipes and such in a future post.

What sort of autumn deliciousness have you been up to, readers? Let us know in the comments!