As a continuation of my last post, let’s discuss my homestead goals for the upcoming year.
Growing Things
The garden did moderately well in 2019. We harvested bumper crops of onions, did pretty well with peppers, and pulled a sizable number of tomatoes off the vines. I also got a harvest of elderberries, and did well enough with mulberries and blackberries to satisfy. The tart cherries did well, also, even if they didn’t exceed last year’s haul.
For 2020, my goals include taking a few steps forward in some places, and a few steps back in others. I hope to propagate the elderberries from cuttings over this winter. I also want to grow some nettle along the edge of the woods, and I hope to “borrow” one of the garden beds for grains in the spring.
The rest of the beds will be fallow, this year, excepting the asparagus (as a perennial, it’ll just keep going). The tomatoes weren’t as happy as they could have been, the squash, melons, and cucumbers succumbed again to borers and disease, and the sweet potato slips were choked out by weeds. We’ve decided to let things “rest” for a year or two, mulching and weeding, just to see if conditions there can improve. Another project is beginning to switch from wooden raised beds to modular concrete beds.
Most of the trees will require a bit of pruning over the winter, as well; I hope to get an apple or two in the fall, and I’d like to see the plum trees begin to produce.
Animals
We’re looking at increasing the flock of chickens in the spring; after a hawk strike and some hungry raccoons in late summer, the flock is only about half layers, the rest being “retired” older birds, or soon to be “retired”. I believe we’re looking at a cross between White Leghorns and another breed–with the productivity of the Leghorns, but less flightiness. The goals there are to get back up to a dozen eggs per day, eventually–probably late fall, more likely spring of 2021.
I hope to have the beehives at full capacity, as well. As I’m writing this, in late December, one of the seven hives has collapsed; at least five of the others were active during a warm spell a few days ago. Barring misfortune, I should be able to finish the winter with four good hives, if not more. Considering that I’ve been calling “at least three” a success, I’m optimistic for the season.
Building Things
In addition to the near-endless work inside the house, my goals for the year include at least starting on the outdoor wood-fired oven, and laying the foundation for a smokehouse. The latter will go “upwind” of everything, near the barn; the former will be nearer the house, and will require converting the back patio to a deck, and extending it to the entirety of the pergola area.
When we go to put in the deck, an important aspect will be a ramp for the dogs. Bacchus, in particular, is old (as Pyrenees go), and his hips and knees aren’t working as well as they used to. Steps give him a bit of trouble; if we can get a decent ramp set up for him, he should be able to come and go much easier.
A Full Plate
That really covers our goals for the homestead for 2020. The deck alone is probably as much as we can handle easily; at least having the foundations for the oven and smoker would be a start. The garden is always a handful; fortunately, the animals can fend for themselves, in large part.
Still, getting the list down where we can see it is a start. It will be interesting coming back to this in a year, and seeing what’s been accomplished.
As I mentioned last week, some of my shop time has been spent getting things ready for spring. In particular, this has meant making sure I have enough, and the right kind, of “additional housing” (hives and frames) for the bees.
Langstroth’s Hives
While I’ve got a top-bar hive box built, I don’t have any bees in it yet. I’m waiting to see if I can catch a swarm to fill it. The main portion of my gear is the so-called “Langstroth Hive” system. It’s named for Rev. Lorenzo Langstroth (1810-1895), who discovered a peculiar notion called the “bee space,” which I’ll describe in a bit.
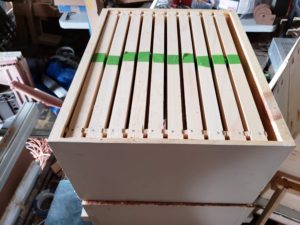
Langstroth’s system involves the use of boxes (“hive bodies”) filled with removable frames, on which the bees build their comb. The boxes mimic the hollows of trees, which the bees would use “in the wild.” The frames provide guidelines of a sort for the comb, otherwise it would be all swirly and convoluted. Pretty, but of no use to the beekeeper, because we can’t remove it intact.
Deep hive body with ten frames. The green tape is holding the last portion of each frame.
The hive bodies come basically in three sizes: deep, medium, and shallow. (We’re nothing if not inconsistent…) The deep is a bit over nine and a half inches tall; the medium is a little more than six and a half inches, and the shallow is about five and three-quarter inches. The length and width of all the boxes in a hive is the same, but they come in two “sizes”: eight-frame, and ten-frame. This, obviously, describes the number of frames in a box.
The three sizes are used for different purposes: deeps are primarily brood boxes, where the queen will lay her eggs. Mediums are sometimes used as brood boxes, but more often they’re placed atop the deeps, for the bees to store honey. And shallow boxes are almost exclusively used for honey.
Bee Space
The main innovation introduced by Langstroth was the concept of “bee space.” Bees are notorious for two types of “building”: comb, and propolis. Comb is, well, comb–where they lay eggs, or store pollen, or put honey. They’ll build it off the tops, sides, or bottoms of things–basically, if they think they’ve got room to put in a bit of honeycomb, they’ll try to build some.
Propolis, on the other hand, is sort of a combination bee-glue, paint, and spackle. In essence, it’s plant resins that they’ve collected, but can’t turn into pollen or honey. It tends to be quite sticky. The bees use it to cover the inside of the hive (it may have some antibacterial properties), to plug “leaks” (if there’s a crack in a hive body, or between two hive bodies), and to make things inside the hive immobile. I generally can’t do a hive inspection without scraping off enough propolis to make a decent-sized ball of the stuff.
The deal is, if there’s more than about a bee’s thickness of space, the bees will build some comb. If there’s less than a bee’s thickness of room, they’ll try to fill it with propolis. But if the spacing is just right, they pretty much leave it be.
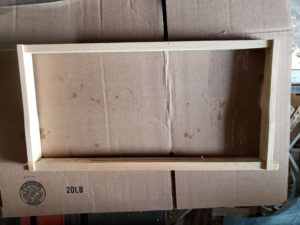
One deep frame, without foundation.
Langstroth observed that “just right” is between 1/4 and 3/8 inch, and sized his boxes and frames to leave just that amount between everything. The boxes and the frames (to guide the bees in making comb) are sized just so, and they maintain the bee space.
But Why?
The reason we’re concerned with keeping excess comb and propolis out of the hive is so that we beekeepers can do our regular inspections. If the bees have built “burr comb,” which juts out from an existing frame, they may stick multiple frames (or boxes!) together. So-called “cross comb” is when they build their comb “sideways,” across multiple frames. This makes it impossible to remove the frames neatly, and generally results in ticked-off bees.
The propolis is less of an issue in that sense, but it has the tendency to glue the frames down inside the boxes, making them difficult to remove. Occasionally, something will get into the hive that the bees don’t want, but can’t remove themselves (the occasional mouse, that sort of thing). In those instances, they’ll propolize the entire thing, also making it difficult to remove–and making quite the mess.
The hive inspections are for multiple purposes. First and foremost, it’s to check on the health of the hive–is the queen healthy and laying lots of eggs? Is there a disease issue to be dealt with? Are there parasites that need to be treated for? Second, we’re looking at how well the hive is working–whether they’re bringing in sufficient pollen and nectar, building enough comb in the right places, and such. Third, we’re looking to see if the bees are preparing to swarm or to replace their queen–sometimes this is good, sometimes not so much. There are things the beekeeper needs to do, in either situation.
Lastly, and certainly not least important, is we’re checking on the honey stores. This is both for ourselves, as the beekeepers, but also to see that the bees have enough to get themselves through any dearths or through the winter (when there is no nectar flow).
Building Boxes
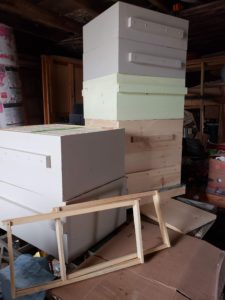
All of this is a long-winded way of saying I spent the better part of a couple of days making new boxes and frames. My “active supplies” included six deeps in use (three per hive–this will probably decrease to two each, by the end of the year), plus two mediums with drawn frames, two mediums with partly-drawn foundation, two shallows with drawn frames, and two more mediums and a deep with empty frames.
Hive Bodies and frames. The rear stack has three medium and two deep boxes.
After a weekend building stuff, I’m up to ten deeps total, eight mediums, and two shallows. There are frames for everything, plus enough foundation to go around. (Foundation is a thin sheet of wax for the bees to use as a starter.) I’ll have to spend a snow day or two installing all of the foundation, but that’s a task for later.
Curiously, of all the things that could happen while building the boxes and frames (which involves time on the table saw, plus hammering in hundreds of nails), the most serious injury I got while doing all of this was a fairly minor cut, from my own knife, while undoing the strapping holding a bunch of frame pieces together. (Hitting my thumb with the hammer a few times doesn’t count. The nails are pretty small, after all.) But then, if you don’t bleed on it, it’s not a real project, right?
Status of the Bees
Of my two hives, as of mid-January both are still alive and kicking. One of them is definitely stronger than the other–on the warmer days over the last few weeks, they’ve been out and flying en masse. The weaker hive is still there, for now, but may not have enough bees to maintain warmth in their cluster. I’m not concerned about them starving, but they might freeze to death. It would suck, but that’s the nature of things.
Still, even if only one hive makes it, come springtime it’ll be off to the races. I’m certain that the stronger hive, should it make it that far, will be looking to swarm; if I play my cards right, I can make a split from it. That involves finding the prospective queen bees (the brood cells holding queen eggs are distinctive). Then I move those frames, together with a bunch of nurse bees, into a new box, and wait.
If I should make it to spring with both hives alive, I can probably get a split off of each. And if the spring nectar flow is good, I may be able to do that multiple times. My end goal is four to five hives by the end of the season–and at least one honey harvest!
I’m also considering setting up a sponsorship program for the hives–kind of like a CSA for the beehives, or “adopt-a-hive,” if you will. Something on the order of a donation of $X per season, and you’ll get email updates and photos of the hive, plus maybe a few pounds of honey, when it comes time for that. If you’re local to me (in the MD/NoVA area) and interested, please email me and we can discuss it!
Another brew day has passed, and the Thanksgiving holiday has come and gone. Things have been quietly busy around the homestead, as the weather has finally turned towards winter.
Brew Day
The brew went fairly seamlessly. I decided, at almost the last minute, to ditch my planned brews for the rest of the year, and instead of doing a Helles Lager this month, I brewed an all-grain version of the English Pale.
The change to the recipe from the extract version involved little more than swapping out the malt extract for eight pounds of Maris Otter malt. The net effect was, as I anticipated, to lighten the color slightly, and (I anticipate) to give an extra fullness to the batch when it’s done.
Now, rather than doing a Samichlaus clone in December, I’m considering brewing up a Kolsch-style lager. If pressed, I’d have to say that a well-done Kolsch is my favorite beer style; if I get it done now, along with maybe another batch in January or February, I’ll have a good start on summer drinking.
Thanksgiving
My wife did her usual astounding job whipping up a feast for us this year. I was pleased at the number of things that came from the homestead, this time around. Not only things grown ourselves (every onion that went into something was from our garden), but things that most folks would buy, that we made from scratch.
Among the snacks while waiting for things to finish baking, we had the smoked cheese from a few weeks back. That went over quite well–it’s always fun to introduce a cheese-lover to a smoked version of their favorite cheese.
Another thing that I threw together was a small batch, about a pound, of gravlax–cured salmon. Normally, the salmon is cured in salt and sugar between layers of fresh dill; lacking that, I used powdered dill from the spice cabinet. Otherwise, it went quite well. (I also got to use a new knife that I picked up, just for doing cured meats–a nice sashimi knife, with a single bevel; after a little practice, I should be able to get those nice paper-thin slices of bresaola…)
For the meal itself, I baked a batch of sourdough, which I’ll have to go into in another post. And we finished off the sauerkraut that had been fermenting on the counter, both as a straight dish, and fried with some shredded apple and a little caraway. And my wife added some of the homemade bacon off-cuts to the roasted brussels sprouts, which really bumped them up a notch.
Homestead
Otherwise, things on the homestead are slowing down for the winter. We’ve had our first snowfall, followed by a few temperature swings, and finally some icy rain. The chicken coop has been almost completely buttoned down for the winter, with the doors closed, insulation put in the eaves, and heat lamps warming the roosting bars. Still, with the cold and the clouds, their production is down from over twenty eggs a day to three or four.
The bees have been hunkered down in their hives for a bit over a month. I’m pleased just in the fact that they’re still there (this is something of a record for me). When last I checked, about two weeks ago, they were still slowly working the candy blocks they had. I’ll pick a warm-ish day in a couple of weeks, pop the tops, and give them more, if they need it.
The garden has gone dormant, as it should. I’m hopeful that the asparagus crowns did well enough this year to survive the winter, and start producing in the spring. And the garlic, which didn’t produce anything to speak of over the summer (as expected), sprang back to life as September rolled through, and it appears to be going into the winter with a vengeance–come spring, we should have a decent harvest there, I hope!
Lastly, I placed an order for two more apple trees: a Black Oxford, and a Golden Russet. I’m trying to decide where to place them; the problem is an excess of good places for them. I’m thinking across the field, near the tilled area for grains; I’ve got a few months to consider the problem, though.
Etsy and My Shop
If you carefully read the “about me” page, you’ll have noticed mention of a shop on Etsy. It’s called the Holmgard Trading Company, and I’ve had it up for over three years; I started with some wooden cups and bowls, adding them as I got time to make new ones. I have, lately, been branching out a bit–particularly since the shop is “climate controlled,” and very cold at present–and adding things I could work on while inside, being warm near the stove.
While I’ll keep the Etsy shop up (it’s certainly good for publicity, and it’s pulling its weight in sales), I’m in the process of getting an independent site set up for Holmgard Trading. The plan is for it to have a wider array of goods, plus better pictures, and some stories about the things. Stay tuned for further updates!
In addition to all of the various cured meats I’ve been doing lately–I’ve added a pork shoulder into the mix–I’m smoking a bit of cheese, in anticipation of Thanksgiving.
Making smoked cheese is one of the simplest, tastiest, and most under-appreciated ways to really bump up an appetizer tray. I suppose the cheeses would go great in a dish, but mine have never actually lasted long enough to cook with them.
Picking Ingredients
The process couldn’t be simpler: buy some cheese from the grocery store. Big blocks of cheese, about a pound apiece, work best, but I’ve also used cheese sticks. My favorite types for smoking are Monterey Jack, Pepper Jack, and sharp Cheddar, but you can use whatever you like.
Second in importance only to the cheese would be the type of smoke. As with the cheese, let taste be your guide. I would stay away from any of the heavier smokes, though–mesquite, oak, hickory–unless you’re really certain that’s what you want. (And even then, I’d start small, and check the results.) I really like fruitwoods; with most cheeses, apple is a good match. Maple, beech, or pear work well, too, but cherry might clash a little with the cheese.
The Process
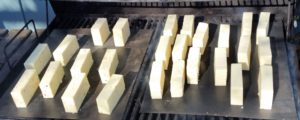
Chop the blocks of cheese into moderate-sized blocks, trying to keep things under an inch in thickness. I usually halve the blocks, then halve the halves, then halve those bits; I end up with pieces about 2″ x 4″ x 1/2″, give or take. This lets the smoke reach all the sides, and penetrate into the cheese, so it’s not just a “surface-taste” event.
Once that’s done, arrange the cheese in your smoker, and fire it up!
Cold-smoking is definitely the way to go, for cheeses. We’re not worried about bacterial contamination, so there’s no need to really heat things up; in fact, you need to keep things cool enough that the cheese doesn’t melt. That would cause a big mess in your smoker. It’s for this reason that I really like fall. Things outside have cooled down to where I don’t generally have to worry about the temperature.
How long to smoke? To taste. I like to let things go for at least six hours; longer if it’s a stronger-flavored cheese. I also like to flip the blocks a couple of times, just to ensure even coverage of smoke.
It’s okay if the cheese sweats just a little, but if things start getting soft and runny, pull them out! It’s a really short step from “soft” to “melted,” and once melted, the cheese is difficult to rescue from the inside of the smoker…
Let it Cure
Far and away the most difficult part of the process is waiting for things to be just right after the smoke. Ideally, you should seal the cheese blocks up in plastic, then let them sit in the fridge for a week or so. (I use a vacuum sealer; this keeps the inside of the refrigerator from smelling like a smokehouse.) The smoke needs time to really, thoroughly penetrate into the cheese, and to mellow a bit. Don’t be afraid to let it sit longer than a week, but much past two and you’re really reaching diminishing returns. Time to eat!
Uses for Smoked Cheese
Beyond the obvious sliced-on-a-tray-with-crackers-and-apples, I would imagine that just about any savory dish involving cheese would be improved with a little smoke. Smoked cheese toast? Sure! Some smoke in a fondue? Why not! Chicken cordon smoked bleu? Yep! The sky’s the limit, really. (I’m wide open to suggestions in the comments!)
The Great Honeybee Project of 2017 ended in early October, with the final disappearance of the bees of the West Hive. (The East Hive was gone by mid-September.) 2016 was done by mid-October, although I didn’t find out about it until late October.
But apparently, the Great Honeybee Project of 2018 remains successful! The bees are still there, still numerous, and still doing their thing! I attribute their success this year to genetics from the Russian strain. I believe I can say I’m cautiously optimistic, but not out of the woods yet!
Feeding the Bees
The trick now will be to get them through the winter! Russian hives are supposed to go more slowly through their stores–but these ladies don’t have much in the way of stores put up. So it’ll be lots of feeding!
To do that, I’ve been making “sugar bricks” (also called candy boards, candy blocks, etc.). In essence, I put a bunch of sugar, a very little water, and a few drops of lemongrass oil (the bees’ favorite!) into a mixer, spin it up a little, divide it around some trays or plastic containers, and let it dry overnight (or over two nights, depending). Five pounds of sugar, a half cup of water, and about four drops of the essential oil will give me four blocks.
How fast the hives eat them will be an “it depends” sort of thing, and I’ll have to keep an eye on it. We’re supposed to have a few days of warm weather, so they’ll probably go through them more quickly. Once things cool off, they’ll slow down; I don’t know what the average will be, though.
How to Feed a Bee
So, the sugar blocks aren’t just shoved into the front of the hive; the feeding is a bit more complicated than that.
When things get cold, the bees form a cluster–they ball up around the queen and a bunch of brood, and shiver. This ideally keeps the center of the cluster at about 95 degrees, if I’m remembering my numbers correctly. But doing all of that shivering takes energy, which takes food–honey! Or, when they run out, sugar.
And where do the bees store honey, when they have it? At the top of the hive. So, over the course of the winter, the cluster moves its way up towards the top of the hive. And when they’re out of honey, they’re at the very top–so putting sugar down at the bottom doesn’t help them.
The remedy is to build a “feeder shim” to go on the top of the hive. Basically, it’s a short (about 2 or 3 inches) almost-hive-box–really, just a “rim” of wood–that has some half-inch mesh attached to the inside. This shim becomes the “top box” of the hive; you put your sugar blocks on the mesh, directly above the bee cluster. The bees generate moisture (rather like fogging the inside of a car window), which rises (due to the warmth) and softens the sugar, which they can then distribute amongst themselves.
The part that makes me nervous is that I’ll have to go into the hives during the cold. I mean, obviously, it’s been done–I’m not making the system up out of whole cloth–but the notion of exposing them to the cold unsettles me. (I’m told that if the wind is still, and you’re quick, it’s not too bad.) So we’ll see.
Bresaola – More Charcuterie
Also as promised, I started another cure over the weekend. This time, Bresaola: dry-cured beef. Specifically, eye-of-round, which is plied with cure for two weeks in the fridge, then trussed, hung, and left to air-dry for a time.
The recipe for this one is a little more complex than for bacon. In part, this is due to the air-drying portion of the event; instead of cure #1 (nitrite), it requires cure #2 (nitrate), for reasons I’ll get into below. And rather than set amounts, it goes by percentages.
I got my eye-of-round, which had already conveniently been cut into two more-or-less equal pieces, and I trimmed all of the visible fat, gristle, and silverskin off of it. Then a little tidying, to ensure no rogue flaps of meat, and I weighed the pieces: mine came to about 1400 grams and about 1250 grams. They went into individual ziplock bags.
Then I measured out the cure: 2% kosher salt, 2.5% sugar, 0.3% cure #2, 0.4% black pepper, 0.4% rosemary, 0.4% thyme, and (lacking the traditional juniper) a pinch of powdered ginger, and some cumin.
What this means is that for the 1400-gram piece, I used 28 grams (2% of 1400 grams) of salt, 35 grams (2.5% of 1400) of sugar, and so on. Yes, it’s difficult to measure the smaller amounts; I have a gram scale for just such occasions, and you should, too.
Why cure #2, instead of #1? It’s all to do with the length of time required for the cure. Either one of the cures will stop botulinum in its tracks, which is a good thing… But #1, sodium nitrite, only works for a short while–fine for bacon, which only takes a week. Cure #2, or sodium nitrate (note the “a,” there), actually has some nitrite in it, to start things off. The sodium nitrate, though, degrades over an extended time (weeks to months) into sodium nitrite, as well, giving you months of protection. Again, this is a good thing.
Having measured out the cure for each piece of meat, I then divided them in half: one half went into the ziplock bags with the bresaola, and the other half into another ziplock, to be reserved for later.
I massaged the cure into the meat, going as best I could for even coverage, and popped them into the fridge, where they are being re-massaged and turned daily. After a week, I’ll dump out the liquid that has accumulated, add the rest of the cure, then repeat the process for another week.
And once I get to there, it’ll be time to truss and hang the bresaola. It’ll also be time for another post!
As I mentioned in my last post, I had some bacon curing in the fridge. I took it out of the cure last night so it could air dry, and today it got smoked. Let’s take a look at the process.
Procuring a Pork Belly
I’ve often said that this is the hardest part of the whole process. If you’re a farmer raising pigs, you’re set. The rest of us, however, face the challenge of finding a good butcher who’s willing to part with a precious belly, before making bacon of his own. (They’re “precious” because there’s only one per pig; maybe 15-20 pounds for a good-sized full belly.)
I’ve had luck in the past at my local Costco; they occasionally have raw pork belly out (sold in half-bellies, typically 8-10 pounds each). But more often, and much more reliably, I head to my local ethnic grocery. In my local area, we have G-Mart and H-Mart; both are full-sized grocery stores, catering to Latin American and Oriental cuisines. Since pork belly is fairly common in Chinese cooking (as a soup flavoring), they typically have it in stock. If you don’t see it out front, ask the butcher behind the counter.
Preparation
Preparing the belly is optional, and will partly depend on how you get it. I like boneless, skinless bellies, because most of the work has been done for me, and I’m left paying for just the “bacon part,” by weight.
If you got it skin-on, don’t worry; you can leave it on, and remove it after smoking. (Save it for cracklings, or soup additives.) If you got bone-in pork belly, you’ll want to remove the bones (ribs) with as little mangling as possible.
After that, I generally cut the belly into two parts, across the center of the belly to give me two rough squares to work with. This isn’t absolutely necessary, but it makes the meat easier to handle. They also fit nicely into extra-large (~2.5 gallon) Ziploc bags.
Into the Cure
I use a variation of the basic bacon cure from Ruhlman and Polcyn’s book Charcuterie: for about every 5 pounds of pork, use 2 ounces (50g) kosher salt, 12g pink salt, 1/4 cup dark brown sugar, 1/4 cup maple syrup, and a healthy dash of fresh, coarsely ground black pepper.
(I apologize for the mixture of measures; between cooking, brewing, and various other hobbies, I move back and forth between systems pretty smoothly. Generally, if it’s important that I get a specific amount by weight or volume, I’ll go metric; if it’s safe to fly by the seat of your pants, I’m fine with Imperial measures.)
Some folks take issue with the use of “pink salt” (AKA “Prague Powder” or “curing salt”, and which adds sodium nitrite to the mix) for health reasons. I counter with the fact that the human body produces sodium nitrite as part of the digestive process, anyway. And besides, if I was being that health-conscious, I wouldn’t be making and eating bacon, right?
Anyway, I put each of the chunks of pork belly into a Ziploc bag, and add a dose of the cure to each bag. Then I zip the bags shut, squeezing out as much air as possible. Then I massage the cure components as thoroughly as I can, over the entirety of the pieces of meat. then, into the refrigerator they go!
Waiting Game
The curing bellies sit in the refrigerator for 5-7 days. (The original recipe calls for a week, but I find that the meat cures faster without the skin, so I lean more towards 5 days.) Flip them over at least daily, and make sure to re-distribute the brine which forms in the bags across the meat.
By the end of the curing process, the meat will be significantly firmer than when you started. The “lean” parts will have darkened somewhat, and the whole thing should look something like this:
Smoke, but no Fire
At this point, the bacon is technically ready to cook and eat. Just heat it in the oven, with as low a heat as you can get, until it reaches an internal temperature of 150 degrees; let it cool a bit, and slice off the skin with a sharp knife.
Or, you can go the route I much prefer, and smoke it. Ruhlman and Polcyn call for a hot-smoke, about 3 hours, ending the same as with the oven method. I like to cold-smoke it, though.
Until I get a full smoker built (a project for another time), I use my grill, and a nifty pellet smoking tube I found. It uses pellets for the smoke, which is convenient: you can find dozens of types of pellets online for use in smoking, and they’re inexpensive, take up less room than chunks of wood, and work extremely well. I find that with the tube, I can easily get six to eight hours of consistent smoke.
This batch of bacon is getting an apple-maple mix that I’ve found to be quite lovely. Other good choices for this bacon would have been oak or maybe cherry; I wouldn’t go for anything heavier like hickory or mesquite, though, as they’d be a bit much for the cure.
It’s Bacon!
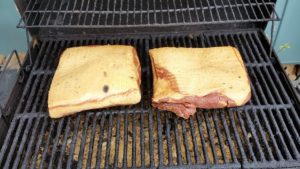
Here’s the slabs before and after smoking:
Before smokeAfter smoke
The last step in the process, unless you’re going to immediately fry it all up and eat it, is to separate it into “single-meal portions,” then wrap it and freeze it (I like vacuum-sealing it). For slabs like this (about 4.5 pounds each), I’ll cut each into rough thirds. Make sure to cut across the grain of the meat, otherwise the bacon can be stringy.
I’ll probably do another couple of slabs of bacon over the fall and winter; I’d also like to do some bigger “whole-muscle” cured bits, like bresaola, lonzo, and maybe a dry-cured pork shoulder (“almost” prosciutto). Heck, I’d like to do a prosciutto, as well as a country-style ham. But before I do either of those, I’ll need to work on that smokehouse project, to say nothing of becoming good friends with one of the local butchers.
What do you think, readers? Do you have suggestions for other curing mixes, or for other things to cure? (I often put some cheese on the top rack in the grill and smoke it, when I’m doing something like this.) Let us know in the comments!
Having recovered (mostly) from Pennsic (the gallery is in the sidebar on the right), we found it was time to get stuck in on the garden and related outside-the-house things. In particular, it was time to do the summer harvest, before the weeds made it completely impossible. Also on the agenda: starting to reclaim the flower beds, and getting the garden beds ready for fall plantings.
Weedmageddon and a Harvest
It seems that we encounter some version of “weedmageddon” every year–a bout of summer rains, alternating with intense heat, often with crazy work schedules, and we can’t keep up with the weeds in the garden, much less get a decent harvest in. This year, the culprit was Pennsic, combined with frequent rains.
On our return, the garden had jumped from barely knee-high plants and a pretty controlled weed situation, to plants (mostly weeds) up to eye-level. An emergency “pull all the weeds!” session was held, combined with brutal prunings of the tomato plants which had threatened to crawl across the entire garden. We salvaged what tomatoes we could, but the chickens were gifted with more than a few of them.
Once things were more or less under control, we set about harvesting what we could. The onions did pretty well, particularly the yellow ones–the red onions never got much above golf-ball sized. The garlic ended up being pretty much a non-starter; we’ll get some more in for the fall, when they’ll be happier with the cool weather. But the big success was the potatoes. From a few small hills, we actually got about 50 pounds! (A photo of the harvest is to the right–please excuse the [ahem] potato-quality picture…)
The tomato harvest is still ongoing, of course, and the pole beans have only just really kicked into gear. Most of the squash have croaked, but a couple of pumpkin vines are still fighting on–the best one being the “volunteer” in the front flower bed. We’ll see how they do.
Getting Things Ready for Fall
The plan for the fall garden includes lots of brassicas–cabbage, bok choi, brussels sprouts, cauliflower, broccoli, and the like. Other beds will get root vegetables, such as beets, turnips, and radishes. Additionally, we’ve got a few unusual things to try out: salsify (two varieties), sugar beets, and swedes (related to rutabagas), to name a few.
A couple of the beds are going to lay fallow over the winter, and I hope to talk my wife into letting me put some winter grains in some of them. A few varieties, I’ve only got enough for about a two-foot square plot; with the winter wheat, I can probably do a full bed. The greens (after I clip the grains, in the spring) would be a good green manure, and having the plants in the garden would cut back on deer predation, which means I might get to harvest some of them, and grow up a better volume of grains.
Other fall preps include keeping a weather eye on the bees. They’ve been sucking down the sugar-water, almost as fast as I can put it out (about a quart each day and a half, give or take). They’ve been slow to draw out supers–I’m giving them another couple of weeks to work on them–but they’re doing fine as far as brood and pollen; their mite counts are as low as expected (zero–these are ‘hygienic’ Russian bees), and they look healthy. At this point I’m cautiously optimistic, but I’ve been here before. Another hive inspection in early- to mid-September will, I think, tell me how things are going to go.
Brewing, Of Course
The August brew day was one of cellar management. I racked some meads over to secondary, and cleaned a couple of things up in the cellar. Upcoming brew days will likely include some teaching moments (several folks have asked me to teach them about brewing), as well as some possible equipment upgrades, and playing around with some interesting techniques. In particular, I’m hoping to:
Upgrade fermenters. I haven’t decided whether to go with conicals, BrewBuckets (almost-conicals), or 10-gallon corny kegs. Pricing, availability, and funds will end up deciding.
Get an “official” water analysis done on the well water, with the goal of being able to dial things in a bit tighter.
Do more in the way of session beers–I have my eyes set primarily on English milds and bitters, although as things cool off, I’m thinking about making a Kolsch or two, as well.
Do a parti-gyle, in the style of Fuller’s (two sets of wort run off from the grains, then mixing the end results). It would require a little juggling of equipment, but I think the results would be fun.
One of the things I simultaneously anticipate and dread each year is the coming of late spring. That’s when the “warm months” really get rolling on the homestead, and everything moves outside into the garden and the fields.
The upsides to the whole thing do outweigh the downsides, all things considered. The garden, so meticulously planned through the winter, finally gets planted. If you’re doing things right, you’ve been harvesting some of the earliest things–brassicas, cold-weather greens, and the like. I really enjoy when our produce starts switching from store-bought to self-grown, fresh from the garden. And it won’t be long before we can start enjoying fresh fruits–cherries, blackberries, and eventually apples and pears.
The plants all have leafed out, of course. Some of them, like the tulip poplars locally, are still blooming, which is great for the bees. The black locust and others have already passed, but the sumac is just beginning. If the colonies were established, I’d be looking at the first honey harvest of the year. (Read more about my bees here.)
The hard parts, though, include keeping the yard mowed, and weeding everything. The garden is small enough (and packed enough) to do by hand, as long as we keep on top of it. My grain patch, out in the field, is tilled, and waiting patiently. I haven’t decided if I’ll do spring grains, given the lateness of the season, or wait for fall and do winter grains. Either way, I can put some red clover seed down as a cover and green mulch–and the bees, again, will love it.
All of the yard tending means breaking out the various pieces of outdoor equipment, tuning things up, and starting them up for the first time. 2018 thus far has seen our trusty riding lawn mower die. We had been eyeing a replacement anyway, so that timeline got moved up. I’ve also historically had very bad luck with small 2-cycle engines, so the string trimmer has finally been replaced with a cordless electric one.
Other ups and downs involve the “livestock”–the chickens, particularly. With the longer days, they tend to lay more regularly. But with the heat of summer already on us, several have gone broody. We move them to the “quarantine” coop, to keep them out of the nesting boxes. This has the added benefit of cooling them off a little, and helps break the broodiness. But the quarantine coop has a flaw…
Oddly, the raccoon (I believe–it may have been a fox) got in before we had any in the quarantine coop. I believe either the coop door wasn’t latched well, or it managed to figure out the gate latch. Either way, it got two of the girls. We’ve addressed the latch issue with the addition of a carabiner “lock.” The longer-term solution for the girls in quarantine will be to move them to “general population” for the overnight. (I’ll stay up late with my “varmint repellant” for a few nights, just in case the raccoon comes back.)
In the meantime, my wife requested the purchase of more chickens, to “boost” the flock (we were down to 18). A search was run, and a gentleman not too far away was selling year-and-a-half old laying hens for $5 each–a steal! He was suffering from a rat problem, and wanted to divest of his flock for a while, in the hopes of clearing the rats out. We went with the intention of getting five or six, and came home with eleven for the price of six. So our flock is nearly back to its largest (we’re at 29; we’ve had as many as 30). After a little assimilation and acclimation, we’ll probably be getting over two dozen eggs a day.
All of this, with an eye towards continued house renovations. We’ve got new appliances on order, to replace the older ones (in excess of 10 years old). Also a new refrigerator, with a different air recirculation mechanism. The current one keeps building up ice next to the fan, which leads to an extensive procedure to dismantle it and clean it out. Also finally getting a propane gas line run for the stove and water heater, plus a few minor “tweaks” to plumbing.
The last major thing for the summer is to re-insulate and seal the joists under the kitchen/dining room floor, with the hopes that they’ll stop buckling. There’s only so much we can do about the humidity and temperatures above it, but we can certainly keep the moisture and cool from coming up from below.
What do you like (and dread) about the switch-over from spring towards summer? I’d love to hear, in the comments below!
Last night, I picked up two baby hives (‘nucs’)of bees for the homestead. They’re both of the Russian bee species, which I’m hoping will help with mites, this year. This will be our third iteration with bees; the first year, one hive absconded, and the second “collapsed,” probably because of varroa mites. The second year, one collapsed due to disease load from mites, and the other was done in, or at least helped along, due to yellowjacket wasps.
Russian bees, however, are from the same area that the mites evolved from, and have developed a resistance. Mostly, it’s a form of “hygiene”–they clean the mites off of themselves, and chew off the legs, to keep the mites from re-attaching. (Yellowjackets can still be problematic, but if the bee population is decent, they’ll defend themselves.)
The nucleus hives come as a box–a little bigger than a shoebox–with five hive framesof honeycomb, a queen, about six thousand bees or so, and whatever they’ve managed to pack into the frames (mostly “brood”–baby bees). Normally, when installing the bees in their “permanent home,” you put them at least overnight where the hives will be, and open up the nuc entrance. Then you wait for a sunny point the next day, so the foragers will be out, and you swap the nuc box for a “normal” box in the same spot. The foragers won’t notice, when they get back–but they’ll have at least double the amount of room.
Last night, however, Mother Nature decided that it was time to move a little more firmly towards summer, and she lit into us with severe thunderstorms, as well as off-and-on rain all day. Most of the time, I’d leave the bees where they were, and wait for a sunnier day to move them. These boxes, however, were cardboard. Waxed cardboard, to be sure, but still, I didn’t want to risk the bees getting wet, and possibly deciding to abscond. (“Absconding” is similar to swarming–they all pack up with whatever honey they’ve got, and go looking for a new home.)
So, I waited until it was between sets of rain, and the sun tried to come out for a minute, then I got to deal with two very full boxes of bees. Both queens have been sighted, and they’ve both been laying a nice brood pattern, so there will be even more bees before too long. The “big” hives have even more honey (left from last year’s bees) and are almost completely drawn-out with comb, so they have lots of room to lay. I’ll give them a peek next weekend, and see how they’re doing. If it’s gangbusters, I’ll consider putting some honey supers on. We’re in this year’s flow, with black locust starting to bloom, and tulip poplars coming soon after.
Of course, they’re calling for thunderstorms and rain all week, which will limit the foraging. So, a little supplemental sugar syrup has been mixed up, and I’ve got plenty of sugar to make more, if needs be. With luck, it’ll be afternoon thunderstorms (typical for this time of year), and they’ll make it out to the trees in the mornings.
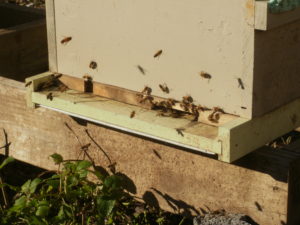
Given the rain, and the new accommodations, I didn’t get any pictures of them this weekend. The picture at the top of this post is from last year, at about this time. (Those are Italian bees, and as such are slightly larger and browner/yellower than the Russians.) But to tide us over until I can get some pics, here are more from last year, as they “bearded” the fronts of the hives.
If any of you keep bees, I’d love to hear about them in the comments. What kind? How successful have you been with them? What tips do you have, that you could share with us?
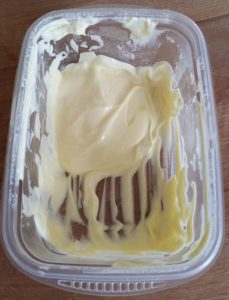
What to do when the world has handed you eggs, and you’re running out of space to store them? Make homemade mayonnaise!
More specifically, my wife has decided that she needs to take firmer control of her meals for the week, which necessarily means that the kids and I will also be taken under her wing. While working up lunches, making large batches of egg and tuna salad, she noted that we were running low on mayo… And we’ve got something like ten dozen eggs in the fridge. Well, eggs being one of the main mayonnaise ingredients, we decided that it would be most cost-effective to make our own.
Now, we’ve made mayonnaise before. Back before we moved out to the homestead, in the heady days when Alton Brown had his show on regularly, we tried out his recipe with some success. But that was years ago, and I at first figured I’d try something different. Enter: the venerable Fanny Farmer Cookbook.
I’m not sure what happened. We followed the instructions precisely. Maybe we added the oil too quickly? Maybe there wasn’t enough mustard? Regardless, it never set up. It remained a liquidy, mayonnaise-flavored soup. We tried the “repairs” that they suggested: adding another egg yolk. More oil. More mustard. Nope.
What eventually worked was starting smaller. We poured everything into a different container, and started over with a single egg yolk, a dollop of mustard, and a splash of vinegar. We got that spun up, then really slowly started adding the previous batch in. At first, literally drop. By. Drop. Then, slowly increasing the speed, but never as fast as the first attempt. I knew things were going well when I started seeing blobs of (recognizably) mayonnaise getting flung into and about the sides of the food processor. After a few short moments, it was done.
The taste was, at first, underwhelming… But after a short while in the fridge, it all came together nicely! Unfortunately, my wife was still making things…
I almost couldn’t get to it fast enough for a picture.
Here’s the recipe I used:
Blender Mayonnaise
1 whole egg (room temperature)
1/4 tsp salt
1/2 tsp dry mustard, or 1 tsp Dijon
1 cup oil (olive, peanut, vegetable, whatever)
1-1/2 Tbsp cider vinegar or lemon juice
1 Tbsp boiling water
additional salt to taste
Place the egg, salt, mustard, and 1/4 cup of the oil in the blender. Turn on the blender, and add the remaining oil slowly, in a thin stream (almost drop-by-drop). Add the vinegar or lemon juice and the water. Taste, add salt if desired, and refrigerate.
Cookie Consent
We use cookies to improve your experience on our site. By using our site, you consent to cookies.
Contains information related to marketing campaigns of the user. These are shared with Google AdWords / Google Ads when the Google Ads and Google Analytics accounts are linked together.
90 days
__utma
ID used to identify users and sessions
2 years after last activity
__utmt
Used to monitor number of Google Analytics server requests
10 minutes
__utmb
Used to distinguish new sessions and visits. This cookie is set when the GA.js javascript library is loaded and there is no existing __utmb cookie. The cookie is updated every time data is sent to the Google Analytics server.
30 minutes after last activity
__utmc
Used only with old Urchin versions of Google Analytics and not with GA.js. Was used to distinguish between new sessions and visits at the end of a session.
End of session (browser)
__utmz
Contains information about the traffic source or campaign that directed user to the website. The cookie is set when the GA.js javascript is loaded and updated when data is sent to the Google Anaytics server
6 months after last activity
__utmv
Contains custom information set by the web developer via the _setCustomVar method in Google Analytics. This cookie is updated every time new data is sent to the Google Analytics server.
2 years after last activity
__utmx
Used to determine whether a user is included in an A / B or Multivariate test.
18 months
_ga
ID used to identify users
2 years
_gali
Used by Google Analytics to determine which links on a page are being clicked
30 seconds
_ga_
ID used to identify users
2 years
_gid
ID used to identify users for 24 hours after last activity
24 hours
_gat
Used to monitor number of Google Analytics server requests when using Google Tag Manager
1 minute
You can find more information in our Cookie Policy and .


 But apparently, the
  I massaged the cure into the meat, going as best I could for even coverage, and popped them into the fridge, where they are being re-massaged and turned daily. After a week, I’ll dump out the liquid that has accumulated, add the rest of the cure, then repeat the process for another week.
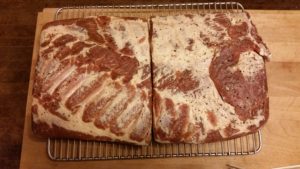
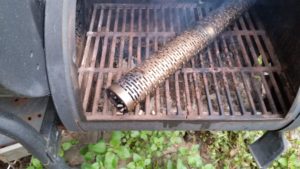 It uses pellets for the smoke, which is convenient: you can find dozens of types of pellets online for use in smoking, and they’re inexpensive, take up less room than chunks of wood, and work extremely well. I find that with the tube, I can easily get six to eight hours of consistent smoke.
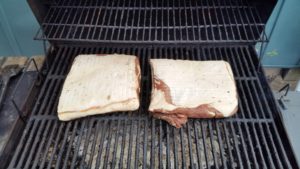
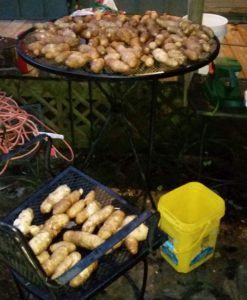 Once things were more or less under control, we set about harvesting what we could. The onions did pretty well, particularly the yellow ones–the red onions never got much above golf-ball sized. The garlic ended up being pretty much a non-starter; we’ll get some more in for the fall, when they’ll be happier with the cool weather. But the big success was the potatoes. From a few small hills, we actually got about 50 pounds! (A photo of the harvest is to the right–please excuse the [ahem] potato-quality picture…)
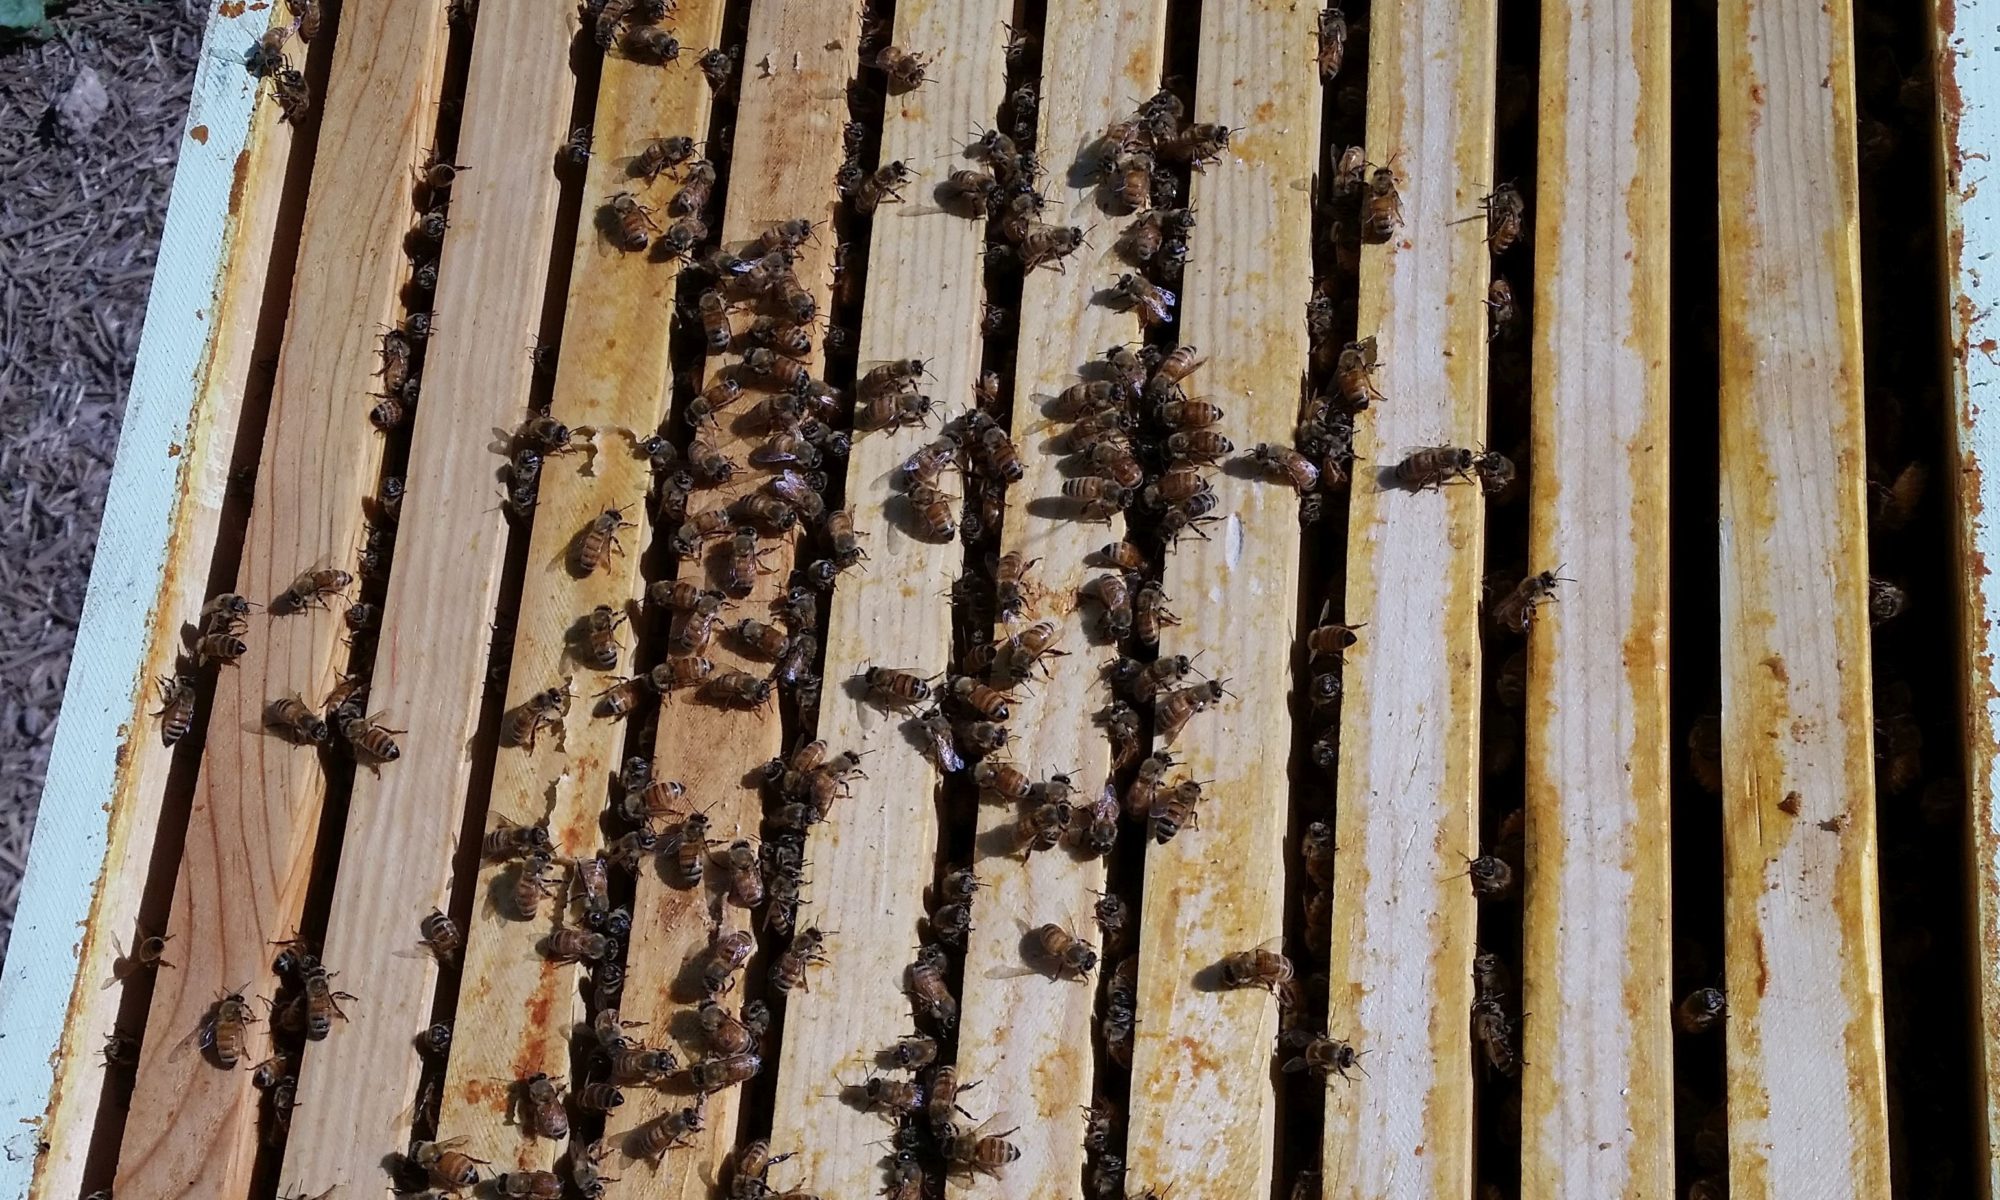
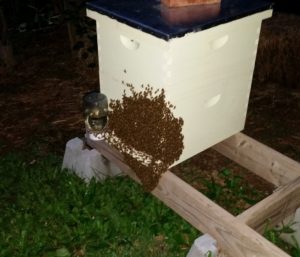 pics, here are more from last year, as they “bearded” the fronts of the hives.
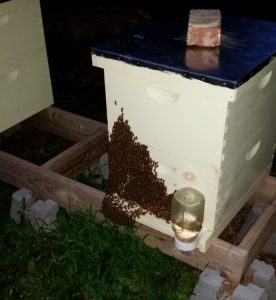 If any of you keep bees, I’d love to hear about them in the comments. What kind? How successful have you been with them? What tips do you have, that you could share with us?