Beekeeping Hardware: Building Hives

As I mentioned last week, some of my shop time has been spent getting things ready for spring. In particular, this has meant making sure I have enough, and the right kind, of “additional housing” (hives and frames) for the bees.

Langstroth’s Hives

While I’ve got a top-bar hive box built, I don’t have any bees in it yet. I’m waiting to see if I can catch a swarm to fill it. The main portion of my gear is the so-called “Langstroth Hive” system. It’s named for Rev. Lorenzo Langstroth (1810-1895), who discovered a peculiar notion called the “bee space,” which I’ll describe in a bit.

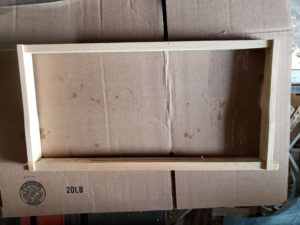
Langstroth’s system involves the use of boxes (“hive bodies”) filled with removable frames, on which the bees build their comb. The boxes mimic the hollows of trees, which the bees would use “in the wild.” The frames provide guidelines of a sort for the comb, otherwise it would be all swirly and convoluted. Pretty, but of no use to the beekeeper, because we can’t remove it intact.

Box with frames
Deep hive body with ten frames. The green tape is holding the last portion of each frame.

The hive bodies come basically in three sizes: deep, medium, and shallow. (We’re nothing if not inconsistent…) The deep is a bit over nine and a half inches tall; the medium is a little more than six and a half inches, and the shallow is about five and three-quarter inches. The length and width of all the boxes in a hive is the same, but they come in two “sizes”: eight-frame, and ten-frame. This, obviously, describes the number of frames in a box.

The three sizes are used for different purposes: deeps are primarily brood boxes, where the queen will lay her eggs. Mediums are sometimes used as brood boxes, but more often they’re placed atop the deeps, for the bees to store honey. And shallow boxes are almost exclusively used for honey.

Bee Space

The main innovation introduced by Langstroth was the concept of “bee space.” Bees are notorious for two types of “building”: comb, and propolis. Comb is, well, comb–where they lay eggs, or store pollen, or put honey. They’ll build it off the tops, sides, or bottoms of things–basically, if they think they’ve got room to put in a bit of honeycomb, they’ll try to build some.

Propolis, on the other hand, is sort of a combination bee-glue, paint,  and spackle. In essence, it’s plant resins that they’ve collected, but can’t turn into pollen or honey. It tends to be quite sticky. The bees use it to cover the inside of the hive (it may have some antibacterial properties), to plug “leaks” (if there’s a crack in a hive body, or between two hive bodies), and to make things inside the hive immobile. I generally can’t do a hive inspection without scraping off enough propolis to make a decent-sized ball of the stuff.

The deal is, if there’s more than about a bee’s thickness of space, the bees will build some comb. If there’s less than a bee’s thickness of room, they’ll try to fill it with propolis. But if the spacing is just right, they pretty much leave it be.

Beehive frame
One deep frame, without foundation.

Langstroth observed that “just right” is between 1/4 and 3/8 inch, and sized his boxes and frames to leave just that amount between everything. The boxes and the frames (to guide the bees in making comb) are sized just so, and they maintain the bee space.

But Why?

The reason we’re concerned with keeping excess comb and propolis out of the hive is so that we beekeepers can do our regular inspections. If the bees have built “burr comb,” which  juts out from an existing frame, they may stick multiple frames (or boxes!) together. So-called “cross comb” is when they build their comb “sideways,” across multiple frames. This makes it impossible to remove the frames neatly, and generally results in ticked-off bees.

The propolis is less of an issue in that sense, but it has the tendency to glue the frames down inside the boxes, making them difficult to remove. Occasionally, something will get into the hive that the bees don’t want, but can’t remove themselves (the occasional mouse, that sort of thing). In those instances, they’ll propolize the entire thing, also making it difficult to remove–and making quite the mess.

The hive inspections are for multiple purposes. First and foremost, it’s to check on the health of the hive–is the queen healthy and laying lots of eggs? Is there a disease issue to be dealt with? Are there parasites that need to be treated for? Second, we’re looking at how well the hive is working–whether they’re bringing in sufficient pollen and nectar, building enough comb in the right places, and such. Third, we’re looking to see if the bees are preparing to swarm or to replace their queen–sometimes this is good, sometimes not so much. There are things the beekeeper needs to do, in either situation.

Lastly, and certainly not least important, is we’re checking on the honey stores. This is both for ourselves, as the beekeepers, but also to see that the bees have enough to get themselves through any dearths or through the winter (when there is no nectar flow).
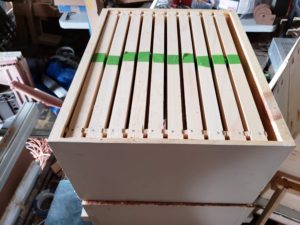
Building Boxes

All of this is a long-winded way of saying I spent the better part of a couple of days making new boxes and frames. My “active supplies” included six deeps in use (three per hive–this will probably decrease to two each, by the end of the year), plus two mediums with drawn frames, two mediums with partly-drawn foundation, two shallows with drawn frames, and two more mediums and a deep with empty frames.

Hive Bodies and Frames
Hive Bodies and frames. The rear stack has three medium and two deep boxes.

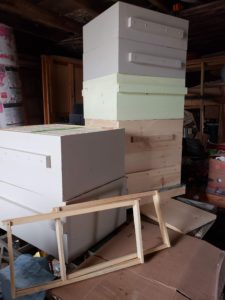
After a weekend building stuff, I’m up to ten deeps total, eight mediums, and two shallows. There are frames for everything, plus enough foundation to go around. (Foundation is a thin sheet of wax for the bees to use as a starter.) I’ll have to spend a snow day or two installing all of the foundation, but that’s a task for later.

Curiously, of all the things that could happen while building the boxes and frames (which involves time on the table saw, plus hammering in hundreds of nails), the most serious injury I got while doing all of this was a fairly minor cut, from my own knife, while undoing the strapping holding a bunch of frame pieces together. (Hitting my thumb with the hammer a few times doesn’t count. The nails are pretty small, after all.) But then, if you don’t bleed on it, it’s not a real project, right?

Status of the Bees

Of my two hives, as of mid-January both are still alive and kicking. One of them is definitely stronger than the other–on the warmer days over the last few weeks, they’ve been out and flying en masse. The weaker hive is still there, for now, but may not have enough bees to maintain warmth in their cluster. I’m not concerned about them starving, but they might freeze to death. It would suck, but that’s the nature of things.

Still, even if only one hive makes it, come springtime it’ll be off to the races. I’m certain that the stronger hive, should it make it that far, will be looking to swarm; if I play my cards right, I can make a split from it. That involves finding the prospective queen bees (the brood cells holding queen eggs are distinctive). Then I move those frames, together with a bunch of nurse bees, into a new box, and wait.

If I should make it to spring with both hives alive, I can probably get a split off of each. And if the spring nectar flow is good, I may be able to do that multiple times. My end goal is four to five hives by the end of the season–and at least one honey harvest!

I’m also considering setting up a sponsorship program for the hives–kind of like a CSA for the beehives, or “adopt-a-hive,” if you will. Something on the order of a donation of $X per season, and you’ll get email updates and photos of the hive, plus maybe a few pounds of honey, when it comes time for that.  If you’re local to me (in the MD/NoVA area) and interested, please email me and we can discuss it!


Making Cups – Quality Time in the Shop

I took advantage of the decent weather over the holidays to spend a bit of time in the shop. There was some re-organization, a little of which happens every time I go out there (and a lot of which still needs to happen). Some was getting a few things ready for spring. The really interesting stuff, though, was playing on the lathe a bit, and doing a little experimentation.

Cups and Goblets

My “lathe activities” tend to focus on drinkware, as befits my passion for brewing. Historically, leaving aside glassware, bowls were used by the majority of people–ale-bowls for, well, ale, and mazers for mead. The archaeological record, however, also shows a large number of what can only be classified as “cups,” with a somewhat smaller number of “goblets.”

(A quick diversion here to note that glass drinking vessels, made of clear glass, appear to have been relatively common. Certainly, they were more common than most folks tend to think. They had some value–they were buried along with their owners–and probably not accessible to the serfs and peasantry. But we’ve found quite a large number of them. This helps, in my opinion, put the lie to the myth that “all beers were dark and cloudy, but they couldn’t see it, so it didn’t matter.” And none of the below even touches on pottery/ceramic/stoneware vessels…)

Jelling Cup
Jelling Cup

One of my favorite period examples by style is a silver vessel called the “Jelling Cup.”  It’s small, only 4.5cm (less than two inches) tall, and about the same diameter. It’s footed, and intricately carved around the outside in the namesake Jellinge style (S-shaped dragons and such).

Something that I’ve been fascinated by, as I’ve researched period cup shapes, is the size of the cups. Almost without exception, they’re tiny–the Jelling Cup is absolutely not exceptional, in this regard. Robin Wood, in his book The Wooden Bowl, has images of lots of different drinking vessels. A number of them, particularly the “globular cups” from Viking-era Coppergate, show gloved hands, holding the some of the cups.

Coppergate cups
Coppergate cups

Doing a little side-by-side comparison, either the person holding the cups has enormous hands, or the cups are quite small… Only maybe three inches across at the most, and certainly all less than five inches tall. (The scale drawings from the archaeological digs, found in another book, indicate the same.)

Cross section
Russian cup in cross section

Things turn a little larger when you start talking turned goblets from medieval Novgorod–but then, the Russians have always been of the “bigger is better” persuasion. The finds from Novgorod include several goblets of the type shown here; they had heights up to about seven inches, and ran to as much as five and a half inches in diameter.

Turning the cups

Most cups are “spindle-turned,” or turned into the end-grain, meaning the grain of the wood runs vertically through the cup as it stands on the table. (By comparison, most bowls and plates are “face-turned,” with the wood grain running horizontally.) While that is a small difference, it significantly affects the wood properties, and thus how the turning is performed.

Significantly, I find it difficult, especially with “green” or slightly wet wood, to

Maple cups
Darker maple cups

turn deep bowls in end-grain, particularly with my current set-up. (With a pole lathe, using hook tools, I can see it being somewhat easier in some respects.) Also, I find that I have to be much more diligent about keeping the tools sharp when turning the end-grain. I mean, I have to keep things sharp anyway, but I probably hit the sharpener twice as often with end-grain.

Maple cups
Lighter maple cups
Birch goblets
Birch goblets

All that said, I do enjoy making the cups–especially when I can get a matched pair out of a single wood blank. I like using 3″x3″x12″ billets for most cups; I can get two to three from a single billet without much difficulty. A single cup would have to be pretty eccentric for the lines to work right, in my opinion; given the narrow bowl, the stem would have to be long and quite slender. While I’ve seen modern goblets turned like that, I’ve never seen anything similar in period.

While I have made Russian-style goblets, as I said, I really like the Jelling style, for some reason. So, I’ve been turning out a number of cups and goblets in that style–both short ones, similar to the Jelling Cup, and taller ones with similar lines.

Finishes – Beeswax or Nothing

How and whether to finish the cups is something I’ve been playing with for almost as long as I’ve been turning them. The originals in period would have probably been left unfinished, or (at most) rubbed down with beeswax, and possibly buffed. Either way, they would have been left susceptible to damage from the liquids they held, or to rotting, if left damp and unused. That said, it’s really an experience to quaff your beverage from an unfinished wood cup, as your ancestors would have; it really changes the experience of the drink.

Another point, particularly for unfinished cups, is that the wood grain would act like a bundle of straws, and eventually whatever liquid the vessels held would find its way through to the bottom. (This is probably one reason that the Coppergate cups were thick-bottomed–to slow the penetration of the liquids.) In the interest of preventing this, I began playing with various oil finishes, such as walnut, linseed, and mineral oils.

Finishes – Oil and Wax

I used a mineral oil/beeswax mix for a long time; the two combine to form a soft paste, which applies nicely, buffs down well, and is food-safe. Any of those need multiple coats, though, to really provide protection to the wood. They also benefit from re-application after using the vessel, for at least the first couple of years. Time-consuming, and not much fun.

Finishes – Pitch

The next step was to use an oil or oil-and-wax finish on the outside, but line the inside of the cup with brewer’s pitch. This provided both the tactile sensation of the wood on the outside, while keeping it completely protected on the inside. Getting the pitch just right can be difficult–it’s a resin, which has to be melted, then poured into the cup and swirled around to coat, then the excess poured back out. When done well, it can be quite beautiful, almost jewel-like on the inside. When done not so well, it’s functional, but not as pretty.

Either way it’s done, the pitch lining is somewhat fragile. It can be scratched with a fingernail, and if (gods forbid) the cup flexes somewhat, it will crack, which creates a whole new set of problems. Adding a bit of beeswax to the pitch gives it more flex, but makes it even softer, and very susceptible to “slumping” into the bottom of the cup on hot days.

Finishes – Modern

Maple cup
Maple cup, quarter for scale

Lately, I’ve moved even further from period methods, and taken a cue from the pen-turners: the outside is finished to a high gloss, using an acrylate finish. (Yes, I’m using super-glue to finish the outsides of the cups.) I’m finding that the wood-grain really “pops,” and any unique features in the wood (figuring, or interesting color) show through nicely.

For the insides of the cups, I’ve got an epoxy that I’ll be giving a shot in the next few days. It’s a clear two-part, and is used for bartops and such; when cured, it’s alcohol- and water-proof, and quite food safe (as is the acrylate finish, when cured).

Birch Goblet
Birch Goblet
Maple cup
Maple cup

The jury is out on whether the epoxy will prove as subject to breakage as the pitch. I’m certain that the cups will be longer-lasting for modern usage–I have noted that we tend to be pretty rough on the cups. But with the acrylic and the epoxy, they should be much more washable, and (I think) quite a bit sturdier for use.

And for the curious, yes, I’ll have the cups up in my Etsy shop and my standalone shop, as soon as I can get doing the lining worked out, and turn a few more. In the meantime, look for me (and them!) at any event I’m at. I’ll try to have a couple of them on-hand, and I’m happy to let folks try them out!