The Little Things – Bone Nalbinding Needle

I really love making things. Among my favorite things to make are the tools used to make other things. There’s just something satisfying about being able to take something you’ve produced and put it to use, making another thing. This weekend, it was time for a batch of bone nalbinding needles.

Nalbinding?

Nalbinding, for those who don’t know, is a fiber arts technique that creates generally thick, warm items. Most common are mittens, socks, and hats, but I’ve seen things ranging from scarfs to sweaters and more.
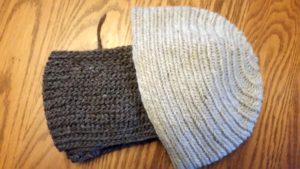
Nalbinding Hat and ScarfThe technique is usually glossed as “Viking knitting,” but that’s very much over-simplifying things. The earliest known pieces are from Israel (scraps of fabric), while the Coptic Egyptians produced socks. Structurally, while there can be a visual resemblance to knitting, it’s closer to crochet–and closer still to net-making.

I’ll save a description of the technique for a separate post; suffice to say, it uses a single needle, similar to but typically larger than a tapestry or yarn needle. Traditionally, these are made of wood, antler, or bone–I prefer bone.

Bonecutting

I make the needles from the leg bones (the ‘cannon-bones’) of elk. I could use deer (whitetail or mule), but I don’t get as many needles from one of those; also, my supplier (Moscow Hide and Fur) tends to have lots of elk bones in stock.

I begin by cutting off the ends–the physical structure of the bone in the ends is unsuitable–and cut the “barrel” of the bone in half lengthwise. I then section the halves into roughly needle-length portions, and cut the needle blanks from those. From one elk cannon-bone, I normally get eight to ten nalbinding needles, plus a few other odds and sods that I can use for sewing needles, shuttles, or tabletweaving tablets. The ends can be made into things like beads or rings; I’m experimenting with spindle whorls, for handspinning drop spindles.

Sanding and drilling

What you’ve got at this point is a handful of rectangular bone pieces, about three inches long, a quarter inch wide, and an eighth of an inch thick. You could carve them down with a knife, but since I make these for my Etsy shop, I’d rather build my inventory a little more quickly.

For our purposes, abrasives are faster than whittling–and safer, too, when it comes down to it. I could sand them all down manually with loose sandpaper, but we’re trying for quickly! So in the interest of speed, I use a benchtop belt sander. After getting my technique down, I can sand a half dozen blanks down into rough needles in under fifteen minutes

Once I have the needles rough-shaped, they go over to the drill press, where I put the preliminary hole for the eye. Then, depending on whether I’m really in a hurry, I will either shape the eye with a rat-tail needle file, or I’ll use a grinding attachment on a rotary tool. The end result is a nice, oval eye, rounded around all of the edges.

The final sanding is a manual process–I haven’t found a way, yet, to get a good finish mechanically. Fortunately, it’s a fairly mindless, Zen sort of thing. I’ve got scraps of sandpaper, about three inches square, in 120, 220, 320, and 400 grits, and a wad of “000” steel wool. Roughed Nalbinding NeedlesFold the sandpaper in half, and plunge the needle between the paper, rotating with successive “stabs”, then flip to do the end you’ve been holding.
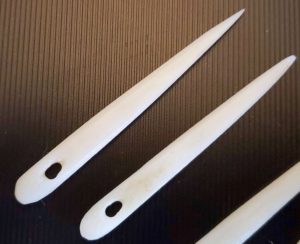
In the photo on the right are some roughed out nalbinding needles. If you look closely at the uppermost, you can see that it is “faceted,” and has several sharp-ish edges.

After a pass with the 120 and 220 grits, it looks like the one below: the edges are softened, and it’s rounder and beginning to smooth out.
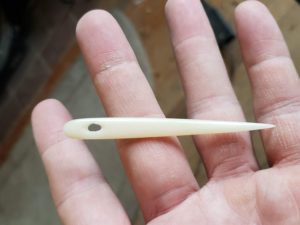
Nalbinding needle, mostly sandedAnd finally, having gone through the 400 grit, and finishing the process out with the steel wool, the needle is smooth, with almost the feel of a hard plastic. There may be some remnant scratches in the larger faces from the coarser sandpaper, but I don’t worry about those much; after a few hats or mittens worth of use, the scratches tend to buff out.Finished Nalbinding needle
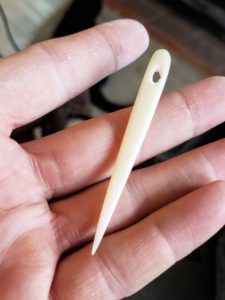
The whole finish-sanding process takes maybe 5 minutes per needle. I like to put on some music, or maybe pop a movie on the laptop, and kind of zone out while sanding.

The needle to the right is basically done. I’ll probably touch up the eye with a file, to “even out” the one side, but it’s not horrible.

Safety First

One word of advice: when you’re cutting or sanding bone or antler, you’ll want to add a face mask to your safety equipment, if not a full respirator. You’ll be sending fine particles of bone into the air; they’re organic particles, potentially with a bacterial load, and you really don’t want them in your lungs.

And while we’re on the topic, safety glass are your friend, especially during the sawing and belt-sanding portions of the event.

A Little Shop Production

That’s pretty much it!  These nalbinding needles (and some shorter ones) seem to have been pretty popular. I’m experimenting with a few new items, as well: I’ve put up some nalbound hats, and will be offering up a leather needle-case (will hold probably four or five of these needles) and a couple of other items, once I work out a couple of bits in the designs. All this, of course, in addition to the turned bowls I’ve mentioned elsewhere.

Also mentioned elsewhere, I’m also in the process of building a “not-Etsy” site. I haven’t decided yet if I want to fully move off of Etsy, as it’s much easier to be “found” there. At least for the foreseeable future, I’ll probably just duplicate my inventory, with a few additional (fancier) items on the standalone site. I’ll be sure, of course, to link to it here, once it’s up.

If there are any small things that my re-enactor readers would like to see me make, I’m certainly open to suggestions in the comments! Let me know what you think!

Cheese Smoking in the Fall

In addition to all of the various cured meats I’ve been doing lately–I’ve added a pork shoulder into the mix–I’m smoking a bit of cheese, in anticipation of Thanksgiving.

Making smoked cheese is one of the simplest, tastiest, and most under-appreciated ways to really bump up an appetizer tray. I suppose the cheeses would go great in a dish, but mine have never actually lasted long enough to cook with them.

Picking Ingredients

The process couldn’t be simpler: buy some cheese from the grocery store. Big blocks of cheese, about a pound apiece, work best, but I’ve also used cheese sticks. My favorite types for smoking are Monterey Jack, Pepper Jack, and sharp Cheddar, but you can use whatever you  like.

Second in importance only to the cheese would be the type of smoke. As with the cheese, let taste be your guide. I would stay away from any of the heavier smokes, though–mesquite, oak, hickory–unless you’re really certain that’s what you want. (And even then, I’d start small, and check the results.) I really like fruitwoods; with most cheeses, apple is a good match. Maple, beech, or pear work well, too, but cherry might clash a little with the cheese.

The Process

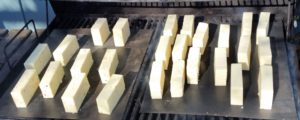
Chop the blocks of cheese into moderate-sized blocks, trying to keep things under an inch in thickness. I usually halve the blocks, then halve the halves, then halve those bits; I end up with pieces about 2″ x 4″ x 1/2″, give or take. This lets the smoke reach all the sides, and penetrate into the cheese, so it’s not just a “surface-taste” event.Cheese on the Smoker

Once that’s done, arrange the cheese in your smoker, and fire it up!

Cold-smoking is definitely the way to go, for cheeses. We’re not worried about bacterial contamination, so there’s no need to really heat things up; in fact, you need to keep things cool enough that the cheese doesn’t melt. That would cause a big mess in your smoker. It’s for this reason that I really like fall. Things outside have cooled down to where I don’t generally have to worry about the temperature. Preparing to smoke some cheese

How long to smoke? To taste. I like to let things go for at least six hours; longer if it’s a stronger-flavored cheese. I also like to flip the blocks a couple of times, just to ensure even coverage of smoke.

It’s okay if the cheese sweats just a little, but if things start getting soft and runny, pull them out! It’s a really short step from “soft” to “melted,” and once melted, the cheese is difficult to rescue from the inside of the smoker…

Let it Cure

Far and away the most difficult part of the process is waiting for things to be just right after the smoke. Ideally, you should seal the cheese blocks up in plastic, then let them sit in the fridge for a week or so. (I use a vacuum sealer; this keeps the inside of the refrigerator from smelling like a smokehouse.) The smoke needs time to really, thoroughly penetrate into the cheese, and to mellow a bit. Don’t be afraid to let it sit longer than a week, but much past two and you’re really reaching diminishing returns. Time to eat!

Uses for Smoked Cheese

Beyond the obvious sliced-on-a-tray-with-crackers-and-apples, I would imagine that just about any savory dish involving cheese would be improved with a little smoke. Smoked cheese toast? Sure!  Some smoke in a fondue? Why not! Chicken cordon smoked bleu? Yep! The sky’s the limit, really. (I’m wide open to suggestions in the comments!)


First Bacon of the Season

As I mentioned in my last post, I had some bacon curing in the fridge. I took it out of the cure last night so it could air dry, and today it got smoked. Let’s take a look at the process.

Procuring a Pork Belly

I’ve often said that this is the hardest part of the whole process. If you’re a farmer raising pigs, you’re set. The rest of us, however, face the challenge of finding a good butcher who’s willing to part with a precious belly, before making bacon of his own. (They’re “precious” because there’s only one per pig; maybe 15-20 pounds for a good-sized full belly.)

I’ve had luck in the past at my local Costco; they occasionally have raw pork belly out (sold in half-bellies, typically 8-10 pounds each). But more often, and much more reliably, I head to my local ethnic grocery. In my local area, we have G-Mart and H-Mart; both are full-sized grocery stores, catering to Latin American and Oriental cuisines. Since pork belly is fairly common in Chinese cooking (as a soup flavoring), they typically have it in stock. If you don’t see it out front, ask the butcher behind the counter.

Preparation

Preparing the belly is optional, and will partly depend on how you get it. I like boneless, skinless bellies, because most of the work has been done for me, and I’m left paying for just the “bacon part,” by weight.

If you got it skin-on, don’t worry; you can leave it on, and remove it after smoking. (Save it for cracklings, or soup additives.) If you got bone-in pork belly, you’ll want to remove the bones (ribs) with as little mangling as possible.

After that, I generally cut the belly into two parts, across the center of the belly to give me two rough squares to work with. This isn’t absolutely necessary, but it makes the meat easier to handle. They also fit nicely into extra-large (~2.5 gallon) Ziploc bags.

Into the Cure

I use a variation of the basic bacon cure from Ruhlman and Polcyn’s book Charcuterie:  for about every 5 pounds of pork, use 2 ounces (50g) kosher salt, 12g pink salt, 1/4 cup dark brown sugar, 1/4 cup maple syrup, and a healthy dash of fresh, coarsely ground black pepper.

(I apologize for the mixture of measures; between cooking, brewing, and various other hobbies, I move back and forth between systems pretty smoothly. Generally, if it’s important that I get a specific amount by weight or volume, I’ll go metric; if it’s safe to fly by the seat of your pants, I’m fine with Imperial measures.)

Some folks take issue with the use of “pink salt” (AKA “Prague Powder” or “curing salt”, and which adds sodium nitrite to the mix) for health reasons. I counter with the fact that the human body produces sodium nitrite as part of the digestive process, anyway. And besides, if I was being that health-conscious, I wouldn’t be making and eating bacon, right?

Anyway, I put each of the chunks of pork belly into a Ziploc bag, and add a dose of the cure to each bag. Then I zip the bags shut, squeezing out as much air as possible. Then I massage the cure components as thoroughly as I can, over the entirety of the pieces of meat. then, into the refrigerator they go!

Waiting Game

The curing bellies sit in the refrigerator for 5-7 days. (The original recipe calls for a week, but I find that the meat cures faster without the skin, so I lean more towards 5 days.) Flip them over at least daily, and make sure to re-distribute the brine which forms in the bags across the meat.

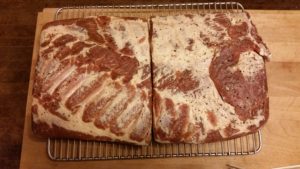
By the end of the curing process, the meat will be significantly firmer than when you started. The “lean” parts will have darkened somewhat, and the whole thing should look something like this:Cured bacon, before smoking

Smoke, but no Fire

At this point, the bacon is technically ready to cook and eat. Just heat it in the oven, with as low a heat as you can get, until it reaches an internal temperature of 150 degrees; let it cool a bit, and slice off the skin with a sharp knife.

Or, you can go the route I much prefer, and smoke it. Ruhlman and Polcyn call for a hot-smoke, about 3 hours, ending the same as with the oven method. I like to cold-smoke it, though.

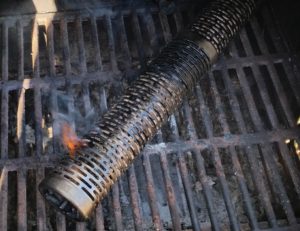
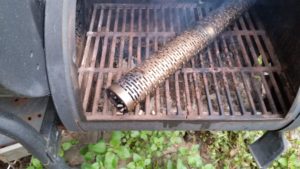
Until I get a full smoker built (a project for another time), I use my grill, and a nifty pellet smoking tube I found.Pellet tube, with pellets lit It uses pellets for the smoke, which is convenient: you can find dozens of types of pellets online for use in smoking, and they’re inexpensive, take up less room than chunks of wood, and work extremely well. I find that with the tube, I can easily get six to eight hours of consistent smoke.
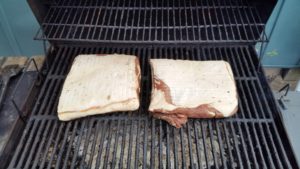
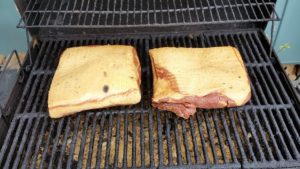
This batch of bacon is getting an apple-maple mix that I’ve found to be quite lovely. Other good choices for this bacon would have been oak or maybe cherry; I wouldn’t go for anything heavier like hickory or mesquite, though, as they’d be a bit much for the cure.

It’s Bacon!

Here’s the slabs before and after smoking:

bacon, before smoke
Before smoke
bacon, after smoke
After smoke


The last step in the process, unless you’re going to immediately fry it all up and eat it, is to separate it into “single-meal portions,” then wrap it and freeze it (I like vacuum-sealing it). For slabs like this (about 4.5 pounds each), I’ll cut each into rough thirds. Make sure to cut across the grain of the meat, otherwise the bacon can be stringy.

I’ll probably do another couple of slabs of bacon over the fall and winter; I’d also like to do some bigger “whole-muscle” cured bits, like bresaola, lonzo, and maybe a dry-cured pork shoulder (“almost” prosciutto). Heck, I’d like to do a prosciutto, as well as a country-style ham. But before I do either of those, I’ll need to work on that smokehouse project, to say nothing of becoming good friends with one of the local butchers.

What do you think, readers? Do you have suggestions for other curing mixes, or for other things to cure? (I often put some cheese on the top rack in the grill and smoke it, when I’m doing something like this.) Let us know in the comments!

Best Bitter Tasting

As promised last week, this time around I’m tasting the Best Bitter I brewed up on the last Brew Day.

Best BitterI’m not as happy with the Bitter as I was with the Pale Ale. A fair amount of it can be chalked up to the yeast, I think (Burton Ale Yeast, WLP-023). It’s just not settling out like it should, leaving the beer hazy. Also, it doesn’t seem to ferment out nearly as dry as the London Ale Yeast (WLP-013); at least, not in this iteration.

Between the yeast still in suspension, and the relative warmth of the fermentation putting out lots of esters, I’m getting a bunch of fruit in this one, mostly in the nose–almost like peaches, if you can believe that. Despite being more aggressively hopped than the Pale (3.5 ounces, versus 2 in the Pale), I’m not getting that as much; it’s not coming across with as much bitterness. Some of that is probably due to the roasted grains in the Pale, which were absent from the Bitter, but I’d expect some of the “greener” bittering from the hops.

It throws a lovely, thick white head, which quickly falls to an eighth of an inch that sticks with the beer for the rest of the glass. It’s not highly carbonated, by design; I wanted it to resemble something from a cask, so I was aiming for about 1.5 volumes. Despite that, it’s pressurizing itself in the keg to about 8 PSI, which is making for an aggressive head when I pour it.

In all, it’s a solid beer, just not exactly to my taste. If I do it again, it’ll have to be in steps, to see how various “improvements” change it. First, I’d have to do it with the WLP-013, then maybe try an all-grain version of it. Fermenting it cooler than I did (about 70 degrees) would probably help with the esters, but I’d probably have to shake it up a bit during fermentation, to rouse the yeast. I’ll admit to also being curious about the Extra Special Bitter, which is a slightly different recipe than this one. It might be worth trying it out on a future Brew Day.

My next Brew Day, on the 21st of October, will feature a mini-mash Irish Red Ale, again from a MoreBeer kit. Being a more “complex” brewing style, I’ll only be doing the one beer; it’ll probably take me a fair part of the afternoon. I plan on using the WLP-013 again, because I think it will really play nicely with the style: rich, lightly roasty, and nicely dry on the palate.

In non-brewing news, with the turn of the seasons, it’s time to get into curing meats again. I’ve already got about 9.5 pounds of pork belly curing in the fridge, a week or two from being delicious homemade bacon. Also, I’ve been eyeing the recipe for bresaola, and I think that once things cool off a little more, I’ll be able to pull that one off in the cellar. I’ll go more in-depth into procedure and recipes and such in a future post.

What sort of autumn deliciousness have you been up to, readers? Let us know in the comments!

More toys!

This is my new lautering manifold. It’s not perfect, but it’ll do, I hope–its inaugural run will be on the 6 September Brew Day. The whole thing is of a piece, except for the connection to the drain fitting (the uppermost bit of copper, in the picture). So, it’ll just pull out for cleaning. I started with a hacksaw yesterday putting in the slots (on the underside, not visible in the picture), but got smart today & pulled out the jigsaw with a metal blade. The whole thing, when attached in my new mash tun (a 70-qt Ice Cube cooler), sits evenly along the bottom. I’m probably going to get a bit of fluid loss with the design (it has to angle up to get to the drain), but as long as my grasp of fluid dynamics is good, I figure it’ll be the same as or less than my fluid losses in the cylindrical cooler using the Bazooka screen.