
Some of the links below are affiliate links, meaning, at no additional cost to you, I will earn a commission if you click through and make a purchase.
I took advantage of the decent weather over the holidays to spend a bit of time in the shop. There was some re-organization, a little of which happens every time I go out there (and a lot of which still needs to happen). Some was getting a few things ready for spring. The really interesting stuff, though, was playing on the lathe a bit, and doing a little experimentation.
Cups and Goblets
My “lathe activities” tend to focus on drinkware, as befits my passion for brewing. Historically, leaving aside glassware, bowls were used by the majority of people–ale-bowls for, well, ale, and mazers for mead. The archaeological record, however, also shows a large number of what can only be classified as “cups,” with a somewhat smaller number of “goblets.”
(A quick diversion here to note that glass drinking vessels, made of clear glass, appear to have been relatively common. Certainly, they were more common than most folks tend to think. They had some value–they were buried along with their owners–and probably not accessible to the serfs and peasantry. But we’ve found quite a large number of them. This helps, in my opinion, put the lie to the myth that “all beers were dark and cloudy, but they couldn’t see it, so it didn’t matter.” And none of the below even touches on pottery/ceramic/stoneware vessels…)
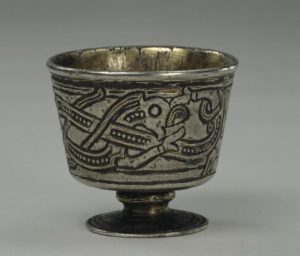
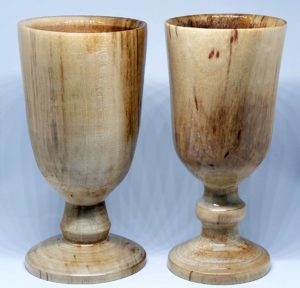
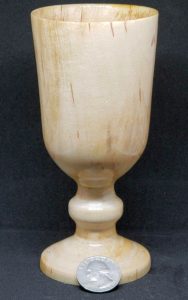
One of my favorite period examples by style is a silver vessel called the “Jelling Cup.” It’s small, only 4.5cm (less than two inches) tall, and about the same diameter. It’s footed, and intricately carved around the outside in the namesake Jellinge style (S-shaped dragons and such).
Something that I’ve been fascinated by, as I’ve researched period cup shapes, is the size of the cups. Almost without exception, they’re tiny–the Jelling Cup is absolutely not exceptional, in this regard. Robin Wood, in his book The Wooden Bowl, has images of lots of different drinking vessels. A number of them, particularly the “globular cups” from Viking-era Coppergate, show gloved hands, holding the some of the cups.
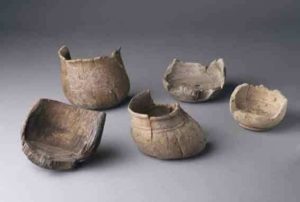
Doing a little side-by-side comparison, either the person holding the cups has enormous hands, or the cups are quite small… Only maybe three inches across at the most, and certainly all less than five inches tall. (The scale drawings from the archaeological digs, found in another book, indicate the same.)
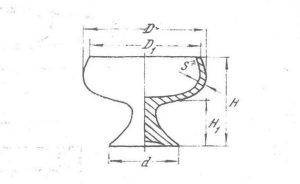
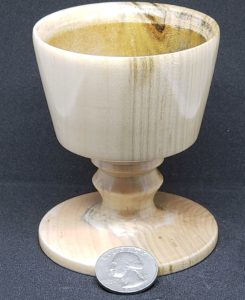
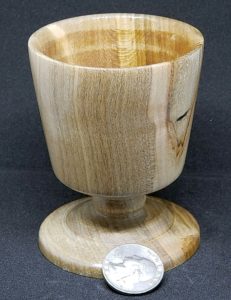
Things turn a little larger when you start talking turned goblets from medieval Novgorod–but then, the Russians have always been of the “bigger is better” persuasion. The finds from Novgorod include several goblets of the type shown here; they had heights up to about seven inches, and ran to as much as five and a half inches in diameter.
Turning the cups
Most cups are “spindle-turned,” or turned into the end-grain, meaning the grain of the wood runs vertically through the cup as it stands on the table. (By comparison, most bowls and plates are “face-turned,” with the wood grain running horizontally.) While that is a small difference, it significantly affects the wood properties, and thus how the turning is performed.
Significantly, I find it difficult, especially with “green” or slightly wet wood, to
turn deep bowls in end-grain, particularly with my current set-up. (With a pole lathe, using hook tools, I can see it being somewhat easier in some respects.) Also, I find that I have to be much more diligent about keeping the tools sharp when turning the end-grain. I mean, I have to keep things sharp anyway, but I probably hit the sharpener twice as often with end-grain.
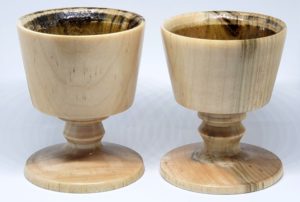
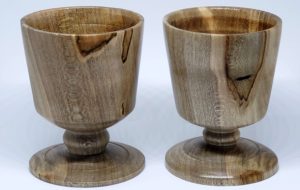
All that said, I do enjoy making the cups–especially when I can get a matched pair out of a single wood blank. I like using 3″x3″x12″ billets for most cups; I can get two to three from a single billet without much difficulty. A single cup would have to be pretty eccentric for the lines to work right, in my opinion; given the narrow bowl, the stem would have to be long and quite slender. While I’ve seen modern goblets turned like that, I’ve never seen anything similar in period.
While I have made Russian-style goblets, as I said, I really like the Jelling style, for some reason. So, I’ve been turning out a number of cups and goblets in that style–both short ones, similar to the Jelling Cup, and taller ones with similar lines.
Finishes – Beeswax or Nothing
How and whether to finish the cups is something I’ve been playing with for almost as long as I’ve been turning them. The originals in period would have probably been left unfinished, or (at most) rubbed down with beeswax, and possibly buffed. Either way, they would have been left susceptible to damage from the liquids they held, or to rotting, if left damp and unused. That said, it’s really an experience to quaff your beverage from an unfinished wood cup, as your ancestors would have; it really changes the experience of the drink.
Another point, particularly for unfinished cups, is that the wood grain would act like a bundle of straws, and eventually whatever liquid the vessels held would find its way through to the bottom. (This is probably one reason that the Coppergate cups were thick-bottomed–to slow the penetration of the liquids.) In the interest of preventing this, I began playing with various oil finishes, such as walnut, linseed, and mineral oils.
Finishes – Oil and Wax
I used a mineral oil/beeswax mix for a long time; the two combine to form a soft paste, which applies nicely, buffs down well, and is food-safe. Any of those need multiple coats, though, to really provide protection to the wood. They also benefit from re-application after using the vessel, for at least the first couple of years. Time-consuming, and not much fun.
Finishes – Pitch
The next step was to use an oil or oil-and-wax finish on the outside, but line the inside of the cup with brewer’s pitch. This provided both the tactile sensation of the wood on the outside, while keeping it completely protected on the inside. Getting the pitch just right can be difficult–it’s a resin, which has to be melted, then poured into the cup and swirled around to coat, then the excess poured back out. When done well, it can be quite beautiful, almost jewel-like on the inside. When done not so well, it’s functional, but not as pretty.
Either way it’s done, the pitch lining is somewhat fragile. It can be scratched with a fingernail, and if (gods forbid) the cup flexes somewhat, it will crack, which creates a whole new set of problems. Adding a bit of beeswax to the pitch gives it more flex, but makes it even softer, and very susceptible to “slumping” into the bottom of the cup on hot days.
Finishes – Modern
Lately, I’ve moved even further from period methods, and taken a cue from the pen-turners: the outside is finished to a high gloss, using an acrylate finish. (Yes, I’m using super-glue to finish the outsides of the cups.) I’m finding that the wood-grain really “pops,” and any unique features in the wood (figuring, or interesting color) show through nicely.
For the insides of the cups, I’ve got an epoxy that I’ll be giving a shot in the next few days. It’s a clear two-part, and is used for bartops and such; when cured, it’s alcohol- and water-proof, and quite food safe (as is the acrylate finish, when cured).
The jury is out on whether the epoxy will prove as subject to breakage as the pitch. I’m certain that the cups will be longer-lasting for modern usage–I have noted that we tend to be pretty rough on the cups. But with the acrylic and the epoxy, they should be much more washable, and (I think) quite a bit sturdier for use.
And for the curious, yes, I’ll have the cups up in my Etsy shop and my standalone shop, as soon as I can get doing the lining worked out, and turn a few more. In the meantime, look for me (and them!) at any event I’m at. I’ll try to have a couple of them on-hand, and I’m happy to let folks try them out!