Following Rabbit-holes in Trossingen

One of the things I find most interesting about my brewing hobby is the various rabbit-holes it will take me down.  The research takes me down all sorts of odd side-streets and alleys.

Rabbit Holes

For example, finding myself with all sorts of “excess”–mostly spent grains–I started looking at other things to do with it. Dog biscuits and bread are the obvious answers. Or when a batch is done fermenting, I’ve got a surfeit of yeast: again with the bread.

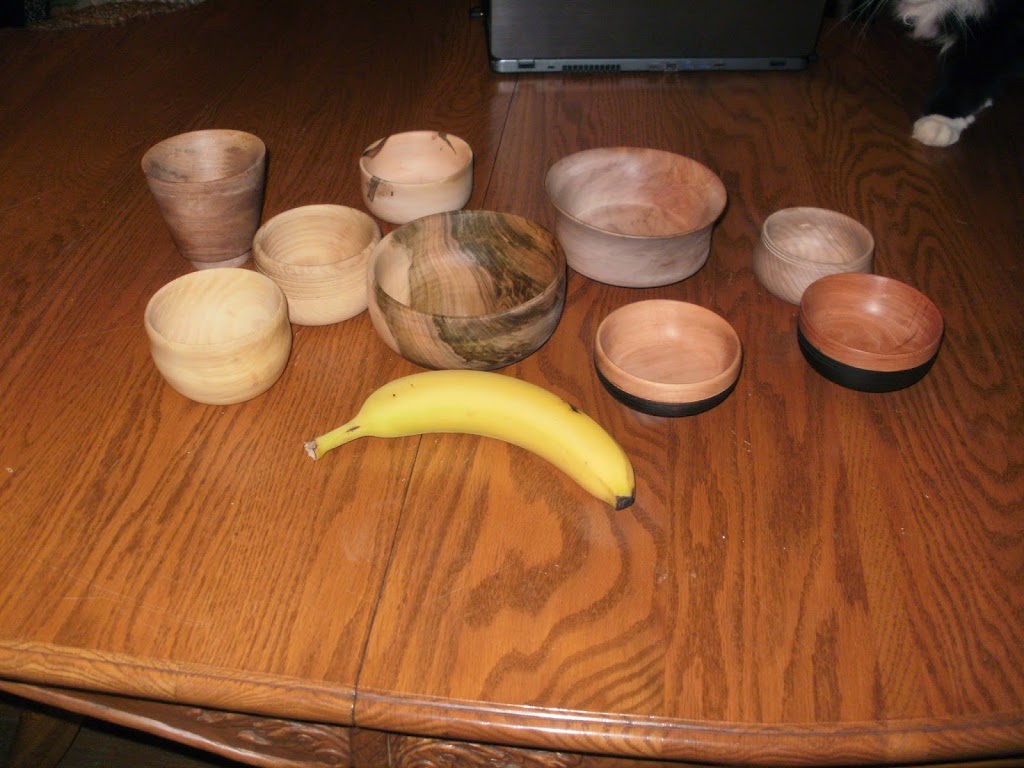
Then there are the slightly odder things. What did they use to drink their beer, or ale, or wine, or mead? That question led me to a number of interesting places. There’s the bowls and cups I mentioned previously–those tended to be for beer, sometimes ale. There are lots of references to “wine cups,” and the Russians even had a “wine bowl” of much larger size.

Drinking horns?  Well, they were used, but I don’t think they were ubiquitous. (There seem to be many more trees than there are horned livestock.) Tankards? Possibly. Probably, even. I’ve seen reference to lots of glassware, too, and its use seems to have spanned class and caste to a much greater degree than people think.

Then there’s the question of mead. It seems to have been very much a special occasion drink in most areas. For that, you’d break out your “fine china,” in the form of your horns and the like. One particular type of vessel stands out for mead, though: the mazier. (It’s also spelled “maser,” but using that as a search term brings back all kinds of odd sci-fi stuff.) Maziers, though, are worth a post all their own.

Where things get really interesting to me, though, is when you can actually look at an extant item. That’ll usually be through photographs, to be sure, but it’s certainly better than nothing. (One interesting source of photos is Robin Wood’s book “The Wooden Bowl”. This book focuses on central and northern European bowls, and has lots of lovely pictures–but it’s not where I’m going today.)

Enter Trossingen

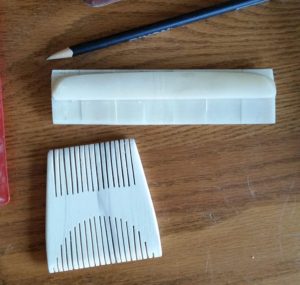
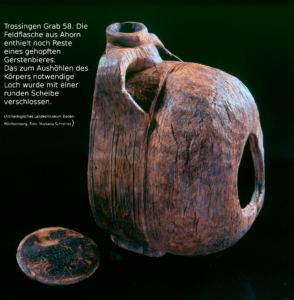
A set of turned things that really caught my attention when I first saw pictures  of them were the wooden goods from the Trossingen grave.  I don’t recall how exactly I ran across them–most likely, it was wandering through Pinterest–but detailed photos and descriptions can be in the book “Mit Leier und Schwert” by Barbara Theune-Großkopf. (The link to it is here, but be forewarned that it’s Amazon.de, the book is in German, and it’s usually out of stock.)

The grave is that of a 6th century Merovingian/Frankish high-status warrior. He was buried in a box-bed turned into a coffin, surrounded by grave goods, to include his sword, shield, spear/lance, a lyre, an antler comb, some pouches, a chair, a small table, candlestick, some candles, two bowls, and a canteen. Of these, the bed, candlestick, chair, table, bowls, and canteen, were at least partly turned.

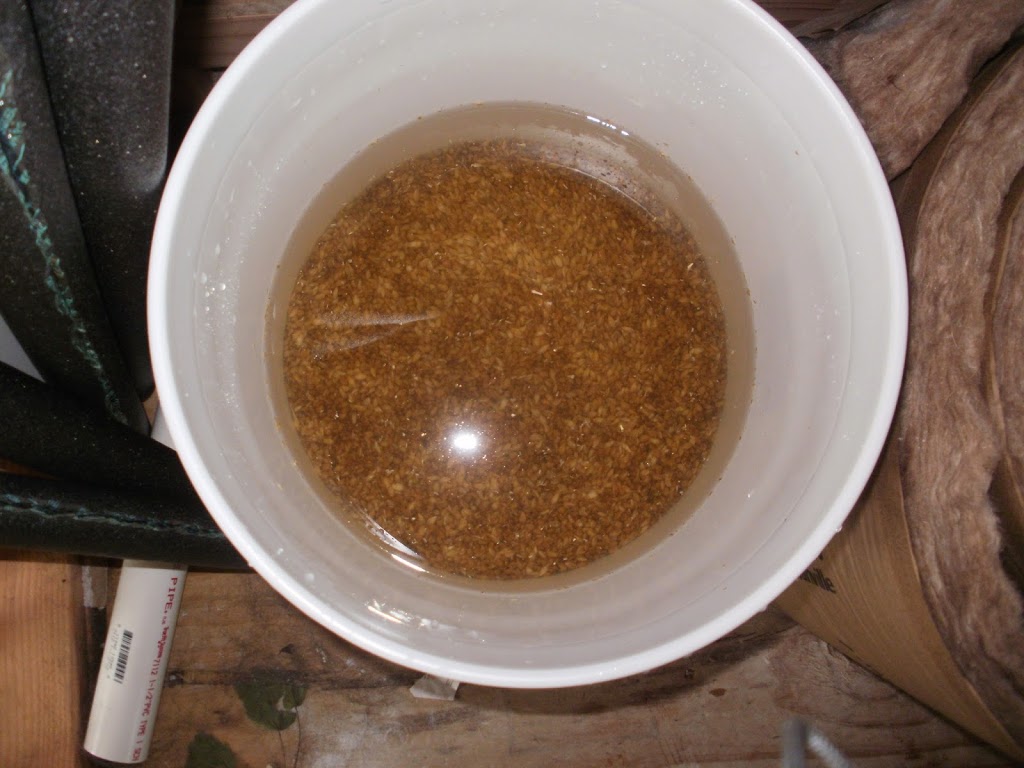
Now, those are enough to pique my interest all on their own. But what really grabbed my attention was when I read through the bit on the canteen. In particular, the fact that the canteen was probably full when it was buried, and there was still residue on the inside–which they ran a pretty full analysis of.

Trossingen Canteen
The Trossingen Canteen

Alamannic “Starkbier” with Honey and Hops

Apparently, the Trossingen canteen once contained a fermented malt-based beverage, strengthened with honey. But where things get really odd is when they looked at the various pollen grains that were present. Among other things, these included hop pollen.

Being good scientists, and Germans to boot, the researchers decided to get together with the Weihenstephan brewery and try to recreate the beer. The report on this was published in a different academic journal, which I’d have to track down separately. If/when I find it, I’ll update the post and put a link to it here.

The recipe was obviously speculative–they were going off of long-since-evaporated 1300 year old dried beer residue. I’d like to see a little more about their process, and probably make a few adjustments to it. For instance, I believe the “recreation” used purely modern barley-malt. Hand-malted, to be sure, but more than likely the period malt would have included wheat and rye at least, possibly oats, and maybe some other weed seeds as well. Small percentages, probably, but it doesn’t necessarily take much.

Nevertheless, they came to the “definitive” conclusion that the canteen was full when buried, it contained a strong barley-based fermented drink. That drink was hopped, and at some point honey was added.

Let that sink in for a minute. They’re talking a hopped beer in 580AD. This is pushing 250 years before Abbot Adelhard of Corbie Abbey wrote, connecting the hop-harvest with brewing, and 600 years before the earliest written evidence of hopped beers in the modern sense, from St. Hildegard of Bingen. (Read about Adelhard and Hildegard over at Zythophile!)

My mind was, to say the least, blown. But still…

What Does It Mean?

How, you may ask, does this affect my brewing?  Well, to be fair, it doesn’t, really. I mean, if your persona in the SCA runs to early Frankish or Germanic, it means that hopped beers are “allowed” (not that that was stopping you). You’re not “stuck” with gruitbeer (which is a topic for another post). And speaking of other posts, we’ll take a look at the bowls, candlestick, and chair in time.

This has me wanting to do another experimental brew on a future Brew Day, to do my own recreation of the batch. What say you? I’m open to questions (and suggestions) in the comments!

Wood Crafting

In addition to my brewing, when I’m not working on some aspect of the house or the homestead, I like to spend time in the wood shop. I’m most successful at turning pieces of wood into big piles of sawdust, but now and again I’ll turn out something I’m willing to show to others. Once in a while, I can even repeat the process, and (after much practice) come up with something I truly like.

This was originally the case with my lathe-turned bowls and cups. My earliest examples, from when I was using a cheap drill-powered “lathe”, and didn’t really know what I was doing, were clunky, at best. I don’t believe any of those pieces still exist.

About four years ago, after a ten-year hiatus, I got myself a better lathe. This one was still cheap, and had its own idiosyncracies, but it had enough power, and stayed on-axis well enough, to let me refine my turning a bit more. After a bit of practice, and learning more about technique and process, I started producing somewhat more usable items.

Then, in early 2016, I went all-out and got a name-brand lathe. This was a step up in terms of being able to find accessories, in terms of the solidity of the lathe bed, and in terms of the power and speed of the motor. (It was also whisper quiet, relative to the old one!) I also went the route of getting a lathe bed extension, which allows me to turn spindles up to about 42″ in length. So, in addition to my usual bowls and cups, I now have the ability to turn the longer parts of chairs.

When I turn bowls, I base them mostly off of finds from Novgorod and/or York excavations. The Russian vessels I like because my SCA persona is Russian, for one, and for two, they’ve got generally the widest variety of things, ranging from small cups and salt-cellars up to really large serving bowls. The York finds are really well documented, but less extensive. Then I’ve got a few drawings, mostly in singles or pairs, from a couple of other finds. Exeter, for instance, provided one of my favorite styles: a “conic section” bowl with straight sides and a flat bottom.

I try to keep a selection up on my Etsy site (Holmgard Trading);

Wood bowls
Turned wood bowls

my inventory usually shows mostly as cups and small bowls, but I’ve got a few larger ones “in the back,” and I’m happy to turn more, especially if you’ve got a picture or a line drawing from an actual find. My main limiting factors are time, wood availability, and that I can only go as big as about 12″ in diameter. That said, if you’re interested in something, email me, or hit me up in my shop–I’m happy to see what I can do.

If you visit the shop, you’ll see that I’ve been branching out a little from just wood. At present, I’ve got a series of bone nalbinding needles. I’m hoping to get some “regular” sewing needles done up, as well, but they’re a little tricker to make. Eventually, I intend to do a few bone combs, as well. They’re problematic not for their size, like the needles, but more for making sure everything goes together correctly. I’ve not had luck with them yet, as things tend to go out-of-alignment, or (worse yet) crack at inopportune moments.

wood crafting combs
Bone comb (top), teeth not cut; wood comb (bottom), teeth cut, not finished.

For handwork, lately, I’ve been trying out wooden combs. They seem about as common, in the Novgorod archaeological record. The process is similar to the bone versions, at least where the “fiddly bits” (the teeth) come in. One difference, though, is that if I mess up and crack a piece of wood, I’m not out that much. Scrap wood for combs I have, but the bones are harder to come by.  Enough practice with the wood ones, I figure, and I’ll try tackling the bone ones again.

While I’m talking about bones, I’d really like to try something more complex with them, at some point–maybe a buckle or the like. I have plans for some small pendants, as well.

This, of course, isn’t the entirety of what keeps me busy–just a small sampling of the various wood crafts that I work on regularly. I’ll come back to this topic later, and take a look at some of my source material, as well as do a bit of how-to. Please sign up to the email list for updates, and post any questions in the comments below!

Anatomy of a Project, Part I

Let’s follow a project of mine from (nearly) the beginning, through to as far as I take it.  Since the project is, as yet, barely started, this will be the first of a series.

I’m not really certain when I got interested in making jewelry. I mean, I’ve entertained the notion of taking up silversmithing classes for probably over a decade. I’ve toyed with the notion of casting (starting with pewter, and working my way up to precious metals) for nearly as long. But gems and stones, particularly cutting and polishing, that’s a fairly new one. Maybe two or three years? But I finally decided to act on that one a few months ago.

The root of the idea was wondering how exactly bezel settings worked–probably based on admiring some of the lovely Anglo-Saxon “gold-and-garnet” jewelry that’s been found. It struck me that the garnet pieces were certainly shaped and polished, and I began thinking about that. I know that precious stones are “lapped” (faceted) using fancy setups with spinning abrasive discs, using finely-tuned armatures to ensure the “proper” angles to the various faces. I reasoned that the first faceted stones probably were lapped and polished by hand, with a somewhat more “organic” form. So I set about to figure out how they did it.

YouTube, one of my normal “how would I…” starting points, was rather mum on the subject. There are several videos about lapping gems, all using modern tools. There are a couple of videos about making homemade modern lapping tools… Just when I thought all was lost, I found one video on polishing and faceting gemstones by hand, using no power tools. Not historical, but it was a start, and told me it could be done.

The next typical online stops for this sort of project include Cariadoc’s Miscellany and Stefan’s Florilegium, two great repositories of knowledge, sources, and information. The Miscellany is a series of essays, classes, documents, papers, and such by one of the more famous people in the SCA, Duke Cariadoc of the Bow. The Florilegium, meanwhile, is a curated compilation of email discussions from various SCA forums, dating from the early days of computer bulletin boards and such. Both pointed me at several books; the Miscellany was extra helpful and gave me some quotes.

One of these sources, which I was able to get my hands on fairly quickly, was Theophilus’ treatise On Divers Arts, which in addition to covering all sorts of metalworking has a chapter on polishing gemstones. Theophilus recommends using powdered emery stone and water on a copper plate as the abrasive; the runoff is collected in a basin and allowed to settle and dry. Afterwards, the powder is sprinkled on a flat limewood board and wet with saliva; this is used to polish the gem.

As it happens, I have access to emery powder (available as filler for making pincushions) and a copper plate that I acquired for a different project some time ago. “Limewood” is probably the same wood that we would call “basswood,” and is available in most craft stores.

Iolite and Carnelian Agate for the Faceting Project
Two Iolite on the left, four Carnelian Agate on the right.

Rough gem material is available from many sources on EBay and Amazon; I have some Carnelian Agate, some Fire Quartz, and some Iolite readily at hand, and if I get decent results with these, I’ll get some others.

In the interest of following the guidelines from the YouTube video, I’ve got an assortment of wet/dry sandpaper, and I’ll use that to give it a go.

Sandpaper assortment
Assortment of Wet-Dry Sandpaper

My theory is that they’ll work more quickly than the emery; we’ll see how they go.

Additionally, knowing that some stones–the harder ones, such as any of the corundum (ruby and sapphire), and a few others–are likely to be very slow to polish up, I’ve got some modern sharpening stones, which use diamond powders of various grits. I’m hopeful that they’ll do a quicker job even than the sandpaper.

That pretty well covers the acquisition of inspiration, ideas, and materials for the project; next time around, we’ll give some of the methods a try.

Finding Inspiration for Historical Crafts

Finding the inspiration to pick up a new craft, especially within the SCA, can be challenging. Let’s face it, it’s one of the two most difficult parts of anything in this game we play–the other one being actually getting started!

A good place to start is to take a hard look at your persona, and think about the things they would have used and/or liked. Don’t limit yourself to the things he or she would have known or done; that’s a decent starting point, but is probably a stricter limit than necessary. And don’t worry about trying to contrive a “backstory” as to why you (as your persona) would know how to do such a thing. While our ancestors were content with relatively narrow, focused lanes to live, work, and play in, we’re not bound by those conventions.

I find that inspiration will tend to strike while I’m noodling about on Pinterest. (Back in the Dark Ages, before the Internet, the equivalent was “going to the library,” an option that is still available today…)  Or I’ll be pondering a question like “how did they do X, originally?” Very often, this will lead me down a rabbit-hole of articles, old email fora, YouTube videos, and the like. Sometimes, I don’t get a good answer, and have to set aside that particular thought for a while. Other times, I’ll find myself with a host of new ideas, and usually other avenues to explore later.

Another good place to go for inspiration, especially SCA-related inspiration, is to an event. It doesn’t even necessarily have to be an Arts-and-Sciences specific event, although there tends to be more to look at if it is. (Often times, my wife or I will see something–particularly clothing–and think, “I can make that better…”) If you’re really fortunate, they’ll even have an Artisan’s Row, where you can watch somebody who already knows how to do X, and possibly even who will show you the basics!

But if there’s one thing I’ve found to be definitely the case, it’s that the know-how is out there, somewhere. You may be re-blazing a trail that hasn’t been blazed in hundreds of years, but someone, somewhere, has written something down relative to your goal. Maybe it’s a complete description of the fabrication of the item. More often, it will be references to various steps and stages of it, and it will be on you to “suss out” what they’re talking about. Another good way to go is to find someone who’s already doing what you’re interested in, and ask them to show you some of the basics and/or become a mentor.

The next part to explore is what you need, in order to make the thing. I’ve found that the instructions you find out there tend to assume you’re a professional, and/or you have hundreds, if not thousands, of dollars to drop on a project. But let’s face it, we’re just starting off on this. That means that alternatives are in order. If you can determine how things were done in the “early days”, you’ll often find that the tools and equipment become much cheaper–often, to be sure, at the expense of simplicity. Don’t let that stop you, though! And remember the adage of being wary of any venture requiring new clothes; the same applies to tools. If you’ve got any sort of a toolbox (or craft chest, or what have you), you probably already have some workable analogs to the tools you’ll need.

Another thing to think about during the materials and equipment phase is how serious you’ll be taking this new craft. This is worth thinking long and hard about. You probably won’t know how much you enjoy it until after you’ve done it for a while; it’s entirely possible that you’ll find yourself completely unsuited to the job. (Contrariwise, you may find that you enjoy the challenge!) Once you’ve tried it, and gotten a taste of what is involved, do you want to keep it at the “hobby” level, or become a “master of the craft”? How much time do you intend to devote to it?

The biggest fear that people seem to have, and which very often holds them back, is that they’ll suck at it. Well, of course you will. You probably will for the first several tries at a thing, or maybe a little longer. The key is to look at each of the “failures” you produce, think hard about why they’re “bad,” how to go about fixing it next time, make those adjustments, then try it again! And don’t be afraid to show your “failures” to others. It may inspire them to give something new a try. And remember–they think that it’s “too hard” to do what you’ve done; the mere fact that you’ve done it puts your hard-won skills far ahead of theirs!

Fourteen Steps for Brewing Medieval Beer

While sorting through stacks of dusty, old German books, looking for beer recipes that might date to pre-1600, or hints as to where they may be, I stumbled across an interesting series of books: the Oeconomia, oder Hausbuch. They were put into publication beginning in 1563 by Johannes Coler, a German Protestant priest who lived from 1566-1639. He lived in various parts of what is now Germany, including Frankfurt and Parchim, but spent a significant part of his early life in Berlin. Coler’s father, the Provost of Berlin, was the Lutheran theologian Jakob Coler; Jakob authored the books, but was in poor health by 1600, and his son had them printed on Jakob’s behalf.

The topic of the books was a popular one at the time: Household Maintenance. This ran the gauntlet from keeping and maintaining the gardens, hunting, cooking, finances, etc. But the most important chapter, for my purposes, was Chapter 20 of the Second Book. This chapter was entitled: On Brewing. Here’s what it looks like:

One page of the German beer brewing text

To be sure, it’s only one brewing method (“how we do things here in Berlin”), but it’s better than most of the other stuff I’ve seen, which includes more than a little bit of guesswork.  And what’s better, it’s all recognizable! This is all stuff that has equivalents in modern brewing (mostly).  Let’s break it down, with my translation (slightly tweaked for readability, and modern language):

  1. Pour the barley into a butt, and leave it to soak there for three days and nights (in winter, four is as well).
  2. Pour the barley onto a platform, raised into a heap, until it begins to germinate or shoot.
  3. Stir it frequently, separating the grains from each other, until there is a small sprout at its tip.
  4. When enough of it has sprouted, separate the grains from each other, and dry it in the stove-room, in the sun, or in a drying-oven.
  5. Grind the malt coarsely, so that the meal is well-hulled.
  6. In a pot, bring water to “seething;” put the milled malt into the butt, and pour the hot water over it, and stir it together.
  7. Scoop the mash from the butt into the kettle, and stir it well so that it does not burn. If the malt is burned, the beer will taste burnt, as well.
  8. Put wood laths alongside each other in the butt, and pack around them tightly with straw to strain the malt out from the liquid. (The butt needs to have a tap in front.)
  9. Pour the cooked malt into the butt, on the straw, and open the tap, collecting the liquid in another butt. If there is a lot of malt, heat another kettle of water, and pour it onto the grain. (If you want good beer, you pour less water; if you want a lot of beer, but lower quality, you pour a lot of water.)
    The second page of the German beer brewing text
  10. Once you have collected the runoff, pour a little into the kettle, so that it is about one-third full. Add hops–if the beer is going to store for a long time, you need a little more hops; if it is going to be drunk quickly, you need less. Stir the hops in, and bring the liquid to a boil. (The boil duration is as long as you think necessary, which is learned by experience and taste).
  11. When the boil has gone long enough, you add the rest of the liquid to fill the kettle, and bring the whole volume to a boil (without stirring).
  12. After the boil, place a large basket over a butt, and scoop the beer into the butt, straining the hops out in the basket. (If you are making a small beer, re-use these hops in it, straining them out after the boil again.)
  13. Let the beer cool to lukewarm, then add an adequate amount of yeast: more yeast if there is more beer, but less yeast for a smaller volume.
  14. Let the beer ferment for one to three days (or eight days for a Lager Beer), then remove the yeast from the top, and pour the beer into a cask. If it will be drunk soon, let it sit for eight days to clear and carbonate. If it is a Lager Beer, let it sit for longer. Afterwards, tap the cask and drink.

The third page of the German beer brewing text.

That seems like a lot to process, I know, but it’s really not so bad once you unpack what Johann says. At its heart, there are three parts to this.

First, steps one through five take you from raw grain to ground malt. There are a pair of surprises here. The most obvious one is that classically, we’ve thought that brewers purchased “finished” malt from maltsters. According to this, that wasn’t the case, at least in some areas–and if there was a part of the world I’d have bet there were professional maltsters in period, it would have been Germany.

But the really interesting thing to me is the drying of the malt. The most common “thought-experiment” description of medieval beer says it would have tasted smoky, from being dried over wood. Here we have a choice of three methods to dry the malt: “in the stove-room, in the sun, or in a drying-oven.” The drying-oven sounds to me like what we’d call a kiln. While I have issues with the notion that all kilns inherently smoked the malt, I’ll grant that it’s possible.

Drying malt “in the sun,” however, sounds like you’re creating what I’ve seen referred to as “wind-malt.” (I’ll call it “sun-malt,” from here out.) Basically, air-dried. And “in the stove-room” sounds to me like the equivalent of “dry it in a warm, dry place.” While I can come up with a way for the “stove-room” to smoke the malt, however slightly, I can’t really picture sun-malt having any smoke at all. And either of these two would give you an extremely pale malt–easily as pale as the palest of modern ale malts. I’d say at most, you’re probably looking at between 2.5 and 3.5 degrees Lovibond.

Second, from six to about thirteen, you’re taking your malt and brewing beer. Again, there are a few interesting points. First, the “seething” water used in the mash. The German word used is “sieden,” which nowadays can translate as “to boil.” I submit to you, however, that the Berliners knew what they were doing, and knew that if the mash steeped too hot, you wouldn’t get good wort. (Modern science tells us that the malt conversion enzymes denature above about 160 degrees Fahrenheit.) Running the numbers through my brewing calculators, in order to cool a volume of boiling water to mash temperature, you’ve got to have so much grain that your mash wouldn’t work.

If, however, you bring your strike-water to a bit below boiling–seething, or (as the English have so poetically put it) “smiling”–your mash temperature will tend to even out in the 152 to 156 degree range, given a number of other variables. This is perfect mashing temperatures. (William Harrison, in his 1577 Description of England, calls several times for seething water.)

Scooping the mash back into the kettle and presumably heating it (all the while stirring it, to prevent it from scorching) looks to me like either decocting, or heating the mash up to “mash-out” temperatures (stopping the enzymatic activity)–probably the former. If the malt is of uneven quality, this would probably help to bump up the mash efficiency a little bit. I’ll have to do a bit of experimentation here, and update this with my results.

Straining the wort out from the malt is fairly straightforward. Pouring more water onto the grain to increase the volume of beer is sensible, as well. I find it interesting that they’re actually adjusting the quality of beer by adding more or less water–the end volume doesn’t seem as important, here, so much as the quality of the end result.

Then they fill the kettle a third of the way with wort, and boil it with the hops. The odd bit here is that they’re doing a partial-boil initially, then later adding the rest of the hops. I’m not certain the purpose of this–again, some experimentation will be forthcoming. (Another interesting point is re-using the same hops to make a small beer…)

Third, step fourteen, is fermenting, racking, clarifying, and (eventually) drinking the beer. The beer goes through what, for lack of a better term, I’ll call primary fermentation: up to three days, or “eight days for a Lager Beer.” Bear in mind, “lagers” in the modern sense were unheard of, at this time. This is attested to by the notion of “removing the yeast from the top”–skimming off the krauesen, or foam. If this were an English ale, we would call this “top-cropping” the yeast.

Having removed the yeast, the beer is now poured into its serving-cask, where it will sit for eight days, or–again, the interesting bit–longer, if it is a Lager Beer.  Either way, by most modern standards, this is really quite quickly done. Most modern ales are around a month old or more, when you’re able to buy them; lagers (in the modern sense) take at least twice as long.

But they’re calling for the beer to be “clear and carbonated.” So, apparently it works… Yet again, further experimentation will need to take place.

There you have it! How to brew beer, in the style of Berlin, circa 1596. Great! But what’s the recipe? Well, for that, you’ll have to wait for my next post. What do you think? Please comment below…

Turning up cups!

Due to Winter(tm), and the associated weather, my outside brewing has been limited, lately.  Instead, I’ve got three batches of mead burbling away.  One is a traditional, made with Radish and Christmasberry honeys; the second is a Blackberry/Raspberry melomel, with these berries in some blackberry honey; the third is my wife’s popular Cranberry, with varietal honey and two pints of homemade cranberry sauce.  The ciders from the fall (2.5 gallons of perry, 5 gallons of apple) are seemingly quite happy, as well–settling out and clearing nicely.

So, given the abundance of “free time,” I’ve been playing with wood.  But not just any playing. Me being me, this is SCA playing.

I wish I could say that I’m using period tools, but I’m just not there yet.  (Yes, I did say ‘yet.’)  I’m working up to using period materials–I want to get some basic skillsets down before I go whole-hog and pay the pretty pennie$ necessary for the right wood varieties.  So, I’m practicing on and off with chest-making; I’ve got a pair of Mastermyr-style chests done.  I really like them–the sloped sides are aesthetically pleasing to me–but finding hardware is a pain.  I’m working up to being able to make my own–but blacksmithing is a whole ‘nother skillset…

Most of the fun, though, has been woodturning: bowls, cups, and plates.

Assortment of my early attempts at turning bowls and cups. Banana for scale
Drinking vessels, in assorted birch, maple, ash, and cherry. Banana for scale.

It’s relatively early days, yet.  I’m almost to where I really want to be with the basics–I don’t have to do much post-processing (sanding), if I take my time and work methodically.  Still, I’m running 45 minutes to an hour per vessel; I might be able to bring it to more like 30 minutes, given enough practice.

I’m doing quite a bit of study, too, to find period-appropriate shapes and styles.  Oddly enough, wood types matter here, too, although it’s not quite as crucial.  Most of what I’ve been turning have been drinking bowls and cups–and they tended to be maple, ash, or birch, depending on what part of the world you were looking at.  (Maple seemed to be a universal; ash and birch–mostly ash–were popular in Russia, while alder and birch seemed to be favored in England.)

So, I’m doing up a class, for Gemutlichplatz (a semi-local event, focused on brewing and brewers), on turned wooden drinking vessels.  I hope to have enough examples to do a bit of drinking with them, too.

But a thought which struck me, recently: how much demand is there, in the SCA community, for period wooden drinking vessels?  Is there enough to support my getting a business license, and peddling them at the odd event or two?  Perhaps an Etsy shop?  I’ve been thinking about this more than a little bit, lately…  Perhaps three “tiers” of wares, to start:

  • Period material and design (researched design);
  • Period design, modern selection of material;
  • Plausibly- or non-period design (inlays, etc.), modern material.

At the least, it might support my hobbies somewhat–even if only to make the turning sustainable.  (Woodturning is an amazingly fun way to make a whole lot of wood shavings…)  I have designs, eventually, on making some pottery and pit-firing it, too–probably using the shavings from turning–which might find its way, eventually, into the second or third tier of the storefront.  Add in carved things (spoons, bowls–particularly the big dough/bread trays), and it starts looking really interesting.

I plan on gauging the reaction at Gemutlichplatz, and asking a few trusted individuals between now and then, and making my decision towards spring.  If I do go for it, it wouldn’t be before fall; I’d have to build up an inventory.  What say you, good Reader?  Is there interest?

(2018 edit: I decided there was enough interest, and have opened Holmgard Trading Company on Etsy. The focus is still mainly on turning bowls, cups, and plates, but I’ve also branched into carved bone items, and will likely expand past that in the future.)

Malting, The Next Adventure

So, after almost twenty years (!) of working on the brewing art, I’ve decided to step up my game, and go to the next level: malting.

As I’ve mentioned here before, I’m now in the process of growing my own grains. This is year two; my total harvest, from less than 120sqft of seed sown, is probably about twelve pounds.  Not much–but not bad, when you consider that I started from just over an ounce total from four varieties of “heirloom” seed (Hana, Bere, Maris Otter, and Halcyon), and added in about a quarter pound of modern commercial seed (Conlon) last year.

I’ve combined the Maris Otter and Halcyon seed, for what I’m calling “MoH”.  Halcyon is derived from Maris Otter, and it’s hard to tell the two apart–particularly when the dogs “helped” with the sowing, and thoroughly “tilled” the patches of sown seed, mixing the two.  No loss.  They’ll be spread across a 50’x50′ area this fall, assuming I can get the rototiller started in the next few days.

In the meantime, I’ve purchased a 25# bag of Conlon seed from the lovely folks at Johnny’s Selected Seeds, and built an Arduino-controlled malt kiln and a decidedly low-tech couching bed, as well as a number of food-grade plastic buckets (can you ever have too many?) and an aquarium air pump.  With this, let the malting begin!

I’m doing this, at first, in six-pound batches.  Once I get things figured out, I might be able to go as high as fifteen; container size is a limiting factor.  The first step is to clean and steep the grains.  I put the grain into a bucket, covered them with a few inches of water, stirred, and poured off the chaff that floated to the top.  Repeat a few times, then just leave the water in, and let ’em go. The picture below is the grains beginning their journey…

Malting: Grains steeping
Grains cleaned and steeping.

After a couple of hours, pour off the water, and let the grains “air” for six to eight hours.  Then cover them again with water for six to eight (or ten or twelve, depending on your source), and repeat.  After about two days, they should have begun “chitting”–you’ll see little white tips on the grains.  At this point, they’re ready to begin germination.  Drain the water thoroughly, then let the grains sit, stirring them (gently) every so often–three or four times a day is supposedly good enough. They need oxygen at this point, and will be giving off CO2 and heat; the stirring keeps them oxygenated, and lets the heat dissipate somewhat.

Let them “rest” a day or two more, and they’ll have developed rootlets:

Malting: Chitting and roots
Grains “chitting,” and root development
You’ll want to start checking for acrospire growth at this point–every now and then, grab a grain, and rip it apart lengthwise.  Look for the shoot, connected to the rootlets, and see how long it is, relative to the grain.  At 2/3 to 100%, you need to start drying and kilning; less, and they need to sit a little longer. If too many of them go longer, you’ve got some lovely animal feed–the chickens love it.


If you’re drying them, there are multiple ways to go.  Easiest for most is probably the oven–but be careful; if you go over about 50 degrees C (about 120F), you’ll kill the enzymes you need for mashing. This is where my kiln comes into play:

Malting: Arduino-powered kiln
Arduino ‘kiln’, sitting atop the couching bed

I can’t take credit for it–that goes to Richard Oliver, whom I haven’t been able to contact, and his kiln design.  I believe mine works exactly the same, even though I’ve built it slightly differently (larger, and different temperature sensors).  Basically, there’s a low-wattage hot-air gun (the green thing, bottom center) blowing hot air below the grain (suspended on a stainless mesh).  There’s a temp sensor below the grain, and another one resting on top. The gaggle of wires is for an Arduino, which monitors the temperatures–if the bottom sensor gets to a set temperature, it starts cycling the heat gun, trying to maintain temp.  (The Arduino is programmed to function like a PID, “learning” to hold the set temp.) Once the top sensor reads the same as the bottom, that means the grain has dried.  In theory, I’ll be able to get most types of base malts with the kiln–crystal and roasted malts will take the oven.

So, the first attempt used the leftover Conlon I had for the planting–it was fairly old, and I’m not certain I got good germination from it. I’ve started batch #2, and will tweak the process, and report back.  Too much fun!

Revamped Beer Cart

So, despite the (torn? strained?) muscle in my back, yesterday was spent re-engineering part of my Beer Cart (from which I serve my brews at events). I had initially only intended to make a ‘cooler’ for the chill plate (a box for the plate & the ice), but ended up re-engineering much of the ‘working’ part of the box. To wit, I switched which end of the cart has the tower, ‘tweaked’ how the non-tower side hinges with the cart, and built the box. Pictures follow:
This is the ‘cooler’ for the chill-plate. I know, black isn’t necessarily the best color for it, but it’ll be inside the cart when in use, so solar-thermal heat absorption shouldn’t be too big of an issue.

This is the finished ‘serving top.’ The tower is now matte black and a couple of inches shorter, which (due to the geometry of things) actually buys me a bit of room inside the cart. To compensate for the color (again, thermal absorption) I cut up some of the blue styrofoam insulation scraps and stuffed the tower full of ’em.

I also managed to get everything hooked up & tested; no leaks were noted. I may have to play a bit more with serving pressure from the CO2 tank–the lines overall are longer than I really like, but that’s unavoidable with the plate–but I should be able to make this work. As mentioned, the cart will see its first ‘live’ use at Lochmere’s Baronial Birthday this coming weekend! (Now, to make sure the beer is properly carbonated…)

Long weekend

So, our long-awaited ‘replacement yurt’ arrived over the week (the reason for the name is a long story, best saved for another post). Its frame is much bulkier than the original’s was; its canvas/cover is much lighter. The folks who made it (about whom I’ll converse with folks via email, not in an open forum such as this) neglected to ‘create’ a set of instructions for it; several (necessary) holes were also undrilled. All that aside, I’m pleased to (finally) have it. Saturday was spent setting it up, only to take it back down immediately. Today we’ve been extremely busy running errands, not least of which to include taking the yurt to the trailer. This required reorganizing the contents of the trailer.

Additionally, I’ve been working (in my copious free time) on the Beer Cart. I’ve got to replace the beer lines; I’m also going to be building a cold compartment for the chill plate. I’ve several ideas for that. Other minor changes include a latch for the access door, to keep it from swinging open all the time as it had done.

To top all of this off, my Lady Wife has had a pile of sewing to do; we’ve had to clean the house up for an A&S Night we’re hosting tomorrow, and I’ve got bunches of stuff from research materials I need to make copies of, in addition to working on my class for University.

So, to make a long, rambling post even longer, I’ve been too busy this weekend to do much posting; hopefully, things will smooth out this week, and I’ll be able to add a bit more.