Bees and Bresaola

The Great Honeybee Project of 2017 ended in early October, with the final disappearance of the bees of the West Hive. (The East Hive was gone by mid-September.) 2016 was done by mid-October, although I didn’t find out about it until late October.
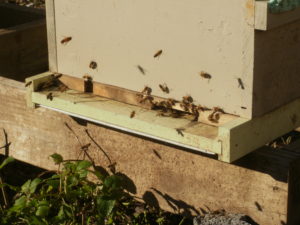
BeesBut apparently, the Great Honeybee Project of 2018 remains successful! The bees are still there, still numerous, and still doing their thing! I attribute their success this year to genetics from the Russian strain. I believe I can say I’m cautiously optimistic, but not out of the woods yet!

Feeding the Bees

The trick now will be to get them through the winter! Russian hives are supposed to go more slowly through their stores–but these ladies don’t have much in the way of stores put up. So it’ll be lots of feeding!

To do that, I’ve been making “sugar bricks” (also called candy boards, candy blocks, etc.). In essence, I put a bunch of sugar, a very little water, and a few drops of lemongrass oil (the bees’ favorite!) into a mixer, spin it up a little, divide it around some trays or plastic containers, and let it dry overnight (or over two nights, depending). Five pounds of sugar, a half cup of water, and about four drops of the essential oil will give me four blocks.

How fast the hives eat them will be an “it depends” sort of thing, and I’ll have to keep an eye on it. We’re supposed to have a few days of warm weather, so they’ll probably go through them more quickly. Once things cool off, they’ll slow down; I don’t know what the average will be, though.

How to Feed a Bee

So, the sugar blocks aren’t just shoved into the front of the hive; the feeding is a bit more complicated than that.

When things get cold, the bees form a cluster–they ball up around the queen and a bunch of brood, and shiver. This ideally keeps the center of the cluster at about 95 degrees, if I’m remembering my numbers correctly. But doing all of that shivering takes energy, which takes food–honey! Or, when they run out, sugar.

And where do the bees store honey, when they have it? At the top of the hive. So, over the course of the winter, the cluster moves its way up towards the top of the hive. And when they’re out of honey, they’re at the very top–so putting sugar down at the bottom doesn’t help them.

The remedy is to build a “feeder shim” to go on the top of the hive. Basically, it’s a short (about 2 or 3 inches) almost-hive-box–really, just a “rim” of wood–that has some half-inch mesh attached to the inside. This shim becomes the “top box” of the hive; you put your sugar blocks on the mesh, directly above the bee cluster. The bees generate moisture (rather like fogging the inside of a car window), which rises (due to the warmth) and softens the sugar, which they can then distribute amongst themselves.

The part that makes me nervous is that I’ll have to go into the hives during the cold. I mean, obviously, it’s been done–I’m not making the system up out of whole cloth–but the notion of exposing them to the cold unsettles me. (I’m told that if the wind is still, and you’re quick, it’s not too bad.) So we’ll see.

Bresaola – More Charcuterie

Also as promised, I started another cure over the weekend. This time, Bresaola: dry-cured beef. Specifically, eye-of-round, which is plied with cure for two weeks in the fridge, then trussed, hung, and left to air-dry for a time.

The recipe for this one is a little more complex than for bacon. In part, this is due to the air-drying portion of the event; instead of cure #1 (nitrite), it requires cure #2 (nitrate), for reasons I’ll get into below. And rather than set amounts, it goes by percentages.

I got my eye-of-round, which had already conveniently been cut into two more-or-less equal pieces, and I trimmed all of the visible fat, gristle, and silverskin off of it. Then a little tidying, to ensure no rogue flaps of meat, and I weighed the pieces: mine came to about 1400 grams and about 1250 grams. They went into individual ziplock bags.

Then I measured out the cure: 2% kosher salt, 2.5% sugar, 0.3% cure #2, 0.4% black pepper, 0.4% rosemary, 0.4% thyme, and (lacking the traditional juniper) a pinch of powdered ginger, and some cumin.

What this means is that for the 1400-gram piece, I used 28 grams (2% of 1400 grams) of salt, 35 grams (2.5% of 1400) of sugar, and so on. Yes, it’s difficult to measure the smaller amounts; I have a gram scale for just such occasions, and you should, too.

Why cure #2, instead of #1? It’s all to do with the length of time required for the cure. Either one of the cures will stop botulinum in its tracks, which is a good thing… But #1, sodium nitrite, only works for a short while–fine for bacon, which only takes a week. Cure #2, or sodium nitrate (note the “a,” there), actually has some nitrite in it, to start things off. The sodium nitrate, though, degrades over an extended time (weeks to months) into sodium nitrite, as well, giving you months of protection. Again, this is a good thing.

Having measured out the cure for each piece of meat, I then divided them in half: one half went into the ziplock bags with the bresaola, and the other half into another ziplock, to be reserved for later.
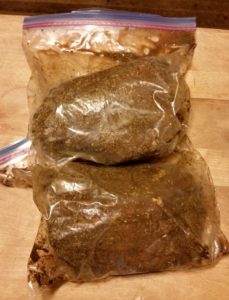
Bresaola, curing in bagsI massaged the cure into the meat, going as best I could for even coverage, and popped them into the fridge, where they are being re-massaged and turned daily. After a week, I’ll dump out the liquid that has accumulated, add the rest of the cure, then repeat the process for another week.

And once I get to there, it’ll be time to truss and hang the bresaola. It’ll also be time for another post!

Happiness is a Planted Garden

One of the things I simultaneously anticipate and dread each year is the coming of late spring. That’s when the “warm months” really get rolling on the homestead, and everything moves outside into the garden and the fields.

The upsides to the whole thing do outweigh the downsides, all things considered. The garden, so meticulously planned through the winter, finally gets planted. If you’re doing things right, you’ve been harvesting some of the earliest things–brassicas, cold-weather greens, and the like. I really enjoy when our produce starts switching from store-bought to self-grown, fresh from the garden. And it won’t be long before we can start enjoying fresh fruits–cherries, blackberries, and eventually apples and pears.

The plants all have leafed out, of course. Some of them, like the tulip poplars locally, are still blooming, which is great for the bees. The black locust and others have already passed, but the sumac is just beginning. If the colonies were established, I’d be looking at the first honey harvest of the year. (Read more about my bees here.)

The hard parts, though, include keeping the yard mowed, and weeding everything. The garden is small enough (and packed enough) to do by hand, as long as we keep on top of it. My grain patch, out in the field, is tilled, and waiting patiently. I haven’t decided if I’ll do spring grains, given the lateness of the season, or wait for fall and do winter grains. Either way, I can put some red clover seed down as a cover and green mulch–and the bees, again, will love it.

All of the yard tending means breaking out the various pieces of outdoor equipment, tuning things up, and starting them up for the first time. 2018 thus far has seen our trusty riding lawn mower die. We had been eyeing a replacement anyway, so that timeline got moved up. I’ve also historically had very bad luck with small 2-cycle engines, so the string trimmer has finally been replaced with a cordless electric one.

Other ups and downs involve the “livestock”–the chickens, particularly. With the longer days, they tend to lay more regularly. But with the heat of summer already on us, several have gone broody. We move them to the “quarantine” coop, to keep them out of the nesting boxes. This has the added benefit of cooling them off a little, and helps break the broodiness. But the quarantine coop has a flaw…

Oddly, the raccoon (I believe–it may have been a fox) got in before we had any in the quarantine coop. I believe either the coop door wasn’t latched well, or it managed to figure out the gate latch. Either way, it got two of the girls. We’ve addressed the latch issue with the addition of a carabiner “lock.” The longer-term solution for the girls in quarantine will be to move them to “general population” for the overnight. (I’ll stay up late with my “varmint repellant” for a few nights, just in case the raccoon comes back.)

In the meantime, my wife requested the purchase of more chickens, to “boost” the flock (we were down to 18). A search was run, and a gentleman not too far away was selling year-and-a-half old laying hens for $5 each–a steal! He was suffering from a rat problem, and wanted to divest of his flock for a while, in the hopes of clearing the rats out. We went with the intention of getting five or six, and came home with eleven for the price of six. So our flock is nearly back to its largest (we’re at 29; we’ve had as many as 30). After a little assimilation and acclimation, we’ll probably be getting over two dozen eggs a day.

All of this, with an eye towards continued house renovations. We’ve got new appliances on order, to replace the older ones (in excess of 10 years old). Also a new refrigerator, with a different air recirculation mechanism. The current one keeps building up ice next to the fan, which leads to an extensive procedure to dismantle it and clean it out. Also finally getting a propane gas line run for the stove and water heater, plus a few minor “tweaks” to plumbing.

The last major thing for the summer is to re-insulate and seal the joists under the kitchen/dining room floor, with the hopes that they’ll stop buckling. There’s only so much we can do about the humidity and temperatures above it, but we can certainly keep the moisture and cool from coming up from below.

What do you like (and dread) about the switch-over from spring towards summer? I’d love to hear, in the comments below!

Five Minutes of Mead

I just realized that for all of my talk about brewing, I’ve neglected to talk about meads. While the majority of my mead recipes are for a full 5-gallon batch, I’ve recently discovered the joys of micro-batches. Here’s an article I wrote up for the newsletter of my local beekeeping association, discussing the process and providing a recipe for them:

Five Minutes of Mead with Misha

An issue many people have with making meads is finding vessels to use for the fermentation. As a homebrewer, I have a plethora of glass carboys of various sizes, from 7 gallons down to one-gallon. While convenient for me, they have a number of drawbacks: they tend to be large; they are heavy (especially when full of liquid); they are fragile, and tend to cut people when they break; and they can be expensive. A less-costly option would be fermenting buckets, made of food-grade plastic. These also come in a range of sizes. Plastic, however, scratches readily, meaning that they’re only really worthwhile for a small number of batches. Then there’s the issue of batch size: while you can brew a 1-gallon batch in a 5-gallon carboy or bucket, the extra airspace can be problematic for the brew. And brewing a 5-gallon batch requires a lot of honey: ten to fifteen pounds, or even more.

A simple solution is the use of pickle fermenting kits (readily found on Amazon; I think I saw a kit in Wegman’s, a while back, as well) and Mason jars. The kits consist of a Mason jar lid, which has been drilled and fitted with an o-ring to hold a standard homebrewing airlock. These are available in both wide- and narrow-mouth styles; I’m fond of the wide-mouth, for ease of adding things to the mead as I feel the urge. Quart jars are readily available, easily cleaned and sanitized (sterilized, even), and make the recipe math fairly easy.

Generally speaking, the amount of honey used will have the largest impact on the final sweetness of the mead. All other things being equal, using less than 2 ¾ pounds of honey per gallon will give you a dry mead; using more, up to about 3 ¼ pounds per gallon, yields an off-dry to semi-sweet mead. Going above that, up to about 4 ¼ pounds per gallon, gives increasingly sweeter meads, then above about 4 ½ pounds per gallon yields what is called “sack” mead.

Honey weighs about twelve pounds per gallon, give or take. Given that there are 16 cups to a gallon, a little kitchen math shows that four cups of honey would weigh three pounds. This means, conveniently, that one cup of honey in a quart is the equivalent of three pounds per gallon—a nice, semi-sweet mead. Want to drop it to two pounds per gallon? Only use 2/3 cup. Four pounds? 1-1/3. Little tweaks beyond that are a matter of tablespoons.

With all that said, here’s a fairly simple, “basic sweet mead” recipe, given in volumes for a quart; everything scales up directly to a gallon, or even five:

1 ¼ cups honey

Hot water to 1 quart

¼ packet of dry wine yeast (I recommend Lalvin K1V-1116, available here or here.)

  1. Put the honey in your fermenting container.
  2. Heat the water to a boil, then let it cool to just off the boil.
  3. Pour the hot water into the container, stirring to dissolve the honey.
  4. Let the liquid cool; when it reaches lukewarm (or below 100º F), add the yeast.
  5. Put the lid on the fermenter, and add water to the airlock.
  6. Give the vessel a shake twice a day for the first week.
  7. Leave the fermenter alone for about a month, then carefully decant the contents into a new fermenter, leaving behind as much sediment as possible.
  8. Once the mead is clear enough to see through, decant it once more.
  9. Let it sit another six months, then decant it a final time; now, you can put the “sealing” lid on the jar (ideally, not too tight-just enough to barely seal). The mead is ready to drink! It should keep a year or more in the refrigerator.

I’ve got another couple of articles that I can clean up a little bit and post, but this should be enough to get even the newest mead-maker started. Enjoy!

A Year on the Homestead – Spring

Spring is always an interesting time around the homestead. You’re never really sure what Nature is going to do from one day to the next; all you really know is that things will be growing before long, and there’s too much to do.

Boreas, guarding the homestead
Boreas, guarding the homestead.

The animals, likewise, are of mixed opinions about the weather. Bacchus and Boreas, our two Great Pyrenees, would generally rather be outside than in–we keep the house “too hot” for them, and they don’t mind the snow. The chickens, on the other hand, aren’t fans.

Chickens at their feeders in the snow
Two chickens braving the elements

This year, we’ve managed to get garlic, onions, and peas in thus far–with luck, they’ve had enough time to settle in, before this nice snowstorm. I’ll be curious to see how the asparagus does. My various hops have sent up shoots, as well. Mostly, they’re still covered by plenty of leaves and grass debris, so they should be fine.

Part of the plan for this year is to have a portion of the side field tilled, so that I can sow various grains–wheat, maybe rye, and of course my barley. We’re also having the “North hillside” tilled up, so we can scatter a variety of pollinator-friendly plants–we’ve got any number of packets of “bee forage mix,” plus lots of sunflower seed, and I’m hoping to try out viper’s bugloss. As we get all of that set up and going, we’ll be updating things here. And with luck, this year the bees will thrive and survive–they’ll be worth a series of posts all their own.

But all of that is yet to come, as we wait for the snow to melt and the weather to warm, however slightly. We wait, and watch the earliest blooms come to life, and watch the various trees and shrubs prepare to burst into green…

Spring Flowers
Flowers blooming in the Spring

Brewing Status Update, October 2017

I’ve got four types of hops growing, assuming the Sterling survive the winter.  They were looking a little weak, but then, so were the Magnums when they were initially planted, so I’m just sort of waiting.  The Magnums are doing pretty well–I actually got some hops from them.  Not much to write home about, but it’s a harvest.  The Willamette plant is absolutely going gangbusters–I need to dig up that crown and split it, this winter/early spring.  I’ll probably be able to divvy it up into six or eight healthy crowns, without trying very hard.  And the Cascades (all 3 bines) are doing quite well–I didn’t get as much of a harvest as I might have liked, but that’s on me, not on the plants.  Next year, hopefully, will be another story.

I’ve been trying my hand at beekeeping; so far, with much less success than I’d like.  I had two colonies last year; both absconded.  Started over with two this year; one has absconded, but the other appears set to at least go into the winter…  We’ll see how they fare.  These have all been Italian bees, and I think part of the reason for them absconding has been mite pressure, combined (this year) with some pollen-bound comb.  I’ve got an order in for two nucleus hives of Russian bees for next spring; they’re apparently mite-resistant.  If they work out, that’ll be outstanding; if not, I may take a break for a year & come back to the hobby again later.

In SCA terms, well…  The King felt it worthwhile to induct me into the Order of the Laurel two weeks back (!!!).  Reasons cited included my baking, woodworking, and a few assorted other crafts… but primarily my brewing.  Which is what brings us here today…

My goal, when starting the latest bit of research, was (and still is) finding a good semblance of a recipe for the original Einbecker Bier–the ancestor of today’s Bock.  I’ve seen references to it from numerous period sources, describing it variously as subtle, light, and “a paragon among all summer, light, hoppy beers.”  The beer was one of the main drivers for Einbeck joining the Hanseatic League; through the League, the beer was shipped as far as Novgorod, England, Italy, and even Jerusalem. (Reportedly, Hansa Hofs and Kontors even built special warehouses, to hold the casks of Einbecker Bier.)

A moment’s thought should bring a conclusion: the beer was likely big, in every sense.  Strong and hoppy.  The descriptions keep calling it “light;” that’s probably more a color thing than flavor–but experimentation may provide other insights; despite being at this issue for several years, now, I’m still pretty early in the hands-on part of the exercise… Maybe next year.

Brew Day, January 2016

The winter barley is getting its first snowfall of the year (!). Chickens are giving us the occasional egg, mostly holding out for slightly longer days. I probably could have harvested hops, if everything hadn’t gotten away from me; they’ll have to wait for this year. Likewise much of the garden. On the bright side, there were no real disasters, so I’ve got that.

I’m brewing regularly again. In fact, there’s an historical-ish English ale coming up to a boil as I type this. I’ve got a half-batch moscat pyment on deck, for my wife. And I’ve got to decide what to make next month… I’m leaning towards a brown ale, for drinking in the late spring or early summer.

Also on deck, I’ll be a beekeeper, come springtime (mid-May or so). I’m looking forward to it, and not just for the honey and wax. I’ve long been interested in bees, and now I’ll get to work with them up-close.

Here’s to a new year, and new excitement!

Harrison’s Wife’s Ale (this recipe is #148 in Misha’s Little Black Book)

8 lbs Maris Otter malt
2 lbs Dark wheat malt
1 lb Oat malt
2 oz East Kent Goldings pellet hops (4.6% AA, 1 hour)
1 Whirlfloc tablet (15 minutes)
1 pack Wyeast 1098 British Ale Yeast

Mash at ~158F for 1 hour. Pre-boil wort volume 7.5 gallons.
Boil 1 hour, hopping to schedule.
OG: 1.052
(Kegged 21 Feb 2016. Color was surprisingly light.)

Springtime!

Well, things are rolling around to springtime again, so it’s been out to the garden/field for me.  It looks as though my Maris Otter barley has survived the winter; with a few more sunny days, it should pop up fairly quickly.  My hops also appear to have survived, at least mostly: the Cascades and Willamettes are already full of shoots, and there appear to be at least a couple of shoots from the Sterlings and Magnums.  The “retired” Cascades are set to go berserk this year, as well.

As a bit of insurance, I ordered one of each type of rhizome this year from Midwest Supplies; they arrived earlier this week, and I got them into the ground yesterday.  The Sterlings and Magnums went to supplement last year’s, and the Cascade and Willamette went into new areas by a fence between my back yard and the “back field”.  I’ll let them climb on the fence, for this year, then put up poles for them in the fall, for next year.

I’ve got to say, also, if you’re going to order rhizomes, go through Midwest.  I’m not affiliated, yada yada; I’m just exceptionally happy with the rhizomes I got this year.  Last year’s, from another source, were kind of wimpy; they looked like they’d been out of the ground for a while, and might not have been viable.  (They’re hops, and tenacious; at least one of each variety survived long enough to put up shoots; I had deer problems…)  The ones this year were sizable, and had at least six or seven shoots  on each rhizome.  (The Magnums had probably a dozen, and the rhizome itself was thicker than my thumb!)  Yes, they’ll be establishing roots, this year, but I’m confident that if I can keep the critters away, they’ll be productive next year.

I also managed to sow my Bere, Hana, and Sprat barley, with another test-planting of volunteer wheat.  It’s year 3 for the Bere, so I’m reasonably confident in it; I hope to double my yield of Hana, this year–I might have gotten 50g from the 5g sown, last year.  This is year 1 for the Sprat; we’ll see how it goes.

I’ve got a few other things going plant-wise, right now, as well… New blackberry plants, in a location hopefully relatively safe from the deer.  I’ve got some hazelnut seedlings in, and hope to be able to “play” with those in a few years.  My apple trees are all budded out nicely, and the cherry trees are looking to follow suit–in a week or two, I expect the orchard area to be awash in white and pink petals.  Plans are afoot to get some beehives; their location is selected, and if things to go plan, I’ll get the bees next spring.  Things are moving along!