The Stirplate

As promised, here are some photos of my new stirplate:

Completed stirplate boxThis is it, in 90% of its glory. A few salient features to note: The knob on the far right controls the speed. The red switch in the center is power on/off (it lights up when on). The jack on the left-facing side is for the wall-jack.

Stirplate plugHere, you see said wall-jack. I haven’t yet firmed up the split in the cable with electrical tape, but that’s not going to be either difficult or time-consuming.

Stirplate stirringHere it is, stirring away (at some water), full-bore. Note the nice whirlpool developed in the center. You can just make out the spinning white stir-bar at the bottom of the flask. Also, note the beautifully lit power switch. 🙂

All told, I don’t think this even cost me $20 to make. The computer fan (the actual “driving force”, if you will) was salvaged from a dead desktop computer. The enclosure I had purchased for another project, but subsequently realized was too small. I had the AC adapter from my other project (the HERMs Rig Controller), and only needed a female jack. The jack, switch, potentiometer, and knob I got at Radio Shack for under $10. Simplicity, itself.

I hope this has inspired you to make your own stirplate! I’ve certainly been bit with the do-it-yourself bug, after this. There’s nothing like having a completed project, functional, made by your own hands, to make you want to create.
Revamped Beer Cart

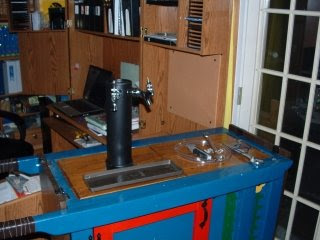
So, despite the (torn? strained?) muscle in my back, yesterday was spent re-engineering part of my Beer Cart (from which I serve my brews at events). I had initially only intended to make a ‘cooler’ for the chill plate (a box for the plate & the ice), but ended up re-engineering much of the ‘working’ part of the box. To wit, I switched which end of the cart has the tower, ‘tweaked’ how the non-tower side hinges with the cart, and built the box. Pictures follow:
This is the ‘cooler’ for the chill-plate. I know, black isn’t necessarily the best color for it, but it’ll be inside the cart when in use, so solar-thermal heat absorption shouldn’t be too big of an issue.

This is the finished ‘serving top.’ The tower is now matte black and a couple of inches shorter, which (due to the geometry of things) actually buys me a bit of room inside the cart. To compensate for the color (again, thermal absorption) I cut up some of the blue styrofoam insulation scraps and stuffed the tower full of ’em.

I also managed to get everything hooked up & tested; no leaks were noted. I may have to play a bit more with serving pressure from the CO2 tank–the lines overall are longer than I really like, but that’s unavoidable with the plate–but I should be able to make this work. As mentioned, the cart will see its first ‘live’ use at Lochmere’s Baronial Birthday this coming weekend! (Now, to make sure the beer is properly carbonated…)

My ‘rig’… The BrewStand

All this time, and I just realized that I haven’t really described my brewing system (which I refer to as the ‘rig,’ or just the brewstand, and my Lady Wife calls the ‘monstrosity’–I actually like her term better). I’ll give just a verbal description for now, and in various posts to come, I’ll detail the individual pieces one at a time, the better to explain why I’ve got what I’ve got, and where I’m going with it.

I do almost entirely all-grain brewing at present. (I don’t really count my wines into my brewing, as they’re completely from kits; I’m moving more into doing fruit wines, but going very slowly with them, as I find that they’re finicky.) I started my all-grain adventures fairly recently, back in 2004 (coincidentally, that’s also when I really got into the SCA, after playing off-and-on for a number of years). The first batches were done on the stovetop, using plastic buckets for a mash tun and various things of that nature. My wife was quickly persuaded to allow me a turkey-fryer, the better to move me outside. One fryer became two, and about two years ago I finally built myself a three-tier brewstand (the original Monstrosity).

After a number of brews, and many minor upgrades (bigger burners, kettle upgrades, mash-tun tweaks), I finally (early this year) broke down and converted my three-tier stand to a two-tier. It will remain thus for as long as I own it… I much prefer not having to lift a kettle of water onto an 8-foot-high ‘shelf’ (where the HLT was originally situated).

The rest of my ‘system’ includes a 70-quart Ice Cube cooler for a mash-tun (detailed in an earlier post here)–it replaced a 40-quart Gott-style cooler. My kettle is a 10-gallon Stainless Steel pot purchased from a local restaurant supply warehouse. For a HLT, I use the 8-gallon aluminum pot that came with one of the original turkey fryers. For heat, I’ve got two LP-fired banjo burners, each at present plumbed to its own propane tank. A home-built immersion chiller and a March pump round out the important bits. Again, I’ll detail the parts in later posts.

My brews are kegged (save the *very* rare exception); I’ve got eight 5-gallon ‘Cornelius’ kegs. I lager the occasional brew in a chest-freezer with a temp controller. I’ve got glass carboys enough for seven brews in various stages (eight, if one is getting kegged soon). Plus an assortment of other miscellaneous bits…

All in all, I’d guesstimate that my gear has run me upwards of $2000, probably not much more than $2500. But then, I like my beer just that much.

More toys!

This is my new lautering manifold. It’s not perfect, but it’ll do, I hope–its inaugural run will be on the 6 September Brew Day. The whole thing is of a piece, except for the connection to the drain fitting (the uppermost bit of copper, in the picture). So, it’ll just pull out for cleaning. I started with a hacksaw yesterday putting in the slots (on the underside, not visible in the picture), but got smart today & pulled out the jigsaw with a metal blade. The whole thing, when attached in my new mash tun (a 70-qt Ice Cube cooler), sits evenly along the bottom. I’m probably going to get a bit of fluid loss with the design (it has to angle up to get to the drain), but as long as my grasp of fluid dynamics is good, I figure it’ll be the same as or less than my fluid losses in the cylindrical cooler using the Bazooka screen.