Well, some of it, anyway. The winter barleys–Maris Otter and Halcyon–are completely harvested. I got most of it last weekend, but left a few stalks to finish “curing”/drying; they were retrieved yesterday. I’ll probably harvest the Bere barley this weekend, while the Hana probably needs another week or two. Overall, from sowing the first seed, it’s been about nine months; by the time it’s done, it’ll probably be ten months overall, for all the varieties. My yield looks pretty good: starting from 5 grams of seed per variety, I’ve got at least several ounces of each: Maris Otter (the only one I’ve done any real processing on) came to a little over 10 ounces, prior to threshing/winnowing (maybe 9 ounces, when all is said and done). With that sort of yield, assuming similar results the next few years, I could get about 28 pounds per variety next year–enough to “play” with malting some, and replanting for sustainability.
Actually, at a that rate of increase, only 8 pounds and a bit (total!) is probably enough to plant and be sustainable, figuring roughly 20 pounds needed per batch (10 gallons), and no more than 20 batches per year (legal limit), that’s 400 pounds; add back in the 8 pounds to re-seed, and it’s pretty close. If I just re-plant everything, then from the 9 ounces this year, I’ll get 28 pounds in 2014, then 1400 pounds in 2015… And that’s per variety; I don’t have enough field to pull that off. Barley has an “optimal” seeding rate of about 85 pounds/acre; sticking to a manageable amount, about 1/4 acre, and planting ~5 pounds of each variety is much more reasonable…
The hops are, of course, another issue entirely. Their harvest season doesn’t usually start until August, as the days start getting a little shorter. My “retired” Cascades have a number of burrs and some early cones; their root system was significantly larger, of course, than the new rhizomes. So far, there’s not much to report with them–the bines were savaged by groundhogs a couple of weeks back, but are rebounding. I’ve set up cages to protect them; I wasn’t anticipating a harvest from them this year, anyway–they need to get established. Next year, however, I’m hoping will be productive. We’ll call it a few ounces this year, and (optimistically) about a pound next year; time will tell.
In other news, I’ve got about 1/3 of the decking on the deck of my future BierGarten (“Dante,” the deck on the Undisclosed Location). I expect to have it done before the end of July; general clean-up and debris removal will probably be going on at the same time. I’m debating right now whether to get a separate power line/meter run, or just to extend the electrical service from the house (it has a 100A panel and a 200A panel-don’t ask why, because I don’t know). I’m planning (hopefully) on taking down the chimney in August/September, and making roof repairs around the same time. I’ve also got to patch the holes in the walls; once all that’s done, I can start storing some of my equipment out there. Still quite a bit to go before it’s even 50% usable, though.
In the meantime, the main house is getting a new outside over the next week–exciting, but also an unholy mess of preparations and the like. And we’re taking the next step in “dismantling” the utility room this evening, the better to re-build it (better and stronger) over the summer… What fun!
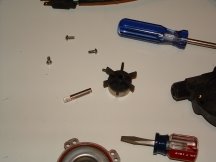
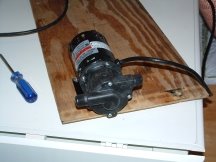
 To install the new pump head, first you have to take off the old one. This is accomplished by removing four screws, located on the ‘face’ of the head. (Sorry for the blurry picture; the arrows indicate the individual screws’ locations.)
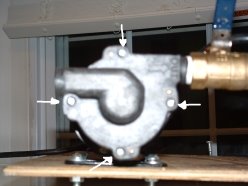 Having pulled the head off, you’re faced with another quartet of screws on the inner workings of the head:
 With these removed, you can pull things apart. You’re now faced with the impeller assembly:
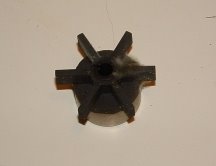
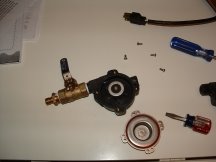 A bit of tugging, and the whole thing will come apart nicely, including the impeller (the spinny bit) and its axle: