Anatomy of a Project, Part I

Let’s follow a project of mine from (nearly) the beginning, through to as far as I take it.  Since the project is, as yet, barely started, this will be the first of a series.

I’m not really certain when I got interested in making jewelry. I mean, I’ve entertained the notion of taking up silversmithing classes for probably over a decade. I’ve toyed with the notion of casting (starting with pewter, and working my way up to precious metals) for nearly as long. But gems and stones, particularly cutting and polishing, that’s a fairly new one. Maybe two or three years? But I finally decided to act on that one a few months ago.

The root of the idea was wondering how exactly bezel settings worked–probably based on admiring some of the lovely Anglo-Saxon “gold-and-garnet” jewelry that’s been found. It struck me that the garnet pieces were certainly shaped and polished, and I began thinking about that. I know that precious stones are “lapped” (faceted) using fancy setups with spinning abrasive discs, using finely-tuned armatures to ensure the “proper” angles to the various faces. I reasoned that the first faceted stones probably were lapped and polished by hand, with a somewhat more “organic” form. So I set about to figure out how they did it.

YouTube, one of my normal “how would I…” starting points, was rather mum on the subject. There are several videos about lapping gems, all using modern tools. There are a couple of videos about making homemade modern lapping tools… Just when I thought all was lost, I found one video on polishing and faceting gemstones by hand, using no power tools. Not historical, but it was a start, and told me it could be done.

The next typical online stops for this sort of project include Cariadoc’s Miscellany and Stefan’s Florilegium, two great repositories of knowledge, sources, and information. The Miscellany is a series of essays, classes, documents, papers, and such by one of the more famous people in the SCA, Duke Cariadoc of the Bow. The Florilegium, meanwhile, is a curated compilation of email discussions from various SCA forums, dating from the early days of computer bulletin boards and such. Both pointed me at several books; the Miscellany was extra helpful and gave me some quotes.

One of these sources, which I was able to get my hands on fairly quickly, was Theophilus’ treatise On Divers Arts, which in addition to covering all sorts of metalworking has a chapter on polishing gemstones. Theophilus recommends using powdered emery stone and water on a copper plate as the abrasive; the runoff is collected in a basin and allowed to settle and dry. Afterwards, the powder is sprinkled on a flat limewood board and wet with saliva; this is used to polish the gem.

As it happens, I have access to emery powder (available as filler for making pincushions) and a copper plate that I acquired for a different project some time ago. “Limewood” is probably the same wood that we would call “basswood,” and is available in most craft stores.
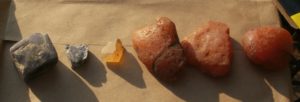
Iolite and Carnelian Agate for the Faceting Project
Two Iolite on the left, four Carnelian Agate on the right.

Rough gem material is available from many sources on EBay and Amazon; I have some Carnelian Agate, some Fire Quartz, and some Iolite readily at hand, and if I get decent results with these, I’ll get some others.

In the interest of following the guidelines from the YouTube video, I’ve got an assortment of wet/dry sandpaper, and I’ll use that to give it a go.
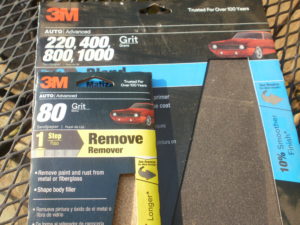
Sandpaper assortment
Assortment of Wet-Dry Sandpaper

My theory is that they’ll work more quickly than the emery; we’ll see how they go.

Additionally, knowing that some stones–the harder ones, such as any of the corundum (ruby and sapphire), and a few others–are likely to be very slow to polish up, I’ve got some modern sharpening stones, which use diamond powders of various grits. I’m hopeful that they’ll do a quicker job even than the sandpaper.

That pretty well covers the acquisition of inspiration, ideas, and materials for the project; next time around, we’ll give some of the methods a try.
Finding Inspiration for Historical Crafts

Finding the inspiration to pick up a new craft, especially within the SCA, can be challenging. Let’s face it, it’s one of the two most difficult parts of anything in this game we play–the other one being actually getting started!

A good place to start is to take a hard look at your persona, and think about the things they would have used and/or liked. Don’t limit yourself to the things he or she would have known or done; that’s a decent starting point, but is probably a stricter limit than necessary. And don’t worry about trying to contrive a “backstory” as to why you (as your persona) would know how to do such a thing. While our ancestors were content with relatively narrow, focused lanes to live, work, and play in, we’re not bound by those conventions.

I find that inspiration will tend to strike while I’m noodling about on Pinterest. (Back in the Dark Ages, before the Internet, the equivalent was “going to the library,” an option that is still available today…)  Or I’ll be pondering a question like “how did they do X, originally?” Very often, this will lead me down a rabbit-hole of articles, old email fora, YouTube videos, and the like. Sometimes, I don’t get a good answer, and have to set aside that particular thought for a while. Other times, I’ll find myself with a host of new ideas, and usually other avenues to explore later.

Another good place to go for inspiration, especially SCA-related inspiration, is to an event. It doesn’t even necessarily have to be an Arts-and-Sciences specific event, although there tends to be more to look at if it is. (Often times, my wife or I will see something–particularly clothing–and think, “I can make that better…”) If you’re really fortunate, they’ll even have an Artisan’s Row, where you can watch somebody who already knows how to do X, and possibly even who will show you the basics!

But if there’s one thing I’ve found to be definitely the case, it’s that the know-how is out there, somewhere. You may be re-blazing a trail that hasn’t been blazed in hundreds of years, but someone, somewhere, has written something down relative to your goal. Maybe it’s a complete description of the fabrication of the item. More often, it will be references to various steps and stages of it, and it will be on you to “suss out” what they’re talking about. Another good way to go is to find someone who’s already doing what you’re interested in, and ask them to show you some of the basics and/or become a mentor.

The next part to explore is what you need, in order to make the thing. I’ve found that the instructions you find out there tend to assume you’re a professional, and/or you have hundreds, if not thousands, of dollars to drop on a project. But let’s face it, we’re just starting off on this. That means that alternatives are in order. If you can determine how things were done in the “early days”, you’ll often find that the tools and equipment become much cheaper–often, to be sure, at the expense of simplicity. Don’t let that stop you, though! And remember the adage of being wary of any venture requiring new clothes; the same applies to tools. If you’ve got any sort of a toolbox (or craft chest, or what have you), you probably already have some workable analogs to the tools you’ll need.

Another thing to think about during the materials and equipment phase is how serious you’ll be taking this new craft. This is worth thinking long and hard about. You probably won’t know how much you enjoy it until after you’ve done it for a while; it’s entirely possible that you’ll find yourself completely unsuited to the job. (Contrariwise, you may find that you enjoy the challenge!) Once you’ve tried it, and gotten a taste of what is involved, do you want to keep it at the “hobby” level, or become a “master of the craft”? How much time do you intend to devote to it?

The biggest fear that people seem to have, and which very often holds them back, is that they’ll suck at it. Well, of course you will. You probably will for the first several tries at a thing, or maybe a little longer. The key is to look at each of the “failures” you produce, think hard about why they’re “bad,” how to go about fixing it next time, make those adjustments, then try it again! And don’t be afraid to show your “failures” to others. It may inspire them to give something new a try. And remember–they think that it’s “too hard” to do what you’ve done; the mere fact that you’ve done it puts your hard-won skills far ahead of theirs!

How, When, and Why I Started Brewing

The things I’m asked most often about when I started brewing are how, when, and why, exactly, I started.  To answer these questions and more, we need to set the way-back machine to 1994, when I was a young Sailor stationed in Hawaii.

At the time, I was in my early 20’s, and a bare novice at all things alcohol. The craft brewery scene hadn’t really launched yet, to say nothing of the homebrewing scene. Oh, I had been ‘introduced’ to beer–I did mention that I was a Sailor, right?–but when I had tried it, it was mass-produced swill, and the low-quality version, at that. (I was young, and the “premium” stuff was too expensive…)

What I was interested in, though, was cooking. I missed home-cooked meals, and the chow hall on base simply wasn’t cutting it. The house I was sharing had a lovely kitchen, but my cooking skills were mostly limited to grilled cheese and soup.  So, seeing an opportunity, I set about learning, by raiding the local bookstores for cookbooks. (I did mention that this was a while ago, right? the Internet was barely in its infancy…)

One fine day, while perusing the shelves in a Borders Bookstore which undoubtedly no longer exists, a book quite literally leapt out at me.  Seriously, it fell off the shelf. That book was The New Complete Joy of Homebrewing, by Charlie Papazian. Intrigued by the promise of learning “to make beer just the way you like it,” the book came home with me, and I devoured its contents in the space of a couple of nights.

It was about the same time that Sam Adams began distributing to the islands, and I had my first taste of the Boston Lager. To put it mildly, I was blown away, and hooked.

It wasn’t for another six months, though, in early 1995, that I put my first batch together. It took a series of things coming together. First, I had found a store that sold homebrew supplies. Second, I moved to a new rental house, with a different roommate. And third, we decided to throw a housewarming party. I scraped together a little extra cash and bought the basics:

  • A 10-quart pot, to serve as my “boil kettle”;
  • A 6-gallon plastic fermenting bucket, with a lid and airlock;
  • A bunch of siphoning gear (tubing, cane, wand); and
  • Two cans of malt extract, two ounces of hops, and a sachet of dry yeast.

I started the batch before we had even finished unpacking. I had my first boilover; we cooled the pot in the sink, and the freshly-pitched batch fermented happily away in the hall closet. I’m not sure exactly what the ingredients were–I was so new at it, that I didn’t even know what was important to record, at the time. I believe that it was Munton and Fisons malt extract (but can’t swear to it); I’m told it was a can each of dark and light extract. The hops were recorded as “one ounce of high-alpha hops, one ounce of low-alpha hops.” As to the yeast, your guess is as good as mine. (Thinking back on the batch, as best I can–this was over twenty years ago–and I’d probably use Nottingham, if I were to try it again.)

Subsequent purchases included bottles and caps, priming sugar, and a bottling wand. Two weeks after the batch was started, it was bottled; about three weeks after that, we had the party.

The beer was extremely well received, with favorable comparisons to Sam Adams. (By this time, I had discovered a local watering hole that carried hundreds of brands of beer, and my tastes had branched out considerably.) Most of it was gone by the next morning, but the feeling of satisfaction from knowing that I had made the beer, and that people liked it, remained.

Many batches followed that one; most of them were less successful. I was still largely flying blind, with just the one guidebook (and the one, very limited, source of ingredients). I had my first infected batch, and more than a couple of “drinkable, but less than tasty” batches. And then I moved back to the mainland; things paused for the duration of one military course, and two years in Japan.

But the urge to brew again never left. The instant I had another place stateside, I went looking for more information–and things had radically changed. There was a homebrewing community, and the Internet had happened (mostly), and craft breweries were popping up seemingly everywhere. And I’ve never really looked back.

Since that first batch, I estimate I’ve brewed nearly 500 batches. I’ve refined my technique, branched into meads and wines, upgraded equipment, shifted to all-grain, and things continue to move. When my wife and I got back into the Society for Creative Anachronism, that opened up the aspect of historical brewing. And things have continued to go, since then.

Let’s see where this all takes us.